Showing posts with label blogspot. Show all posts

3 Column XML Blogger Template "Colors of Life!" - Download

Download 3 Column Blogger Template "Colors of Life!"


Hi friends, here is my latest Blogger template (blogspot template) "Colors of Life!"

Feautures:
3 columns
Professional design
Adsense ready
Widget ready

Note:DON'T COPY & PASTE THE TEMPLATE CODE. Follow the below instructions:-

How to install this xml blogger template??
1.Sign in to your blogger dashboard
2.click on the 'layout' link.
3.Select the 'Edit html' tab at the top
and upload the template using the 'browse' button
Use the browse button to upload the template
4. 'Save' the changes.


Like the template or have any question to ask..?? ask it here via the 'comments' link.
-thanks


Blogger Templates

READ MORE - 3 Column XML Blogger Template "Colors of Life!" - Download

How to add "Email Subscription Form" to your blog(blogger,blogspot)

This post explains how to add "Email Subscription Form"to your blog:

If are a new blogger,you may have seen an email subscrtiption form like the below one in other blogs while browsing.

It is delevered by FeedBurner.When people subscribe,they will recieve a email with your blog posts whenever your blog is updated.It is a very easy thing and make your visitors come back again and again to your blog.


So,Let's see how to add a "Email Subscription form" like that in your blog:

1.First,Sign in to your FeedBurner account.If you don't have a FeedBurner account yet,you can register it here


2.Click on the "My Feeds" link at the top of the page and next ,click on your blog name[look at the below screenshot]


3.Next,Click on the 'Publicize' tab as shown below.


4.Select the "Email Subscriptions" option[look at the left sidebar]


5.Next, you will see like this


Click on 'Activate'

6.If you look at the sidebar now,there are a few more options under the Email Subscriptions column namely Subscription Management,Communication Preferences,Email Branding and Delivery options.Edit them according to your needs.

Now,Click on the Subscription Managemant option and copy the code they provide[see the below *screenshot*]


7.Um............Finally,the last step

Sign in to your blogger dashboard>layout>add a page element>html/javascript

and paste the code and SAVE THE CHANGES.


That's it!..........too long process know? No.Very simple process to do.

OK.Why don't you subscribe to this site Email updates -So,you will be up to date with the latest blogger tips and tricks.More & More coming soon................

Blogger Tricks


READ MORE - How to add "Email Subscription Form" to your blog(blogger,blogspot)

"Email Me" html/javascript code for your blogs,web pages

How to add a "Email me" link on your blog?

Adding the "Email me" link to your blog/webpage is very helpful for the visitors who want to contact you.It increases the interactivity between the visitors and your site and make them come regularly.

Hi Kranthi! I will write the email address directly like abc@gmail.com and ask visitors to contact me.So,why to add these clickable links like"Email me" ?
There are plenty of problems if you show your email address directly on your site as SPAMMERS find your email address easily via search engines,and other sources.
So,by adding this type of links will hide your email address and If your visitors want to contact you,they will click on it.If the visior want to sent to you via another source like yahoo,google,etc they will simply copy the email address(in the outlook express) and email you.
On clicking the links,WINDOWS OUTLOOK EXPRESS will be open by default.
So,how to add the "Email me" link?
There are two types of ways to do it.One is text link and another one is image link.

Text Link:
Suppose,your email id is abc@gmail.com ,here is the code you have to add

<a href="mailto:abc@gmail.com">Email me </a>


Don't forget to change the email address in the above code to your's.If you want another anchor text(not "Email me"),you can change it.

Image link:

Suppose,if you want the visitors to email you by clicking on an image like the below one

Email me

First you have to upload your picture to some image hosting services.They will give a direct link for the uploaded image.Take a note of it.

In this example, the direct link for the uploaded image is http://i219.photobucket.com/albums/cc286/7kranthiswaroop/thenvelope.gif and your email address is some abc@gmail.com ,the code you have to add is

<a href="mailto:abc@gmail.com"><img src="http://i219.photobucket.com/albums/cc286/7kranthiswaroop/thenvelope.gif" alt="Email me" width="120" height="57" border="0" /></a>


Where to paste this code in your blogger(blogspot) blog?

Sign into your blogger dashboard>layout>add a page element>html/javascript and Paste the code and save the changes.

That's it!

Blogger Tricks

READ MORE - "Email Me" html/javascript code for your blogs,web pages

Flowers 3 Column Blogger template-download

3 Column Flowers Classic blogger template:
You can see the DEMO SITE HERE

Download this template


This is another beautiful looking 3 column classic blogger template.It has two sidebars and a navigation menu at the top,so looks Professional and highly custamisable.

How to install this template?
1.Sign in to your blogger dashboard>layout>edit html
2.Scroll down and click on the 'Revert to Classic Template' and click OK when the pop up window comes.
3.Replace the template code with the one you have downloaded.

Still can't understand? Here is the detailed description on HOW TO INSTALL A CLASSIC BLOGGER TEMPLATE [with screenshots]

More and more templates and blogging tips are coming........so, Subscribe to my Blog feed or Email subscription,so you won't miss them.
Please leave the comments if you like the template of if you have any questions,doubts regarding this template.
READ MORE - Flowers 3 Column Blogger template-download

Maroon 3 Column Blogger template -Download Now!

Maroon 3 Column Blogger template:

You can see the demo site here or download directly

Download template

Here is another 3 column blogger template for you guys.Two sidebars give the template extra flexibility than the two column templates.This is adsense supportive,ie..it is designed to provide you more space for your adsense units and you can manage them easily.

This is a Classic Blogger template guys.If you don't know how to install a classic blogger template in 'new blogger',Please read this.[I will show you how to install the classic blogger with screenshots]

If you like the template,please add the comments or if you have any doubts about installing the template,ask me.

More templates coming very very soon........Don't forget to subscribe to my rss feed or Email subscription inorder to don't miss it.

Kranthitips-Your online source for Free Blogger templates


READ MORE - Maroon 3 Column Blogger template -Download Now!

Red Rise Classic Blogger(blogspot) Template

Red Rise Classic Blogger(blogspot) Template:

You can see the Demo Site Here

Download Template


This is a beautiful classic blogger template with two columns with one wonderful sidebar.
You can change the header image if you want,but the present header is not bad.
All the images in the template are hosted by photobucket.So,if bandwidth exceeds,you won't see images in the template.So,I added the images to the download file.After downloading the file,first upload the pictures to your own image server(I recommend Photobucket).

Note:This is a classic blogger template.If you are a new blogger,or you don't know how to install a classic blogger template,Please read this.

More Templates coming very very soon.Please,leave your comments here if you like the template or if you have any question about the template.Thanks.

Don't forget to Subscribe to my RSS Feed,so you don't miss the template.
READ MORE - Red Rise Classic Blogger(blogspot) Template

Beautiful 3 Column Blogger template-Download Now!

Blue Stars 3 Column Classic Blogger template

Click Here to See How it looks in your blog.....

Download Now!


Template Feautures:

  • 3 columns
  • Professional look
  • Navigation menu at the top
  • Beautiful looking Sidebars
  • Highly Custamisable
  • & many more...............
How to install this template?

Sign in to your blogger dashboard>Click on the 'layout' link>Edit html [see the screenshots below]


Next,Scroll down and click on the 'Revert to Classic Template' and Click on 'OK' when a pop up window comes.
Revert to classic template That's it,Replace template code with the downloaded template(the template is in the text file)and SAVE THE CHANGES.

Note:All the images in the template are hosted by Photobucket(Image hosting service)

This template is downloaded by hundreds of people.So,if my account bandwidth exceeds,the images may not show in your blog.So,I provided the images in your downloaded file.All you need to do is upload that images to your own image hosting server(like Photobucket,Imageshack.us).I recommend Photobucket).They provide direct links for the images.After uploading your images,replace the image links in the template with your own image links(given to you by photobucket).

For example,I uploaded the header image to photobucket and the direct link for that image is

http://i219.photobucket.com/albums/cc286/7kranthiswaroop/stars_1c.jpg

After,you uploaded the image to your own server,they will give you a link like

http..........................jpg, Simply replace the above url with your own url.

Search the image url's in the template(the one's starting with http and ending with jpg) and replace them.

-Thanks guys for your support....

Blogger Tricks

READ MORE - Beautiful 3 Column Blogger template-Download Now!

Adding meta tags to blogger(blogspot) blogs,websites-SEO

If you don't know what meta tags are, and what is the importance of adding meta tags, here is the detailed description on how to add them to your blogger(blogspot) blogs or any website.

Do you know adding meta tags is so important if you want to get more traffic from search engines like google,yahoo,msn,etc,especially the meta description is the most important one.

If you don't know what meta tags are,Meta tags are the tags which describes your site and tells the search engines what your site is all about.Adding meta tags is an important factor in SEO.(Search Engine Optimisation).Meta tags allows search engines to index your web pages more accurately. In other words,Meta tags communicate with the search engines and tells more information about your site and make it index correctly and accurately.
Here is an example.This is what I got when I typed 'Kranthi tips' in the Google Search Engine.
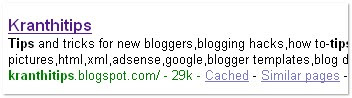

adding meta tags to blogger
As you can observe.'Tips and tricks............' is the meta tags description which I added to my site.

We have to add two meta tags to the head section of the template.One is the Meta description which describes your site and another one is Meta Keywords which tells about your site keywords(what your site is all about)

Here is how to add meta tags to your blogger(blogspot) blog:

1.Sign in to your blogger dashboard>click the 'layout' button[see the screenshot below]
click on the 'layout' link
2.Click on the 'Edit html' tab
click on the 'edit html' tab


Here is the code you have to add


<meta content='DESCRIPTION HERE' name='description'/>
<meta content='KEYWORDS HERE' name='keywords'/>
<meta content='AUTHOR NAME HERE' name='author'/>


DESCRIPTION HERE:Write your blog description
KEYWORDS:Write the keywords of your blog
AUTHOR NAME:Write the author's name(Your name)


{ UPDATE : }
Now..You don't need to do it manually.. I created an automatic Meta Tags Generator to make this process easy for you!
Just go to this page and Enter some basic information like keywords,description,etc.. It will automatically generate you error free, effective Meta tags. Once done, copy that code and follow the next step.

3.Add the above code just after this [Look at the below screenshot]
<b:include data='blog' name='all-head-content'/>
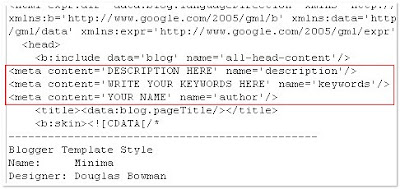

add the code just like this
Don't forget to add description and keywords.
and save the changes.


IMPORTANT:

Several people were filling with just the keywords in the description.DON'T DO THAT.Google and other search engines will ban your site from the search engines list if you did so.And also,don't repeat the keyword more than 3 times.

That's it!You have sucessfully added the metatags to your blogger(blogpsot) blog.If you want to check whether you added the meta tags correctly or not,just type 'meta tags analyzer tool' in the google and you will find so many sites which can check whether you have added the tags correctly or not.


Blogger Tricks

READ MORE - Adding meta tags to blogger(blogspot) blogs,websites-SEO

How to add Favicon to blogger(blogspot) blog

Adding a favicon to the blogger(blogspot) blog:
For those who don't know what Favicon is 'Favicon is a small icon(image) displayed at the beginning of the address bar of the browser.It is also called Favourite Icon,Pageicon and urlicon.

The main advantage of creating and using favicon is ,it makes it easy to find your blog or site when someone favourited or bookmarked your site/blog among several other sites.


favicon Most of the people use 16*16 pixel favicon(you can also use 32*32 pixel favicon) with ".ico" format.But,you can also use gif,png(image formats) aswell.

So,ready to create a favicon?

Updated:
I created a Free Favicon generator tool which will save lot of your time. Just go to this page and upload any image file (JPG or GIF or PNG or BTM) and it will automatically convert it to icon file and you can save it to your desktop.
Next, you need to upload it to some host. There are lot of free hosts available to host .ico files and with hotlinking enabled.. Just do a quick google search.
Once you upload it to some host. you get a direct url to the favicon file..
Ex:

http://howshealth.com/favicons/bt.ico

Next, Skip the below part and go to Next step..

{SKIP THIS PART- ITS OLD} {start}

All you need is a program to create a favicon in (.ico) format.If you haven't a program to create in .ico format,No Problem....you can also use png or gif format.If you have Photoshop, or any other programs like that,open it and create a 16*16 image and save it as .png or gif format [look at the below screenshot below] or there are so many online sites which can create a favicon for you,just search by typing'free online 16*16 icon generator' in google.They ask you to upload a picture from your desktop,and they convert it into 16*16 .ico file.

save the image in png format So,Now your icon is ready...You are just a few steps away from creating a beautiful favicon for your site...

Now,go to Google Page Creator
and upload your icon file by clicking on the upload link(look at right side) and browse the file and note down the url of the file by clicking on the file.[see the screenshots below]


note down the url


{SKIP THIS PART- ITS OLD} {end}


Now,go to your blogger dashboard>layout>Edit html[look at the below screenshots]


and look for this code(it is at the top the template)


<title><data:blog.pagetitle/></title>

and add the below code just after the above one[as shown in the below screenshot]

<link href='ICON FILE URL' rel='shortcut icon'/>
<link href='ICON FILE URL' rel='icon'/>


and replace the 'ICON FILE URL' with the url of your icon file.(like http://howshealth.com/favicons/bt.ico)
That's it! Now you can see a beautiful favicon in your blog.

Fee free to add the comments.....and doubts(if any?)

Blogger Tricks

READ MORE - How to add Favicon to blogger(blogspot) blog

how to submit blogger sitemap to google-useful tip for new bloggers

This tip explains how to generate and submit blogger sitemap to google webmaster tools:
Before doing this,let me say what are sitemaps and how they will help us.The reason we use them is,they will help google bot to crawl,index pages of your site and tell you if there are any problems when they try to index it.It also helps you to know,how many pages exactly are indexed,and what people searched in the search engine to visit your site.
Let me explain the detailed procedure on how to submit your blogger sitemap to google.
1.First,go to google webmaster tools and sign in with your gmail account.
2.After you logged in, you will see this asking you to add a site.
google webmaster tools
Add your blog url(ex:kranthitips.blogspot.com).Don't add with http or www.

3.Next,it asks you to verify your site.It is just to confirm whether you are the owner or not.

CLICK on the 'verify your site' link.

click the 'verify your site' link


Next,

choose verification method


4.There are two ways to verify your ownership but, there is only one way for the blogger users to add a metatag.

copy the metatag

5.Copy the metatag.

Now,sign into your blogger account>click the layout button>Edit html and paste the metatag just after the head tag and save the changes.

paste the metatag like this
and click the verify button in the google webmaster tools and there will be a confirmation message saying that you have sucessfully verified.


conformation message

Now,you have to submit a sitemap for google to crawl your site.Go back to the google webmaster dashboard or (home) and click the 'Add' link which is next to your blog name and in the Sitemaps column.Then,you see this,


Choose 'Add general web sitemap' from the dropdown menu and type rss.xml or atom.xml next to your blog address as shown below


or

and click the 'Add General Web Sitemap' button.

6.That's it.Now your sitemap is successfully submitted to google.Check 2 or 3 days after and you will see the detailed statistics of your blog(indexed pages,any errors,etc.)

If you have any questions regarding this,you can ask here via your comments

READ MORE - how to submit blogger sitemap to google-useful tip for new bloggers
 

Support By Blogger