Showing posts with label blogger templates. Show all posts

Another STUNNING Magazine Style Blogger Template "Novinture"

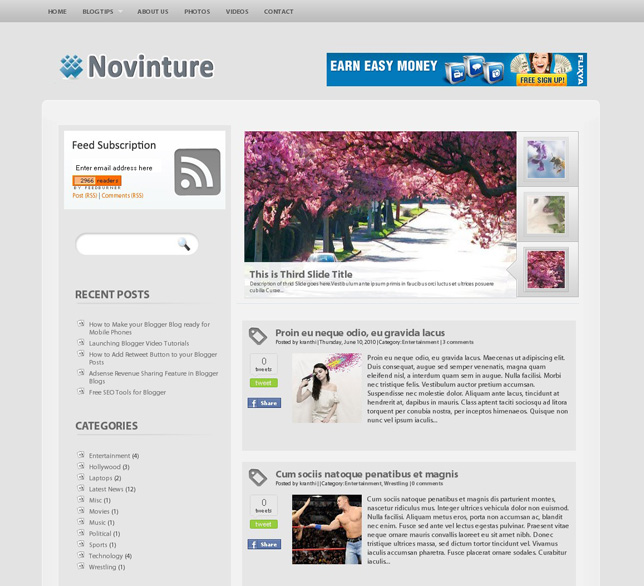
stunning blogger template Novinture

It's been quite a while since I've released any new blogger template...because of my studies,etc..but, Here I'm ...again back with another Stunningly looking Magazine Style Blogger Template.."Novinture".

I've did so many blogger templates sofar, but for me this one is the best of all.. I love the color combination..looks very professional and cool... and ofcourse with an amazing slideshow feature.

Here are some of the features :

  • Top Nav links
  • Stunning Slideshow
  • Retweet button
  • Facebook Share button
  • 4 Column footer
  • Email Subscriptions
  • Feed Counter
  • Built in Search Box
  • Wonderful Comment section (with avatars)
  • Most Wanted feature.. Page Navigation Enabled
  • Automatic Thumbnails on homepage
  • Automatic Post summaries on homepage
  • Advertisement banner ready (on header)
  • many more.....
Look at few more screenshots...


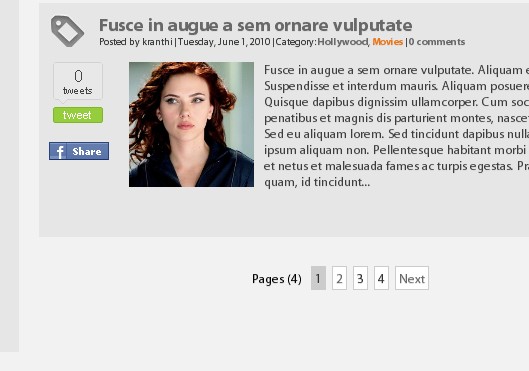
Page Navigation Ready!


Clean and Professional Comments Section
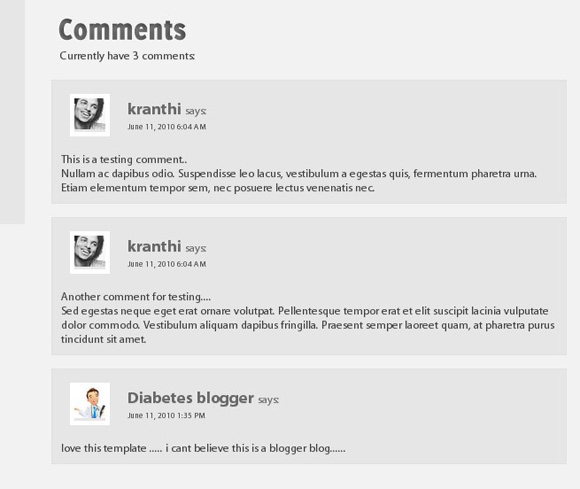


comments section

And the best thing is..its very easy to install.

Here are Installation Instructions:
(Before you do this, first backup your current template)

1. Download the template and Sign into Blogger � Design � Edit html

and Upload the template file (xml file) and Save it.

2. Editing Top Navigation Links...

To Edit the top Nav links (Home, About Us, Photos,etc..)

Sign into Blogger � Design � Edit html � Tick the "Expand Widget Templates"

Control + F (to search)

Find these lines

<li>

<a href='http://www.bloggertricks.com'>Blog Tips</a>

<ul>

<li><a href='http://templates.bloggertricks.com'>Blogger Templates</a></li>

</ul>

</li>
<li><a href='http://YOURLINK.blogspot.com'>About Us</a></li>

<li><a href='http://YOURLINK.blogspot.com'>Photos</a></li>

<li><a href='http://YOURLINK.blogspot.com'>Videos</a></li>

<li><a href='http://YOURLINK.blogspot.com'>Contact</a></li>


Edit the URL's and their respective Anchor Text's to whatever you like.


3. Editing the Feedburner links

Suppose, if your Blog's Feedburner url is

http://feeds2.feedburner.com/YOURBLOG


Search for "BloggerTricksdotcom" in the template code.. (it will appear 5 times)
and replace every "BloggerTricksdotcom" with "YOURBLOG"

Save the template!


And for Editing Slideshow, Adding Adsense inside post,etc .. Refer to the Complete guide.

If you've any questions,doubts... feel free to ask HERE (template support link) .. I'll help you out..

I hope All of you like the template... looking forward for the comments! :)

READ MORE - Another STUNNING Magazine Style Blogger Template "Novinture"

Releasing Mind Blowing Magazine style Blogger Template "Falkner Press"

After the huge hit of my previous two Magazine style Blogger Templates Turnout Mag and SchemerMag, here is my latest yet another Mind Blowing Blogger Template "Falkner Press".
Yes! It's simply Mind Blowing with so many cool features including Automatic Thumbnails and Automatic Post summarize on homepage, Youtube video integration,etc.
This was converted from a wordpress theme designed by CamelGraph.com.

FalknerPress Blogger Template
Main Features:
* Automatic Thumbnails on posts
* Automatic Post Summarize
* Featured Content Slider
* Adsense ready
* PSD Custom Logo Included
* Youtube Video embedding Integrated
* Fully SEO Optimized
* Advertisement Block Ready
* 3 Columns
* Social Bookmarking Icons
* Twitter Updates widget
* Feedburner Email Subscription ready
* Thumbnails on Recent Posts in Sidebar
* Integrated Search box
* Beautiful top Navigation bar
* Cross-browser compatible
* and many more....

Step by Step Installation Guide:


(Make sure you backup your current template before installing any new template)

Step 0 : First Follow the basic installation steps here.

Step 1 : Edit the Logo

Edit the logoThe logo *psd (photoshop) file is included in the download file. Open it with Photoshop and Edit the logo and Save it in .jpg format.
Next, upload that image to some image host like tinypic, photobucket,etc.. and get the image link to that file.
Help : Don't have photoshop ? or don't know how to edit the logo ? Leave a comment here with your site name.. I'll make it for you..
If you want the logo quickly.. Post your request here. I'll quickly help you out!

Go to LayoutEdit html
Find this url

https://blogger.googleusercontent.com/img/b/R29vZ2xl/AVvXsEjmkl9fh_nhIrwnwqHWT1G8SAyFJPVnQWBFgi_79XCOt0Tw-oKBp3sSGKAo9OEFrgfek1dhJx67h3f4xRtiJsFvgG1tlxcykyM3PdxcYe91vTXPmiadEz0KUf0Fp7HMZX2ey16HkrLzt6LE/

and replace it with your image url.

Step 2 : Edit the top Navigation links

edit the top navigation links
Go to Layout � Edit html and find this code

<ul>

<li><a expr:href='data:blog.homepageUrl'>Home</a></li>

<li><a href='WEBSITE URL HERE'>About</a></li>

<li><a href='WEBSITE URL HERE'>Archives</a></li>
<li><a href='WEBSITE URL HERE'>Contact</a></li>


<li><a href='WEBSITE URL HERE'>Disclaimer</a></li>


<li><a href='WEBSITE URL HERE'>Forum</a></li>


<li><a href='WEBSITE URL HERE'>Subscribe</a></li>


<li><a href='WEBSITE URL HERE'>History</a></li>


<li><a href='WEBSITE URL HERE'>Profiles</a></li></ul>


See the pattern..you can easily understand. Simply replace the WEBSITE URL HERE with your target url. Also, Edit the anchor texts to your liking (About,Archives,Contact,etc)

Step 3 : Edit the Latest Twits

Latest Twits widget
If you use twitter, You can use the integrated twitter twits widget. Simply find this


<a href='http://twitter.com/bloggertricks' id='twitter-link' style='display:block;text-align:right;'>follow me on Twitter</a>

</div>

<script src='http://twitter.com/javascripts/blogger.js' type='text/javascript'/>

<script src='http://twitter.com/statuses/user_timeline/bloggertricks.json?callback=twitterCallback2&amp;count=1' type='text/javascript'/>


and replace bloggertricks with your twitter id.

Don't use Twitter...? then simply delete this code from the template.

From...

<b:widget id='HTML5' locked='false' title='Twitter' type='HTML'>

...................

...............

<script src='http://twitter.com/statuses/user_timeline/bloggertricks.json?callback=twitterCallback2&amp;count=1' type='text/javascript'/>

</div>

</div>

<b:include name='quickedit'/>

</b:includable>

</b:widget>


Step 4: Edit Feedburner Email subscription and Feed count Button

Edit Feedburner Email subscription and Feed count ButtonThis is another cool feature in this template.. built in Email subscription form and Feed count button.

Search for this line


http://feedburner.google.com/fb/a/mailverify?uri=bloggertricksdotcom


and next, this line


<p><a href='http://feeds2.feedburner.com/bloggertricksdotcom'><img alt='' height='26' src='http://feeds2.feedburner.com/~fc/bloggertricksdotcom?bg=FD6D00&amp;fg=202931&amp;anim=1' style='border:0' width='88'/></a></p>


and Edit those urls to your feedburner links.
Don't have Feedburner yet ? You can signup here.

Step 5 : Add Youtube Video

Add Youtube Video

Go to Layout tab.. and you can see like this

Click on the edit and add your youtube code

Click on the edit button and paste your youtube video code.
Don't forget to change the width and height of the video to 250 x 190 px to fit perfectly in the layout. You can edit the width and height values in the youtube embed code.
Help: How to add Youtube videos to Blogger

Don't want Youtube Video Widget ? then, simply remove this code from the template.


<b:widget id='HTML2' locked='true' title='VIDEO (250 x 190)' type='HTML'>

<b:includable id='main'>

<!-- only display title if it's non-empty -->

<data:content/>

<b:include name='quickedit'/>

</b:includable>

</b:widget>

Step 6 : Setup Mini Updates (Recent Posts with thumbnails)

This template has inbuilt Recent Posts with Thumbnails widget. All you have to do is enter your blog url and it will do the rest.
Look for this code in the template

Mini Updates


home_page = &quot;http://falknerpress.blogspot.com/&quot;;


and replace the url with your Blog url.

Step 7 : Edit Social Bookmarking links

Be my Friend?

In the footer, you will see three widgets, 1.About me 2. Be my Frined? and 3. Advertisement widget.
The 1 & 3 widgets can be directly added by going to Layout tab.
All you need to edit is the second widget 'Be my Friend'. Using Social Bookmarking sites is a smart way to drive traffic to your sites.. So, if you don't have any of those accounts, Just take time to register..they are free and worth it :)

Find these lines:

<ul>


<li><a href='http://your-feedburner-url.com' target='_blank'>Subscribe</a></li>


<li><a href='http://digg.com/users/bloggertricks' target='_blank'>Digg</a></li>


<li><a href='http://www.facebook.com/people/bloggertricks' target='_blank'>Facebook</a></li>


<li><a href='http://bloggertricks.stumbleupon.com'>Stumble It!</a></li>


</ul>


</div>

<div class='share-list2'>


<ul>


<li><a href='http://technorati.com/faves?add=http://your-blog.blogspot.com/'>Technorati</a></li>


<li><a href='http://twitter.com/bloggertricks' target='_blank'>Twitter</a></li>


</ul>


and Edit them accordingly.

Step 8 : Featured Content Slideshow

Featured Content SlideshowCheck out the Live Demo to see how it looks.

Edit the Slideshow...
Go to Layout � Edit html and find these lines..
Observe the pattern, it's easy!
wait! First prepare your images... the images should be 490(width) x 280 (height) pixels. Use Photoshop or any other image editing software to crop the images to 490 x 280 px and then upload the images to some image host like photobucket,tinypic,etc.

Next, find this code

<div id='myGallery'>

<!-- First Picture Start -->

<div class='imageElement'>

<h3>Title One </h3>

<p/>

<a class='open' href='http://bloggertricks.com'/>

<img alt='Marley And Me' class='full' src='IMAGE URL'/>

<img alt='Marley And Me' class='thumbnail' src='http://54800.com/wp-content/uploads/a1.jpg'/>

</div>

<!-- First Picture End -->

.........................................

..........................................

</div>


The pattern is like this

<div id='myGallery'>


<!-- First Picture Start -->


<div class='imageElement'>


<h3>Title 1 </h3>


<p/>


<a class='open' href='LINK 1 '/>


<img alt='Marley And Me' class='full' src='URL OF IMAGE 1 '/>


</div>


<!-- First Picture End -->


<!-- Second Picture Start -->


<div class='imageElement'>


<h3>Title 2 </h3>


<p/>


<a class='open' href='LINK 2 '/>


<img alt='Marley And Me' class='full' src='URL OF IMAGE 2 '/>


</div>


<!-- Second Picture End -->


<!-- Third Picture Start -->


<div class='imageElement'>


<h3>Title 3 </h3>


<p/>


<a class='open' href='LINK 3 '/>


<img alt='Marley And Me' class='full' src='URL OF IMAGE 3 '/>


</div>


<!-- Third Picture End -->


</div>


Got it? Now edit those links and Save the Changes!!
Now, FalknerPress template is successfully installed!

Extras

Here are few more things you can learn about this template..
Adsense Color Codes:

Here is the Color Palattes you can use to perfectly blend your adsense ads in the layout

1. Adsense in Left sidebar:
Preview:

Adsense in left sidebar


Colors to use:

left sidebar colors


2. Adsense in Right sidebar:

Preview:
Adsense in right sidebar

Colors to use:

Right sidebar colors

3. Adsense just below Featured Content Slideshow:
(468 x 60px)

SAME COLORS as 2nd one


4. Adsense in Footer:
Colors to use:

Colors to use in footer


That's it guys! Hope you like the template :D

Like the template? or If you have any questions ? Comment here...

READ MORE - Releasing Mind Blowing Magazine style Blogger Template "Falkner Press"

TurnOut Mag & SchemerMag Templates updated!

automatic thumbnails and automatic post summary


Good news guys!
I added to more functionalities to the two Free Premium blogger templates TurnOut Mag and SchemerMag that I released a couple of days ago.

1. AUTOMATIC THUMBNAILS on Homepage:
Previously, we have to add small images to the top of the post to display thumbnails on the homepage. Even, if go to post pages, the thumbnails stay as thumbnails.
But, now, I added the AutoThumbnails feature to the template.
What it does?
You can add big images to your posts, doesn't matter you add them at the top of the post or at the bottom of the post. This trick automatically grabs the picture from the post and resizes it on the homepage.. and the same pic appear in full size in the post pages.

2. AUTOMATIC Post Summarize and Read More... :
Previously, we have to edit each and every post to display the summary on the homepage.. If we don't edit them.. the homepage looks crappy.
But, with the additional feature I added, doesn't matter if you have 1 post or 1,000000 posts, the trick will automatically summarize the text for you on the homepage..

What next..?
With these two additional features, Personally I feel, these are the top 2 Blogger templates of all time with so many features included...what do you say..?
So, why not test the layout on your blog..?
Download the Turnout Mag here and SchemerMag here.


-------------------------------------------------
NOTE : You DON'T need to change these if you are downloading a FRESH COPY now!
Downloaded the previous version (2 days ago) and want to change to this one?
Simply make these couple of changes..
1. FIND THIS:
</head>

AND ADD THIS CODE AFTER THAT
<SCRIPT type='text/javascript'> var thumbnail_mode = &quot;no-float&quot; ; summary_noimg = 230; summary_img = 200; img_thumb_height = 80; img_thumb_width = 80; </SCRIPT> <SCRIPT src='http://myblogtalk.com/bloggertemplates/turnoutmag/autoreadmorethumb.js' type='text/javascript'/>

2. FIND THIS:

<style>#fullpost{display:none;}</style>


<p><data:post.body/></p>


and REPLACE it with this..

<DIV expr:id='&quot;summary&quot; + data:post.id'><p><data:post.body/></p></DIV> <SCRIPT type='text/javascript'>createSummaryAndThumb(&quot;summary<data:post.id/>&quot;);</SCRIPT>


and Done!
READ MORE - TurnOut Mag & SchemerMag Templates updated!

One more Magazine style Blogger Template "SchemerMag"

After very good response on my previous Magazine style Blogger template Turn out Mag, I decided to go for one more Magazine style layout.. so, here it is..

Releasing SchemerMag Magazine style 3 Column Blogger Template:
As usual, this is a wordpress to blogger conversion.. wp theme by Chiq Montes of wpthemedesigner.com and converted to Blogger by me.

look at the screenshot:

SchemerMag blogger template screenshot

Special Features:
� Thumbnails on articles (automatic resize)
� Google Adsense/banner ready
� 3 Columns
� SEO Optimized
� Featured video
� Read more..(automatic summarize)


Step by Step Installation guide:

Step 0: First , follow the basic installation steps here.

Step 1 : Editing top Navigation links
1.a :

editing links 1
Go to LayoutEdit html and find this code


<li><a expr:href='data:blog.homepageUrl'>Home</a></li>

<li><a href='http://bloggertricks.com'>Blogger Templates</a></li>

<li><a href='http://blogger.com'>Blogger</a></li>

<li><a href='http://bloggertricks.com'>Blog Tips</a></li>


and Replace the Anchor text (Blogger Templates,Blogger,Blogtips) and their respective links to your needs.

1.b:

editing nav links 2
and again, there's another navigation bar..
Find this code


<li class='f'><a href='http://google.com'>Google</a></li>

<li><a href='http://bloggertricks.com'>Blogger Templates</a></li>

<li><a href='http://gmail.com'>Gmail</a></li>

<li><a href='http://bloggertricks.com'>Blogging Tips</a></li>

<li><a href='http://blogger.com'>Blogger</a></li>

<li><a href='http://adsense.com'>Adsense</a></li>


and edit the anchor texts,links as you wish.

Step 2: Adding Adsense banners to header and on top of every post

2.a: Adsense on header

Adsense on headerJust go to Layout and edit the gadget as shown below and paste your adsense code (468 x 60px) and save it..

edit the gadget for adsense banner on header

2.b: Adsense on above first post (even on labels,search pages)

editing ad
Just go to Layout page and edit the 'advertisement' gadget as shown below

edit this

Step 2 : Edit the logo text

edit the header
The .psd file is included in the template download file. Just open it with photoshop and edit the text and save it as image file (.jpg or .gif). Next , upload to any image hosting servies and copy the image url of the uploaded image.
Next, go to Edit html and replace this image url in the template with the one you just copied now.

http://i43.tinypic.com/er0iyo.jpg

READ MORE - One more Magazine style Blogger Template "SchemerMag"

Releasing Premium Magazine Style Blogger Template "TURN OUT MAG"

FREE Premium Magazine Style Blogger Template " TURN OUT MAG "

Over the last few days, so many readers commented on this site asking me to convert a Magazine style wordpress theme to Blogger version... So, for all you guys.. Releasing Premium Magazine style Blogger Template "TURN OUT MAG". This was originally a wordpress theme designed by ChiQ Montes and I converted it to Blogger version.

Screenshot
The template comes with so many built in features including:
� Thumbnails on homepage (automatic)
� Two main columns on the Homepage (Mag style)
� Banner ad / Adsense ready
� 468 x 60 px Banner ad on the header
� Three Columns
� Search Box
� SEO Optimized
� "Read More.." (automatic summarize)
� Featured Video
...and many more...


Step by Step Installation Guide:

(First backup your current template file before installing any new template)

Step 0: First, follow the Basic Template Installation steps here.

Step 1: Go to SettingsFormatting and select the Date Header format like the one shown below and Save the changes.Choose the DATE HEADER Format
Step 2 : Editing the top Navigation links:

Edit the Nav linksJust go to LayoutEdit html
and Look for this code:


<li><a href='http://bloggertricks.com'>Blogger Templates</a></li>

<li><a href='http://bloggertricks.com'>Blog Tips</a></li>

<li><a href='http://wpthemedesigner.com'>WP themes</a></li>


Just look at the code.. You'll understand. Got it? Just replace the Anchor text (Blogger Templates, Blog Tips, WP themes ) with the corresponding links.

Step 3: You can add 468 x 60 px Adsense ad on Right side of Header:

Adsense ad on header
Just go to Layout and click on "Edit" of the header widget as shown in the pic below:

adsense adand paste you adsense code in the box and Save it.

Step 4: Editing the Logo:

editing logo

The .psd file of the Header logo is included in the download file. Open it with Photoshop and edit the Site Name and description and Save it as image file (.jpg)
Next, upload the image to any image hosting services like Photobucket, Tinypic,etc and after uploading, they will give you a direct link to that image file.

Go to LayoutEdit html and find this image url in the template code..

http://i44.tinypic.com/24exqxd.jpg


and replace it with the one you uploaded and Save the template.
(If you don't know editing the .psd file or If you don't have photoshop, just leave a comment here with your Sitename and description, I'll do it for you..)


Now your Mag style template is successfully installed... Congrats :)

Like the template ? or Have any questions ? Comment here...


---------------------------------------------
Answers to Reader comments:

Question: hi! how about the feed in the upper left corner, how can I edit that? thank you!!! (by weng cariyaga)

Answer: To edit the feed url, just find this

<a expr:href='data:blog.homepageUrl + &quot;feeds/posts/default&quot;'>Posts</a>


and change it to like this


<a href='http://YOUR-FEEDBURNER-URL.com'>Posts</a>


Don't forget to edit the YOUR-FEEDBURNER-URL with your feed address..


Question:
can you please tell me where to add a "share this" or "Addthis" button, and also a Digg button. I want the "share this" button to appear at the end of the post and the "Digg" with submission capability at the top on the main post page. thanks a lot in advance.

To add Sharethis/add this button on the homepage:

preview after adding addthis widget

First go to addthis.com and select the button shown below and get the html code for that button.

share this

Next, go to Layout � Edit html and find this code
<a href="data:post.url">Read More</a>
and replace it with this

<a href="data:post.url">Read More</a> / YOUR ADDTHIS CODE

To add on the Post pages:
Find this..

<div id="contentb">


<div class="single">

<h2><data:post.title></data:post.title></h2>

<div class="contentb"><p><data:post.body></data:post.body></p>

</div>

</div>


and add your ADDTHIS code below those lines

The digg option is already there in the sharethis widget..so, if you add digg button again,the homepage looks crappy.

BloggerTricks.com
READ MORE - Releasing Premium Magazine Style Blogger Template "TURN OUT MAG"

"Floral Concept" 3 Column Blogger Template

Bringing you all BloggerTricks.com readers another lovely 3 Column Blogger Template "Floral Concept".
Floral Concept was originally a Wordpress theme by Wordpressthemepark.com and I converted this beautiful template to Blogger version.
Look at the screenshot..

The template comes with so many features including 3 columns, embedded comment form below post, Google adsense ready,etc..

Template Installation:

1. First Follow the basic installation steps here.
2.Once, you installed the template, you can change the top navigation links (Home, About,etc)

navlinks
Just find this code in the template...

<li><a href='#'>Home</a></li>

<li><a href='#'>About</a></li>

<li><a href='#'>Pictures</a></li>

<li><a href='#'>Contact</a></li>


and replace the links for your interest.
Suppose if you want to link to Google, Yahoo and Blogger.. the code should be..


<li><a href='http://google.com'>Google</a></li>

<li><a href='http://yahoo.com'>Yahoo</a></li>

<li><a href='http://blogger.com'>Blogger</a></li>


That's it! Now your template is successfully installed!


Blogger Tricks

READ MORE - "Floral Concept" 3 Column Blogger Template

Another 3 Column Blogger Template "Hot Coffee"

Hello guys.. I'm back again! Sorry for not updating the blog frequently as I'm busy preparing for the exams.. Anyways.. here is my latest Wordpress to Blogger conversion.. "Hot Coffee". The template is 3 columns with two sidebars on the right side. The template suits well for blogs related to foods,drinks,cooking,etc..

Look at the screenshot:

HotCoffee Blogger Template screenshot


Template Installation:

(Before uploading any new template, backup your current template first)

1. After downloading the template, extract the file using winzip or winrar. Sign in to Blogger and go to Layout � Edit html
and upload the downloaded xml file using the Upload button and Save the Changes.

Editing the Top Navigation Links:

navlinksAfter installing the template, you can edit the top navigation links to your desired links.. Just search for this code in the template ( Ctrl+F to search)


<li><a href='#'>About</a></li>

<li><a href='#'>Resources</a></li>

<li><a href='#'>Contact</a></li>


and SAVE THE CHANGES.

Installing "Hot Coffee" Blogger Template - Video Tutorial:


READ MORE - Another 3 Column Blogger Template "Hot Coffee"

Blackberry Blogger Template - Mobile,tech niche template

Here again guys, I'm back with another professional Blogger template "Blackberry". The template is two columns and very well suits for mobile,tech related sites. This was originally a wordpress theme by QualityWordpress.com. I converted it into Blogger xml format for you guys!

Take a look at the screenshot:

screenshot


Template Installation Instructions:

1.
First, download and install the template following these basic installation steps.

2.
Now, go to LayoutEdit html and scroll down the template and find these lines and edit the links with your desired ones.

Edit the links

<div id='header-menu'>

<ul>

<li class='current_page_item'><a href='http://blogger.com'>Blogger</a></li>

<li class='page_item page-item-2'><a href='http://bloggertricks.com'>Blogger Templates </a></li>

<li class='page_item page-item-3'><a href='http://google.com'>Google</a></li>

<li class='page_item page-item-4'><a href='http://gmail.com'>Gmail</a></li>

</ul>

</div>


3. Now, go to SettingsFormatting and change the Timestamp format like this one

Change the timestamp format like this one

and Save the Changes... that's it!
READ MORE - Blackberry Blogger Template - Mobile,tech niche template

3 Column Vector Blogger Template 'Butterfly' - Download

Here again, a new stylish, fantastic looking Blogger Template 'Butterfly' for you guys!
Butterfly template was originally a wordpress theme designed by Templates4all.com and I converted that into Blogger format.
As you can see in the below screenshot, the template comes with two sidebars in the left and the main coloum in the right side. The highlight of the template is the mind blowing vector header.

screenshot

If you are a newbie, first follow the basic installation instructions here
After installing the template,you have to edit the feedburner url

rss
go to Layout � Edit html
and find this below code and write your blog feedburner url


<div align='right'><a href='http://YOUR-FEEDBURNER-URL.COM'><img align='top' alt='' src='http://myblogtalk.com/bloggertemplates/butterfly/images/spacer.gif' style='width:150px; height:103px'/></a></div>


That's it! Leave a reply if you like the template or if you have any questions..
READ MORE - 3 Column Vector Blogger Template 'Butterfly' - Download

Stylish 3 Column Blogger Template "Techlure" Free Download

Here I am.. again back with.. a great 3 Column Blogger Template for you guys!
The template is very stylish,professional looking with a nice header logo at the top and you can put adsense 728 X 15 adsense link unit at the top which will maximise your CTR and your earnings.
This was originally a wordpress theme designed by Padd IT Solutions... and I converted that wp theme into Blogger format.

Screenshot

Installation Instructions:

First follow the basic installation steps here.

Once you completed installing the template successfully, you have to do a few things..

1.The *psd file of the logo is supplied with the download files. Open it with photoshop, select the text layer and use the 'Text' tool to edit the 'techlure' name with your's (your blog name)

Edit an upload your own logo
After editing the logo, save the file in *jpeg format and upload the image to any image hosting service like photobucket and copy the direct link to that image..
and replace this below url in the template code with the one you just copied and save the changes.

http://i522.photobucket.com/albums/w346/charcoal2-template/techlure/background-title.jpg


2.Edit the top navigation links by simple finding the below code ( Ctrl+ F to search)

Edit the top navigation links

<li class='current_page_item'><a href='http://bloggertricks.com'>Home</a></li>

<li class='nl'><a href='http://blogger.com'>Blogger</a></li>

<li class='nl'><a href='http://bloggertricks.com'>Templates</a></li>

<li class='nl'><a href='http://google.com'>Google</a></li>

<li class='nl'><a href='http://gmail.com'>Gmail</a></li>


3. Edit the Rss Feedburner url by finding this code

Edit the feedburner url
<li class='rss'><a href='YOUR-FEEDBURNER-URL-HERE'>Subscribe RSS</a></li>


4.And the final thing is adding an adsense link unit (728 X 15px)

Adding adsense code
Use the colors as shown in the below screenshot sothat the ad will be perfectly blended to the background


use this colors to the link unit

After copying the adsense code, Sign in to Blogger � layout
and click on the 'edit' as shown below and paste your adsense code and SAVE THE CHANGES.

click on the EDIT and paste your Adsense code

That's it guys! Hope you all like the template...
If you like the template or have any questions to ask..?? leave a comment!


READ MORE - Stylish 3 Column Blogger Template "Techlure" Free Download
 

Support By Blogger