Showing posts with label feed. Show all posts

Blogger New Feature : Five New Dynamic Views

Now Blogger has introduced a new feature again. They currently offers five dynamic views for public blogger blogs. These views are only accessible if allowed for by the blog author. You can also can see a message in your blogger dashboard. Use this new feature you must configure your sire feed as "Full". Unless it will not work.

Blogger Five new dynamic views

To enable this new 5 dynamic view feature for your blogger go to Settings --> Site Feed. Now from "Allow Blog Feeds" section, select the option "Full" and click on save. Now you blogger blog ready for this "Five New Dynamic Views" feature.

Blogger Feed Settings

To view this dynamic views simply follow the url formats given below:

Flipcard : available at [yourblogURL]/view/flipcard
Mosaic : available at [yourblogURL]/view/mosaic
Sidebar : available at [yourblogURL]/view/sidebar
Snapshot : available at [yourblogURL]/view/snapshot
Timeslide : available at [yourblogURL]/view/timeslide

Replace [yourblogURL] with your blogger blog url.

For example, click on the links given below to see how this work :

Flipcard : http://www.bloggertipandtrick.net/view/flipcard
Mosaic : http://www.bloggertipandtrick.net/view/mosaic
Sidebar : http://www.bloggertipandtrick.net/view/sidebar
Snapshot : http://www.bloggertipandtrick.net/view/snapshot
Timeslide : http://www.bloggertipandtrick.net/view/timeslide

These views require modern browsers such as Internet Explorer 8+, Firefox 3.5+, Chrome or Safari. Many elements of these views will not work should you have an older browser.

Flipcard View : http://www.premiumbloggertemplates.com/view/flipcard

Flipcard View

Mosaic View : http://www.premiumbloggertemplates.com/view/mosaic

Mosaic View

Sidebar View : http://www.premiumbloggertemplates.com/view/sidebar

Sidebar View

Snapshot View : http://www.premiumbloggertemplates.com/view/snapshot

Snapshot View

Timeslide View : http://www.premiumbloggertemplates.com/view/timeslide

Timeslide View

You can view more info about this here : http://www.google.com/support/blogger/bin/answer.py?hl=en&answer=1229061
READ MORE - Blogger New Feature : Five New Dynamic Views

Attractive Subscribe Section + Search Box For Blogger

In this article,I am going to explain how to add more attractive Subscribe Section + Search Box to your blogger blog.This subscribe section is included Feedburner feed and Email subscriptions boxes,Twitter and Facebook boxes for your Twitter and Facebook profiles and Social networking buttons(Digg,Twitter,Facebook,Stumbleupon,Delicious) to share your articles among social networks.These social network buttons are powered by www.addthis.com.Above the subscribe section,Search box is included.You don't want to change anything in the search box code.To add this widget to your blogger sidebar without doing any modification,sidebar width must be at least 305 px. You can add this Subscribe Section + Search Box into your blog within few seconds and very easy to configure.If you like to add this widget to your blog or a website,then follow the steps given below.

Attractive Subscribe Section + Search Box

1.Login to your blogger dashboard --> Design --> Edit HTML

2.Scroll down to where you see </head> tag .

3.Copy below code and paste it just before the </head> tag .

<style type="text/css">
.subbox{width:305px;border:0 solid #141414;overflow:hidden}
.addthis_toolbox{padding:15px 0 5px 0;text-align:center}
.addthis_toolbox .custom_images a{width:32px;height:32px;margin:0 4px 0 4px;padding:0}
.addthis_toolbox .custom_images a:hover img{opacity:1}
.addthis_toolbox .custom_images a img{opacity:0.85}
.rssbox{background:#f7f6f6;border:1px solid #ccd1d7;padding:5px 10px;margin:10px 0 0 0;-moz-border-radius:10px;-khtml-border-radius:10px;-webkit-border-radius:10px;border-radius:10px;width:125px}
.rssbox:hover{border:1px solid #92aed1}
.rssbox a{color:#7c8a9b;text-transform:uppercase;text-decoration:none;font:bold 12px Arial,Helvetica,Sans-serif}
.rssbox a:hover{color:#7c8a9b;text-decoration:underline}
.emailsbox{background:#f7f6f6;border:1px solid #ccd1d7;padding:5px 10px;margin:10px 0 0 0;-moz-border-radius:10px;-khtml-border-radius:10px;-webkit-border-radius:10px;border-radius:10px;width:125px}
.emailsbox:hover{border:1px solid #92aed1}
.emailsbox a{color:#7c8a9b;text-transform:uppercase;text-decoration:none;font:bold 12px Arial,Helvetica,Sans-serif}
.emailsbox a:hover{color:#7c8a9b;text-decoration:underline}
.twitterbox{background:#f7f6f6;border:1px solid #ccd1d7;padding:5px 10px;margin:10px 0 0 0;-moz-border-radius:10px;-khtml-border-radius:10px;-webkit-border-radius:10px;border-radius:10px;width:125px}
.twitterbox:hover{border:1px solid #92aed1}
.twitterbox a{color:#7c8a9b;text-transform:uppercase;text-decoration:none;font:bold 12px Arial,Helvetica,Sans-serif}
.twitterbox a:hover{color:#7c8a9b;text-decoration:underline}
.facebookbox{background:#f7f6f6;border:1px solid #ccd1d7;padding:5px 10px;margin:10px 0 0 0;-moz-border-radius:10px;-khtml-border-radius:10px;-webkit-border-radius:10px;border-radius:10px;width:125px}
.facebookbox:hover{border:1px solid #92aed1}
.facebookbox a{color:#7c8a9b;text-transform:uppercase;text-decoration:none;font:bold 12px Arial,Helvetica,Sans-serif}
.facebookbox a:hover{color:#7c8a9b;text-decoration:underline}
#search{width:290px;padding:2px 2px;background:#f7f6f6;border:1px solid #ccd1d7;height:28px;margin-top:0;margin-left:5px;display:inline;float:left}
#search:hover{border:1px solid #92aed1}
#search form{margin:0;padding:0}
#search fieldset{margin:0;padding:0;border:none}
#search p{margin:0;font-size:85%}
#s{width:200px;margin:0 0 0 0;padding:5px 5px 5px 5px;border:none;font:normal 80% &quot;Tahoma&quot;,Arial,Helvetica,sans-serif;color:#000;float:left;background:#f7f6f6;display:inline}
input#searchsubmit{float:right;display:inline;margin:0 0 0 0;height:28px;background:#b2b2b2;color:#000;border:0 solid #222}
</style>

Save your template.

4.Now go to Design --> Page Elements and click on "Add a gadget".

5.Select "html/java script" and add the code given below and click save.

<div class="subbox">
<div id='search' style='display:inline;'>
<form action='/search' id='searchform' method='get'>
<input id="s" name="q" onblur="if (this.value == &quot;&quot;) {this.value = &quot;Search...&quot;;}" onfocus="if (this.value == &quot;Search...&quot;) {this.value = &quot;&quot;;}" type="text" value="Search..." />
<input id="searchsubmit" type="submit" value="Search" />
</form>
</div>
<table><tr>
<td><div class="rssbox">
<a href="http://feeds.feedburner.com/FEEDBURNER-ID" target="_blank" rel="nofollow"><img src="https://blogger.googleusercontent.com/img/b/R29vZ2xl/AVvXsEjmvabLcXZqBW8O-B2fEs9Tig-ZPG2CKLov061p_FKWSZ39-z_9MBGVY_UXXZHFYYleGW0MmAYIPpquX9QCWEsKbVmgD-uqUksN4QfxKl1zNW1I5YSBKQrXvMvNEIFjubHLcU6LBIY7IQ08/" alt="RSS Feed" title="RSS Feed" style="vertical-align:middle; margin-right: 5px;border:none;" /></a><a href="http://feeds.feedburner.com/FEEDBURNER-ID" target="_blank" rel="nofollow">RSS Feed</a>
</div></td>
<td><div class="emailsbox">
<a href="http://feedburner.google.com/fb/a/mailverify?uri=FEEDBURNER-ID" target="_blank" rel="nofollow"><img src="https://blogger.googleusercontent.com/img/b/R29vZ2xl/AVvXsEjwasMxTl83FBR3ABqqv51HClMBnVtEjYQ6YbhNrh0KVYqk9RBHE9N7tS_YnzeQQAcVke8bmrIwmMF7H0bvN7sbW6fZC_7rdzhVB4AxB267QwN9tFCPFU8J2LELfMfaOW3ClBhlUP-9HgKa/" alt="EMail Feed" title="EMail Feed" style="vertical-align:middle; margin-right: 5px;border:none;" /></a><a href="http://feedburner.google.com/fb/a/mailverify?uri=FEEDBURNER-ID" target="_blank" rel="nofollow">EMail Feed</a>
</div></td>
</tr><tr>
<td><div class="twitterbox">
<a href="http://twitter.com/TWITTER-USERNAME" target="_blank" rel="nofollow"><img src="https://blogger.googleusercontent.com/img/b/R29vZ2xl/AVvXsEi-HPZ0jc6soYbpCy0ydcXSfy1QjfgPcrpQ7oU1sxYYI5OF_qtTfiJHWK4zu6AmJVHUpbzNh__F4RaY5ku0o0EOHqQvWCdOwlOuG441C8eWGXhqQ3bVWWNBcXEJ4EZ0IoplhMIZdMg4f8YB/" alt="Twitter" title="Twitter" style="vertical-align:middle; margin-right: 5px;border:none;" /></a><a href="http://twitter.com/TWITTER-USERNAME" target="_blank" rel="nofollow">Twitter</a>
</div></td>
<td><div class="facebookbox">
<a href="http://www.facebook.com/FACEBOOK-USERNAME" target="_blank" rel="nofollow"><img src="https://blogger.googleusercontent.com/img/b/R29vZ2xl/AVvXsEjE2X4PZC40ODBL-BrHfhIDSrQvJPtzqdYj3MM40z_PV7D453mXfmOObCHoxw6xUqqX_dR19jH4QI7y26Buj5TCPXsDGahtZjtZAYePr48lbrcKFEEvQAXLkEqb3fFbUv1anR8guFabUA6j/" alt="Facebook" title="Facebook" style="vertical-align:middle; margin-right: 5px;border:none;" /></a><a href="http://www.facebook.com/FACEBOOK-USERNAME" target="_blank" rel="nofollow">Facebook</a>
</div></td>
</tr></table>
<p style="display:none;" align="center">Widget by <a href="http://www.bloggertipandtrick.net/" target="_blank">Blogger Tips And Tricks</a></p>
<div class='addthis_toolbox'>
<div class='custom_images'>
<a class='addthis_button_twitter'><img alt='Twitter' height='32' src='https://blogger.googleusercontent.com/img/b/R29vZ2xl/AVvXsEhXTkadw-1wMvBU9M6DdFCOL4vw10PYczniCuzkJgUzE0SNRufZYBGr09RG45yQt_hpTAkn37EoudIj2DHAbyPE3C1BUAs05Ui9w54kAOY7Ie8jypuNSrxlvprjwolNlP439TSbkOeLLdQ/' width='32'/></a>
<a class='addthis_button_delicious'><img alt='Delicious' height='32' src='https://blogger.googleusercontent.com/img/b/R29vZ2xl/AVvXsEiAV3exFgUg2F4o77g7uAKzB3M28cMUscvT9KcU76C4zz9usbwUYrt49PlEyoBt_zAciLD7jmPaFb7mjKO_MOlfMs3B8Db74eMeGNX53AO201rauvEXR3u2HKFTgRS3kFE372ZxYayHSdM/' width='32'/></a>
<a class='addthis_button_facebook'><img alt='Facebook' height='32' src='https://blogger.googleusercontent.com/img/b/R29vZ2xl/AVvXsEgbKju9fIykpMF-tQVGSGaDB1crt5bI-ld8WcE7ibRwj9hQdJT2XlLA4UR9VULTBkcyF9zFxR68jp9W0uTFpa9NlNYfzgDS1UvJqvCQSJhZ45pjKLiCvgF2gRHllCoczaldpVNIcVAh7HU/' width='32'/></a>
<a class='addthis_button_digg'><img alt='Digg' height='32' src='https://blogger.googleusercontent.com/img/b/R29vZ2xl/AVvXsEgsYamSe-ldxH_aViGNkTy0oScKpRW9uEh94c415Co0YTd4MgBnDKNoXLqpRfITk2AKE3MNzMifsVgA6Zn4ToPIO757vIm6zJBf_sWWwYnSXGRN3BKCce07OtPdPp-ZeuQGeBphnLoBa64/' width='32'/></a>
<a class='addthis_button_stumbleupon'><img alt='Stumbleupon' height='32' src='https://blogger.googleusercontent.com/img/b/R29vZ2xl/AVvXsEjAleO2WPoDHOS1HsWXTvTccRyVevHCBAVWOEK90naSDXNZqAEmbqOsi7GUyj-lB9hvi9uJlRsnVJjzJ1ZL_NKoT8sUiYjaox5z687ZIGlw92zbvlUdQU8ZtW0lTthhSibMHXxZ4hwAMKM/' width='32'/></a>
<a class='addthis_button_favorites'><img alt='Favorites' height='32' src='https://blogger.googleusercontent.com/img/b/R29vZ2xl/AVvXsEgpBBJM9_XYdwYun0rboe6mfjEZc2Blf5JXoByQEFmumE7ysyWKFeO4toKtg1NQcBedfXQ5wBuyrYq7fmpLLyMbYbcfCz1mM10ZIpyWNjG2-5t7p_oToidhR7AYu35o2TycUCpTja224fg/' width='32'/></a>
<a class='addthis_button_more'><img alt='More' height='32' src='https://blogger.googleusercontent.com/img/b/R29vZ2xl/AVvXsEhTTQYysZWjTDD4qd8bn7ZS29rPPQ_MFYBrv7p4Y6yag3SnN2FUYHaeY6yUjZGPZXuc5a-e2kLyYz33QcmxlNI5kvUmvauoX6230T7HSnXE1Y5EM3Iy6e__l5ZKdafPaCmFLpz18uZqSPw/' width='32'/></a>
</div>
<script src='http://s7.addthis.com/js/250/addthis_widget.js' type='text/javascript'/>
</div>
</div>

NOTE : Remember to Replace,

FEEDBURNER-ID with your real Feedburner ID.(4 times).
TWITTER-USERNAME with your real Twitter username.
FACEBOOK-USERNAME with your real Facebook username.

You are done.
READ MORE - Attractive Subscribe Section + Search Box For Blogger

How To Add Subscribe Box to Blogger/Website

In this tutorials,I will explain to you how create a Subscribe Box with Feedburner Email subscription,Feed subscription and Social networking buttons(Digg,Twitter,Facebook,Stumbleupon,Delicious).You can easily add or remove social buttons to this widget and setup your email subscription.If you like to add this widget to your blog or a website,then follow the steps given below.


1.Log in to your dashboard--> Design- ->Page Elements.

2.Click on 'Add a Gadget' on the sidebar.

3.Select 'HTML/Javascript' and add the code given below and click save.

<style type="text/css">
#subscribe-box {
overflow: hidden;
margin: 10px 0 0 0;
}

#subscribe-box a.subscribe-sec {
display: inline-block;
display: -moz-inline-stack;
width: 40px;
padding-top: 38px;
zoom: 1;
}

#subscribe-box a.subscribe-sec:hover {
color: #660000;
}
</style>

<form action="http://feedburner.google.com/fb/a/mailverify" style="border:1px solid #ccc;padding:3px;" target="popupwindow" method="post" onsubmit="window.open('http://feedburner.google.com/fb/a/mailverify?uri=FEEDBURNER-ID', 'popupwindow', 'scrollbars=yes,width=550,height=520');return true"><p>Get Notified When We Update !!!</p><p><input style="width:180px" name="email" type="text" value="Enter your email address:" onclick="this.value=&#39;&#39;;" /><input value="FEEDBURNER-ID" name="uri" type="hidden" /><input value="en_US" name="loc" type="hidden" /><input value="Subscribe" type="submit" /></p>

<p><div id="subscribe-box">
<a title="Delicious" href="http://delicious.com/DELICIOUS-USERNAME" class="subscribe-sec" style="background: url(https://blogger.googleusercontent.com/img/b/R29vZ2xl/AVvXsEhKJghAnPBnR71bXvCq2VxNWc5SN-ewVZJo56xXIDxScME_LvXj8JMN3OhWI3mGgrgZkeJmWlv3Wbzi1qnhDJWqkZzDKAZzF_N73auO6sHG24mg1rrrbcFtTGqy7tTD21VUXMSgWvduCuEu/s1600/delicious.png) center top no-repeat"></a>
<a title="Twitter" href="http://twitter.com/TWITTER-USERNAME" class="subscribe-sec" style="background: url(https://blogger.googleusercontent.com/img/b/R29vZ2xl/AVvXsEjLuz5mlzTFzr64rX6mzu3fmRCioTleB7f0R9DPpgd3QDNwLmI3MNOL161FWNiwP_96XbsJxoS1YqKTTmeexii9JS8K3520Nyb3Z_G4lApMfk2VmcC9ew3bgVsIXiiAZlb2TqbrdM-Cys8h/s1600/twitter.png) center top no-repeat"></a>
<a title="Digg" href="http://digg.com/users/DIGG-USERNAME" class="subscribe-sec" style="background: url(https://blogger.googleusercontent.com/img/b/R29vZ2xl/AVvXsEiSCXQ6fH6XCvYyyXXN0XuYmFDL2dfCUKrEa5yEAtYUzuPDxr9_b0MGjnGoCXgEvGSUOPSOPhVqtcBoARIwTir4raeK9DhAig8X89nEzokP4crxxge44F-0ONAETf7hFI7FjdyHtVmvvM-b/s1600/digg.png) center top no-repeat"></a>
<a title="Facebook" href="http://www.facebook.com/FACEBOOK-USERNAME" class="subscribe-sec" style="background: url(https://blogger.googleusercontent.com/img/b/R29vZ2xl/AVvXsEiTD5SfB6UAOh3vAkomhnCLj9eINjKoYifbDxcTDqAupFc62VQwSOf4GQ0Dq7qcmam7K_ZAXU3AZw7nzX1oxjFNDrqxF2oKkKtqvLwFPUx9UaN6vzQnkjwPwU2SVU7jBDqmqXDbQ6QiaIBf/s1600/facebook.png) center top no-repeat"></a>
<a title="Stumbleupon" href="http://www.stumbleupon.com/stumbler/STUMBLEUPON-USERNAME" class="subscribe-sec" style="background: url(https://blogger.googleusercontent.com/img/b/R29vZ2xl/AVvXsEj8BTMvS3DuknzUayHIiF3h3lc353X5_H_r52qqkM5BEclYdD6YUI9hE2lFaM5ak2MmNIjkwOxiEKY1UNgcGTX2wGyR75-9hj9AQDATqlKvi6nYYgvpOKigWqeta8712qjLym7yhgVyMshV/s1600/stumbleupon.png) center top no-repeat"></a>
<a title="RSS Feed" href="http://feeds.feedburner.com/FEEDBURNER-ID" class="subscribe-sec" style="background: url(https://blogger.googleusercontent.com/img/b/R29vZ2xl/AVvXsEhlrvXaCXSreYrfRNoDQYZdd5vHrCS_ygnalNyYxevRqN9PzB9yZs-qUT-bsBi1PmeILM9RryDuSYQNhoLE-p7pZhRT4PRaVq6APTc7eW_mzjtZD6BX05Ny0fGrVDtWZKqiMbbwOhoTCOPj/s1600/rss.png) center top no-repeat"></a>
</div></p>

</form>


Note : Remember to REPLACE,

FEEDBURNER-ID with your feedburner ID.
DELICIOUS-USERNAME with your delicious username.
TWITTER-USERNAME with your twitter username.
FACEBOOK-USERNAME with your facebook username.
STUMBLEUPON-USERNAME with your stumbleupon username.

Look at the example given below.
<style type="text/css">
#subscribe-box {
overflow: hidden;
margin: 10px 0 0 0;
}

#subscribe-box a.subscribe-sec {
display: inline-block;
display: -moz-inline-stack;
width: 40px;
padding-top: 38px;
zoom: 1;
}

#subscribe-box a.subscribe-sec:hover {
color: #660000;
}
</style>

<form action="http://feedburner.google.com/fb/a/mailverify" style="border:1px solid #ccc;padding:3px;" target="popupwindow" method="post" onsubmit="window.open('http://feedburner.google.com/fb/a/mailverify?uri=blogspot/WyNa', 'popupwindow', 'scrollbars=yes,width=550,height=520');return true"><p>Get Notified When We Update !!!</p><p><input style="width:180px" name="email" type="text" value="Enter your email address:" onclick="this.value=&#39;&#39;;" /><input value="blogspot/WyNa" name="uri" type="hidden" /><input value="en_US" name="loc" type="hidden" /><input value="Subscribe" type="submit" /></p>

<p><div id="subscribe-box">
<a title="Delicious" href="http://delicious.com/wam8387" class="subscribe-sec" style="background: url(https://blogger.googleusercontent.com/img/b/R29vZ2xl/AVvXsEhKJghAnPBnR71bXvCq2VxNWc5SN-ewVZJo56xXIDxScME_LvXj8JMN3OhWI3mGgrgZkeJmWlv3Wbzi1qnhDJWqkZzDKAZzF_N73auO6sHG24mg1rrrbcFtTGqy7tTD21VUXMSgWvduCuEu/s1600/delicious.png) center top no-repeat"></a>
<a title="Twitter" href="http://twitter.com/btipandtrick" class="subscribe-sec" style="background: url(https://blogger.googleusercontent.com/img/b/R29vZ2xl/AVvXsEjLuz5mlzTFzr64rX6mzu3fmRCioTleB7f0R9DPpgd3QDNwLmI3MNOL161FWNiwP_96XbsJxoS1YqKTTmeexii9JS8K3520Nyb3Z_G4lApMfk2VmcC9ew3bgVsIXiiAZlb2TqbrdM-Cys8h/s1600/twitter.png) center top no-repeat"></a>
<a title="Digg" href="http://digg.com/users/wam8387" class="subscribe-sec" style="background: url(https://blogger.googleusercontent.com/img/b/R29vZ2xl/AVvXsEiSCXQ6fH6XCvYyyXXN0XuYmFDL2dfCUKrEa5yEAtYUzuPDxr9_b0MGjnGoCXgEvGSUOPSOPhVqtcBoARIwTir4raeK9DhAig8X89nEzokP4crxxge44F-0ONAETf7hFI7FjdyHtVmvvM-b/s1600/digg.png) center top no-repeat"></a>
<a title="Facebook" href="http://www.facebook.com/btipandtrick" class="subscribe-sec" style="background: url(https://blogger.googleusercontent.com/img/b/R29vZ2xl/AVvXsEiTD5SfB6UAOh3vAkomhnCLj9eINjKoYifbDxcTDqAupFc62VQwSOf4GQ0Dq7qcmam7K_ZAXU3AZw7nzX1oxjFNDrqxF2oKkKtqvLwFPUx9UaN6vzQnkjwPwU2SVU7jBDqmqXDbQ6QiaIBf/s1600/facebook.png) center top no-repeat"></a>
<a title="Stumbleupon" href="http://www.stumbleupon.com/stumbler/wam83879" class="subscribe-sec" style="background: url(https://blogger.googleusercontent.com/img/b/R29vZ2xl/AVvXsEj8BTMvS3DuknzUayHIiF3h3lc353X5_H_r52qqkM5BEclYdD6YUI9hE2lFaM5ak2MmNIjkwOxiEKY1UNgcGTX2wGyR75-9hj9AQDATqlKvi6nYYgvpOKigWqeta8712qjLym7yhgVyMshV/s1600/stumbleupon.png) center top no-repeat"></a>
<a title="RSS Feed" href="http://feeds.feedburner.com/blogspot/WyNa" class="subscribe-sec" style="background: url(https://blogger.googleusercontent.com/img/b/R29vZ2xl/AVvXsEhlrvXaCXSreYrfRNoDQYZdd5vHrCS_ygnalNyYxevRqN9PzB9yZs-qUT-bsBi1PmeILM9RryDuSYQNhoLE-p7pZhRT4PRaVq6APTc7eW_mzjtZD6BX05Ny0fGrVDtWZKqiMbbwOhoTCOPj/s1600/rss.png) center top no-repeat"></a>
</div></p>

</form>


You are done.
READ MORE - How To Add Subscribe Box to Blogger/Website

How To Add Comment Feeds For Individual Blogger Posts

This is very useful for your visitors to Subscribe to comments for the special blog posts of your blogger blog.

1.Log in to your dashboard--> layout- -> Edit HTML

2.Click on "Expand Widget Templates"

3.Scroll down to where you see this:

<data:post.body/>


4.Copy below code and paste it immediately after the line <data:post.body/>.

<p style='background-color:#ffffc6;'><a expr:href='"http://YOURBLOG.blogspot.com/feeds/" + data:post.id + "/comments/default?alt=rss"'>Comments Feed For This Post</a></p>


Note:Replace YOURBLOG with your blog url name.

5.Now save your template and you are done.

Comments Feed For This Post
READ MORE - How To Add Comment Feeds For Individual Blogger Posts

How To Add Beautiful Page Peel Effect with jQuery

1.Login to your blogger dashboard--> layout- -> Edit HTML

2.Don't Click on "Expand Widget Templates"

3.Scroll down to where you see ]]></b:skin> tag:

4.Copy below code and paste it just before the ]]></b:skin> tag.

#pageflip {
position: relative;
}
#pageflip img {
width: 50px; height: 52px;
z-index: 99;
position: absolute;
right: 0; top: 0;
-ms-interpolation-mode: bicubic;
}
#pageflip .msg_block {
width: 50px; height: 50px;
position: absolute;
z-index: 50;
right: 0; top: 0;
background: url(https://blogger.googleusercontent.com/img/b/R29vZ2xl/AVvXsEg2nYUXZbMatVlDFVEN-oCEFWNVL8gKMuGF8YLgPwisZhVKIyFtxxqYpiN6XqGya9CmU546JqThqt3v-READzZUMOM_kPk8_NUQqR20YqFfSRA_7ntYPgFbg9Vsh8ZUbJrTdvNNafoLxURe/) no-repeat right top;
text-indent: -9999px;
}


Note : Please host 'subscribe.png' image yourself.

5.Scroll down to where you see </head> tag:

6.Copy below code and paste it just before the </head> tag.

<script src='http://code.jquery.com/jquery-latest.js' type='text/javascript'/>
<script type='text/javascript'>
$(document).ready(function(){

//Page Flip on hover

$(&quot;#pageflip&quot;).hover(function() {
$(&quot;#pageflip img , .msg_block&quot;).stop()
.animate({
width: &#39;307px&#39;,
height: &#39;319px&#39;
}, 500);
} , function() {
$(&quot;#pageflip img&quot;).stop()
.animate({
width: &#39;50px&#39;,
height: &#39;52px&#39;
}, 220);
$(&quot;.msg_block&quot;).stop()
.animate({
width: &#39;50px&#39;,
height: &#39;50px&#39;
}, 200);
});


});
</script>


6.Scroll down to where you see <body> tag:

7.Copy below code and paste it just after the <body> tag.

<div id='pageflip'>
<a href='http://feeds2.feedburner.com/blogspot/WyNa'>
<img alt='' src='https://blogger.googleusercontent.com/img/b/R29vZ2xl/AVvXsEjBxjNruxpdFsi9Y5RtkWUQg4pXdzWFh4DRey-NsWNU7QUlIalXduKDCExjmXulq3BnZhtfxzwuixtGzoXGoPGal_hifHRq7rk3tzi5ScrcAw3mhHfyKCyFO5LVV-s-itcod7idEu5lMgKQ/'/>
<span class='msg_block'>Subscribe via RSS</span>
</a>
</div>


Note : Please host 'page_flip.png' image yourself.

Replace 'http://feeds2.feedburner.com/blogspot/WyNa' with your feed address.

8.Click on "Save Templates" and now you are done.It will look like this :


When your mouse brings towards above icon it willlook like this :

READ MORE - How To Add Beautiful Page Peel Effect with jQuery

Replace "Subscribe to: Posts (Atom)" With "Subscribe to: Posts (RSS)"

1.Log in to your dashboard--> layout- -> Edit HTML

2.Click on "Expand Widget Templates"

3.Scroll down to where you see this:

<b:includable id='feedLinksBody' var='links'>
<div class='feed-links'>
<data:feedLinksMsg/>
<b:loop values='data:links' var='f'>
<a class='feed-link' expr:href='data:f.url' expr:type='data:f.mimeType' target='_blank'><data:f.name/> (<data:f.feedType/>)</a>
</b:loop>
</div>
</b:includable>


4.Replace above with below code.

<b:includable id='feedLinksBody' var='links'>
<div class='feed-links'>
<data:feedLinksMsg/>
<b:loop values='data:links' var='f'>
<a class='feed-link' expr:href='data:f.url + "?alt=rss"' type='application/rss+xml' target='_blank'><data:f.name/> (RSS)</a>
</b:loop>
</div>
</b:includable>


5.Now save your template and your done.
READ MORE - Replace "Subscribe to: Posts (Atom)" With "Subscribe to: Posts (RSS)"

How To Add Subscribe Feed... Drop Down Menu to blogger

1.Log in to your dashboard--> layout- ->Page Elements

2.Click on 'Add a Gadget' on the sidebar.

3.Select 'HTML/Javascript' and add the code given below and click save.

<form><select class="dropdown"
onchange="location = this.options[this.selectedIndex].value;">
<option value="" selected>Subscribe feed..</option>
<option
value="http://fusion.google.com/add?feedurl=YOUR-FEEDBURNER-URL">&nbsp;&nbsp;in Google Reader</option>
<option value="http://add.my.yahoo.com/rss?url=YOUR-FEEDBURNER-URL">&nbsp;&nbsp;in
My Yahoo!</option>
<option value="http://feeds.my.aol.com/add.jsp?url=YOUR-FEEDBURNER-URL">&nbsp;&nbsp;in
My AOL</option>
<option
value="http://www.bloglines.com/sub/YOUR-FEEDBURNER-URL">&nbsp;&nbsp;in
Bloglines</option>
<option
value="http://www.netvibes.com/subscribe.php?url=YOUR-FEEDBURNER-URL">&nbsp;&nbsp;in
Netvibes</option>
<option
value="http://www.newsgator.com/ngs/subscriber/subext.aspx?url=YOUR-FEEDBURNER-URL">&nbsp;&nbsp;in
NewsGator</option>
<option
value="http://www.addthis.com/feed.php?pub=YOUR-FEEDBURNER-ID&h1=http%3A%2F%2Ffeeds2.feedburner.com%2FYOUR-FEEDBURNER-ID&t1=">&nbsp;&nbsp;..more Options</option>
</select></form>


Note :
Remember to replace YOUR-FEEDBURNER-URL and YOUR-FEEDBURNER-ID with your real details.

Look at the example below.

<form><select class="dropdown"
onchange="location = this.options[this.selectedIndex].value;">
<option value="" selected>Subscribe feed..</option>
<option
value="http://fusion.google.com/add?feedurl=http://feeds2.feedburner.com/blogspot/WyNa">&nbsp;&nbsp;in Google Reader</option>
<option value="http://add.my.yahoo.com/rss?url=http://feeds2.feedburner.com/blogspot/WyNa">&nbsp;&nbsp;in
My Yahoo!</option>
<option value="http://feeds.my.aol.com/add.jsp?url=http://feeds2.feedburner.com/blogspot/WyNa">&nbsp;&nbsp;in
My AOL</option>
<option
value="http://www.bloglines.com/sub/http://feeds2.feedburner.com/blogspot/WyNa">&nbsp;&nbsp;in
Bloglines</option>
<option
value="http://www.netvibes.com/subscribe.php?url=http://feeds2.feedburner.com/blogspot/WyNa">&nbsp;&nbsp;in
Netvibes</option>
<option
value="http://www.newsgator.com/ngs/subscriber/subext.aspx?url=http://feeds2.feedburner.com/blogspot/WyNa">&nbsp;&nbsp;in
NewsGator</option>
<option
value="http://www.addthis.com/feed.php?pub=blogspot/WyNa&h1=http%3A%2F%2Ffeeds2.feedburner.com%2Fblogspot/WyNa&t1=">&nbsp;&nbsp;..more Options</option>
</select></form>


Now you are done.Look at the picture below.

READ MORE - How To Add Subscribe Feed... Drop Down Menu to blogger

How To Add Feed Link Button Before All Labels in Blogger

1.Log in to your dashboard--> layout- -> Edit HTML

2.Click on "Expand Widget Templates"

3.Scroll down to where you see this code:

<b:loop values='data:labels' var='label'>
<li>
<b:if cond='data:blog.url == data:label.url'>
<span expr:dir='data:blog.languageDirection'><data:label.name/></span>
<b:else/>
<a expr:dir='data:blog.languageDirection' expr:href='data:label.url'><data:label.name/></a>
</b:if>
<span dir='ltr'/>
</li>
</b:loop>


4.Now replace above code with below code.

<b:loop values='data:labels' var='label'>
<li>

<a expr:href='data:blog.homepageUrl + &quot;feeds/posts/default/-/&quot; + data:label.name'><img alt='Subscribe' src='http://www.feedburner.com/fb/images/pub/feed-icon16x16.png' style='vertical-align:middle;border:0'/></a>

<b:if cond='data:blog.url == data:label.url'>
<span expr:dir='data:blog.languageDirection'><data:label.name/></span>
<b:else/>
<a expr:dir='data:blog.languageDirection' expr:href='data:label.url'><data:label.name/></a>
</b:if>
<span dir='ltr'/>
</li>
</b:loop>


5.Now save your template and you are done.It will look like this.

READ MORE - How To Add Feed Link Button Before All Labels in Blogger

How To Add Feeds For LABELS in Blogger

If you want to add feeds for labels in your blog read this post.For easy explanation I use my blogspot url.If you have a Blogspot blog:

URL Address : http://YOURBLOG.blogspot.com/

example :- http://bloggertipandtrick.blogspot.com/

FEED Address: http://YOURBLOG.blogspot.com/feeds/posts/default

example :- http://bloggertipandtrick.blogspot.com/feeds/posts/default

LABEL Address : http://YOURBLOG.blogspot.com/search/label/labelname

example :- http://bloggertipandtrick.blogspot.com/search/label/Templates


To Add a feed for your label your, feed address should like this :

http://YOURBLOG.blogspot.com/feeds/posts/default/-/labelname

example :- http://bloggertipandtrick.blogspot.com/feeds/posts/default/-/Templates

If you have spaces in your label, your feed address should like this :

example :- http://bloggertipandtrick.blogspot.com/feeds/posts/default/-/Change%20Template


Note : If you want to show your latest post under a label follow the steps below.

1.Login to your dashboard--> layout- ->Page Elements

2.Click on 'Add a Gadget' on the sidebar.

3.Click on 'Feed' .


4.Add feed address for your label and click continue.Look at the example below.


5.Now customize your feed showing setting an click save.


Now you are done.
READ MORE - How To Add Feeds For LABELS in Blogger

How To Create Table Of Content Using AJAX Feed

Follow below steps to create nice Table Of Content for your blog.

1.First sign up for your Google API Key.


2.Now copy your AJAX Feed API key to notepad.


3.Now Login to your blogger dashboard--> layout- ->Page Elements

4.Click on 'Add a Gadget'.

5.Select 'HTML/Javascript' and add the code given below.

<!-- ++Begin Dynamic Feed Wizard Generated Code++ -->
<!--
// Created with a Google AJAX Search and Feed Wizard
// http://code.google.com/apis/ajaxsearch/wizards.html
-->

<!--
// The Following div element will end up holding the actual feed control.
// You can place this anywhere on your page.
-->
<div id="feed-control">
<span style="margin:10px;padding:4px;">Loading...</span>
</div>

<!-- Google Ajax Api
-->
<script src="http://www.google.com/jsapi?key=YOUR-AJAX-FEED-API-KEY>>"
type="text/javascript"></script>

<!-- Dynamic Feed Control and Stylesheet -->
<script src="http://simblogg.googlepages.com/gfdynamicfeedcontrol.js"
type="text/javascript"></script>
<style type="text/css">
@import url("http://www.google.com/uds/solutions/dynamicfeed/gfdynamicfeedcontrol.css");
</style>

<script type="text/javascript">
function LoadDynamicFeedControl() {
var feeds = [
{title: 'Table of Contents',
url: 'http://YOURBLOG.blogspot.com/atom.xml?redirect=false&start-index=1&max-results=999'
}];
var options = {
stacked : true,
horizontal : false,
title : "YOUR-BLOG-TITLE"
}

new GFdynamicFeedControl(feeds, 'feed-control', options);
}
// Load the feeds API and set the onload callback.
google.load('feeds', '1');
google.setOnLoadCallback(LoadDynamicFeedControl);
</script>

<!-- ++End Dynamic Feed Control Wizard Generated Code++ -->


6.Now Replace,

YOUR-AJAX-FEED-API-KEY with your real key.

YOURBLOG with your real blog name.

YOUR-BLOG-TITLE with your real blog title.

7.Now click SAVE and you are done.Look at the picture below.

READ MORE - How To Create Table Of Content Using AJAX Feed

How To Create Recent Articles Widget using Feed2JS

1.First Go to Feed2JS Website.Look at the picture below.


2.Now fill in the form above.

URL Enter the web address of the RSS Feed :

http://yourblogname.blogspot.com/feeds/posts/default

Fill Other informations as your choice.Look at the example below.

3.Now Click on 'Generate JavaScript'.Now you can get your JavaScript code.

4.Log in to your dashboard--> layout- ->Page Elements

5.Click on 'Add a Gadget' on the sidebar.

6.Select 'HTML/Javascript' and add your JavaScript code and click save.

Now You are done.

READ MORE - How To Create Recent Articles Widget using Feed2JS

How To Add Feed Burner Email Subscriptions to Blogger

Using Feedburner, you are able to instantly have an email subscription service for your blog. Every day that you post something new in the blog, an email is sent out to the people who have subscribed to your blog. You don't have to do anything. People join the list and leave the list of their own free will; again, You don't have to do anything. You can make some choice about the way the email is configured, but Feedburner does all the work of actually maintaining the list and sending out the email.

1. Login to your Feedburner account.

2. Click on the Feed Title.

3. Click on Publicize Tab.
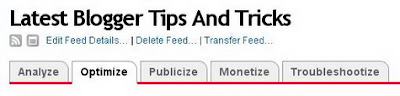

4.Now Click on Email Subscriptions.

5.Now Click on "Activate" Button.

6.Now Choose the Blogging Platform as "Blogger"

7.Then you will get code . Copy and paste the code in your blog where ever you like to add Feed Burner Email Subscriptions Form.

READ MORE - How To Add Feed Burner Email Subscriptions to Blogger

How To Redirect your Blogger feed to FeedBurner feed

If you have a blog and start to use FeedBurner to manage your feed, you have to change the auto discovery link in your template and redirect the old feed to FeedBurner, so you don't have to tell your readers to subscribe to the new feed.To Redirect your Blogger feed to FeedBurner feed follow the steps below.

1.Login to your blogger dashboard.

2.Go to settings-->Site Feed.

3.Now type your Feedburner Feed URL into the Post Feed Redirect URL text field. Remember to include http://

For example My Feedburner Feed URL is http://feeds2.feedburner.com/blogspot/WyNa

I must enter it like below.

4.After you enter your Feedburner Feed URL click on "Save Settings" and your done.Now Blogger will redirect feed traffic of your blog to your Feedburner feed.

READ MORE - How To Redirect your Blogger feed to FeedBurner feed

How To Add Feedburner FeedFlare below your Blog Post

If you want to add the FeedFlare to your blog follow the instruction below.

1. Login to your Feedburner account.

2. Click on the Feed Title.

3. Click on Optimize Tab.

4. Click on FeedFlare.

5. Check on the services you want to display in your Feed or on your Site.

6.There is a FeedFlare Preview/Ordering below the list of services. This lets you see how FeedFlare will appear in your feed and/or on your site. Just Click and Drag the links on the location that you want.

7.Click on "Activate".Now You will get this message.

8.Now in this window Before the Save button, there is a "Get the HTML code to put FeedFlare on your site". Choose the Blogging Platform as "Blogger"

9. A pop-up window will appear and it contains the instructions on how you embed the Feed burner FeedFlare on your blog.Just follow the instructions.Now wait about 20 minutes and refresh your site.Look at the example below.

READ MORE - How To Add Feedburner FeedFlare below your Blog Post

Blogger Feed URLs

I think this simple informations (but very useful) should know every blogger.

Full site feed:

Atom 1.0: http://yourblog.blogspot.com/feeds/posts/default

RSS 2.0: http://yourblog.blogspot.com/feeds/posts/default?alt=rss

Comments-only feed:

Atom 1.0: http://yourblog.blogspot.com/feeds/comments/default

RSS 2.0: http://yourblog.blogspot.com/feeds/comments/default?alt=rss

Label-specific site feed:

Atom 1.0: http://yourblog.blogspot.com/feeds/posts/default/-/labelname

RSS 2.0: http://yourblog.blogspot.com/feeds/posts/default?alt=rss/-/labelname

Individual post comment feed:

Atom 1.0: http://yourblog.blogspot.com/feeds/postId/comments/default

RSS 2.0: http://yourblog.blogspot.com/feeds/postId/comments/default?alt=rss


Resource :
Blogger Help :http://help.blogger.com/bin/answer.py?hl=en&answer=97933
READ MORE - Blogger Feed URLs

How To Remove-Subscribe to: Posts (Atom)-Link

If You need to remove this Subscribe to: Posts (Atom) link,Then Follow the instructions below.


log in to your dashboard--> layout- -> Edit HTML-->Check "Expand Widget Templates"

scroll down to where you see this:-

<b:include name='feedLinks'/>


Now Delete this code and preview the template before saving to check if any errors occured or not.

Now click "Save Template" and refresh your site.
READ MORE - How To Remove-Subscribe to: Posts (Atom)-Link
 

Support By Blogger