Showing posts with label comments. Show all posts

How To Add Disqus Comment System to Blogger

DISQUS is a comments platform that helps you build an active community from your website's audience. It has awesome features, powerful tools, and it's easy to install.Before this I have explain how to add IntenseDebate comment system to blogger blog and now I am going to explain how to add Disqus comment system to your blogger blog.

There are lot of good features with Disqus comment system when we comparing it with Blogger default comment system.

Realtime comment system

Comments become more like live discussions with realtime posting and updating. By offering a faster, more intuitive experience, Disqus is everyone's favorite way to comment.

Notification and reply system

The notification system lets people know when they've received a response. Best of all, they can continue the conversation straight from the email.

Inline media embedding

Full integration with media services such as Youtube, Flickr, and more. Attach media such as photos and videos right within the comments.

Mobile commenting

Fully compatible with mobile websites for commenting while on the go. The default mobile theme is formatted with smartphones, like the iPhone or Android phones, in mind.

Social integration

Full integration with Facebook, Twitter, and more. Let people login, comment, and share using social services they already use and love.

The Community Box

A quick way to show off what your community is made up of. The community box gives everyone a summary view of the activity and people participating on the site.

Liking and sharing

People can rate what they like by liking pages or comments and then sharing that on Facebook, Twitter, and other networks.

Moderation tools

Powerful and easy-to-use tools helps you keep your community under control. The moderation panel is designed for managing a large volume of incoming comments.

Spam-Be-Gone

Our in-house anti-spam technology keeps spam and unsavory people out of your community. Our anti-spam continually learns from the rest of the Disqus network to keep your site safe.

Mobile apps

Disqus apps are available for the iPhone, Android, and webOS phones. Manage your communities while you're on the go with these freely available apps.

Blacklists and whitelists

Make daily moderation easier with granular control over who gets to contribute within the community. Disqus gives you powerful tools such as blacklists, whitelists, and word filtering.

Import and export

Import existing comments into Disqus and sync up your data. All data is completely portable and can be exported at any time.

International languages

Disqus supports dozens of languages in addition to English. Complete your integration with native language support.

SEO-friendly and local sync

We offer plugins and integration methods that ensure compatibility with search engines.

Theme customization

Customize with CSS to smooth out the integration with your website. Or, use our advanced theme editor to craft your own custom theme.

Tweets and reactions

Disqus brings the conversation back to your site by collecting Tweets, mentions, and other reactions from around the web.

Profile management

Commenters control their personas and reputation across the different communities they participate on. Disqus makes it easy to track and keep conversations together.

Activity streams

Audiences stay engaged with insight into others' activity all over the web. Integrated activity streams let people see where else the smart people are talking.

Connected communities

Disqus reaches 200 million people every month across half a million websites and communities on the web. Keep the conversations lively by connecting your audience with the millions of others already on Disqus.

Before follow the instruction given below,

(a) Login to your Blogger Account.
(b) Backup your blogger template.
(c) Make sure that your blog is using Blogger Layouts. See upgrade instructions if not.
(d) Enable commenting. See instructions to enable commenting. Make sure that Who Can Comment? is set to Anyone.

Now Follow the steps given below. You can add Disqus comment system to your blog easily.

1. First create a account on Disqus.com.

2. Now visit this link to add your blog to the Disqus account:

http://disqus.com/admin/register/

3. Fill in the necessary details and click on "Continue".
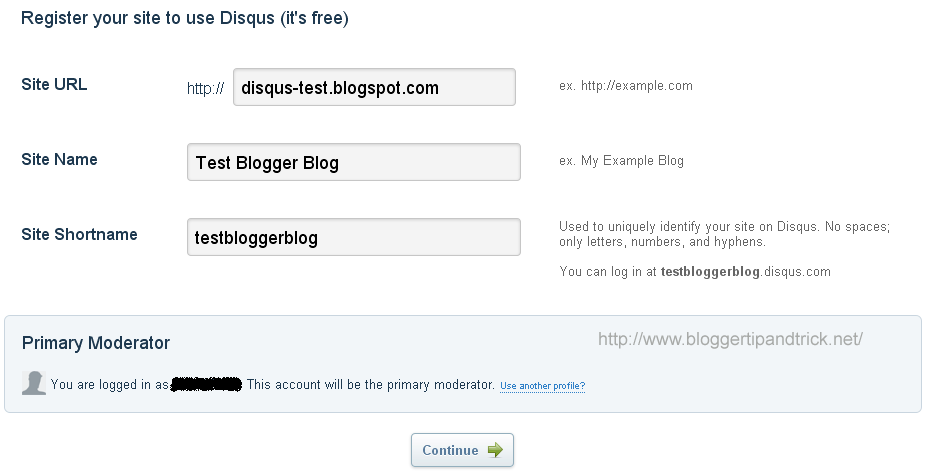
Register your blog

4. Now you can see below screen. select the option as you like and click on "Continue" again.
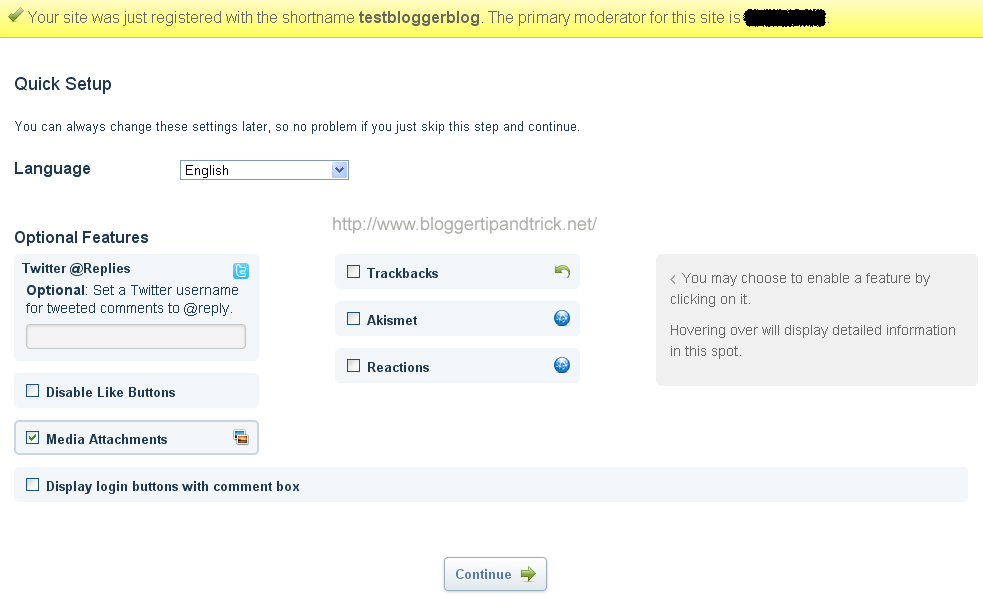
Select options

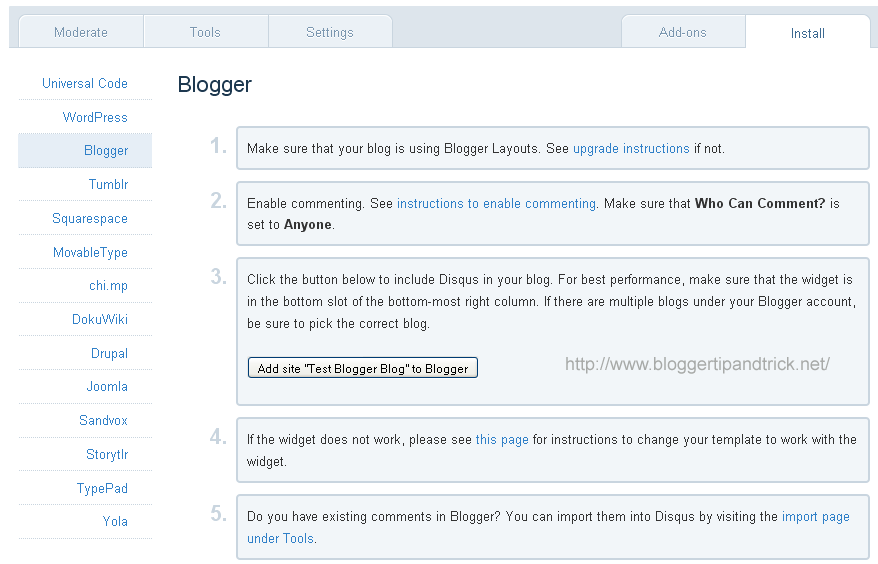
5. Now can see installer instructions page.
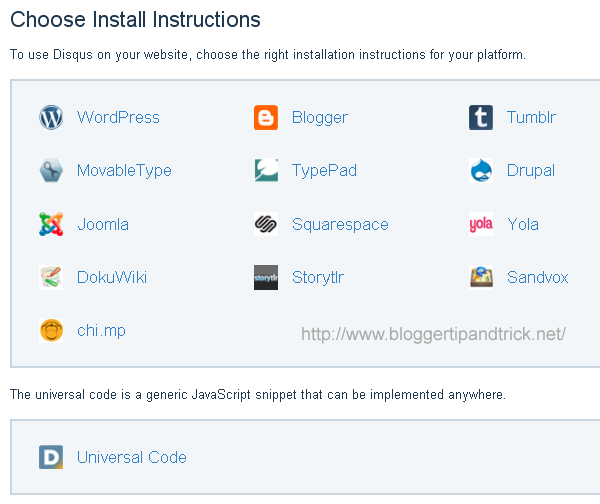
Select Install Instruction

Click on "Blogger" instructions.

Install Instruction

6. Now click on "Add site..." button.
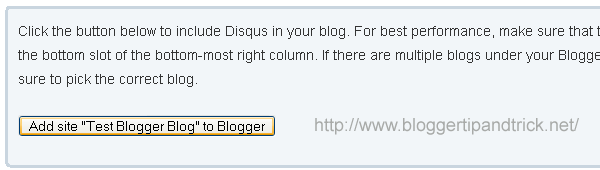
Add your blog to Disqus

7. You will bring to your blogger account. If there are multiple blogs under your Blogger account, be sure to pick the correct blog. Select your blog and click on "Add Widget" button.
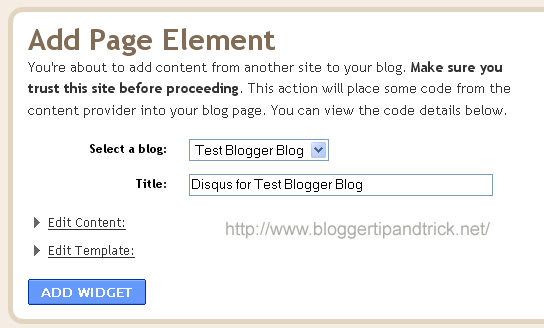
Add Page Element


You are done. you can see Disqus widget there in Blogger "page elements" page. For best performance, make sure that the widget is in the bottom slot of the bottom-most right column.

Now Disqus comment box will appear under your every blogger posts.


Note : Do you have existing comments in Blogger? You can import them into Disqus by visiting the import page under Tools.
READ MORE - How To Add Disqus Comment System to Blogger

How To Add IntenseDebate Comment System to Blogger

IntenseDebate is one of the most popular a feature-rich comment system for WordPress, Blogger, Tumblr and many other blogging/CMS platforms.In this tutorial I am going to explain how to add IntenseDebate comment system to Blogger blog.

With IntenseDebate,you can do many things than your default comment system.These are some main features of IntenseDebate comments.

IntenseDebate features:
  • Comment Threading.
  • Reply-By-Email.
  • Email Notifications.
  • Commenter Profiles.
  • Moderation/Blacklisting.
  • Reputation Points & Comment Voting.
  • Plugins API.
  • OpenID.
  • Widgets.
  • Twitter Connect.
  • Facebook Connect.
  • RSS Readers & Tracking.


HTML Formatting

You can also customize your links and add some photos to your comments. IntenseDebate supports the following HTML tags: <a>, <b>, <i>, <u>, <em>, <p>, <blockquote>, <br>, <strong>, <strike>, <img>

Gravatar

Intensedebate offers full Gravatar support. If you have a Gravatar they will automatically upload your Gravatar when you signup for IntenseDebate. You can choose to use your Gravatar or upload a different profile pic.

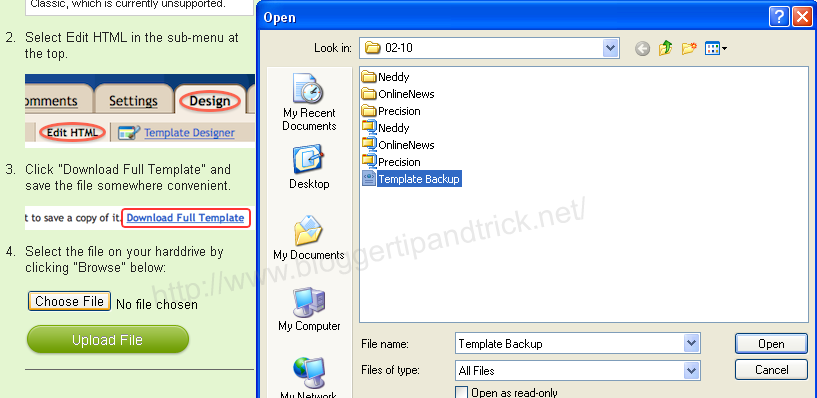
Before start this process,you must backup your blogger template first.Save the backup template file on your hard drive.


1.Create a Account on IntenseDebate.com.


2.Now add your blog to IntenseDebate : http://intensedebate.com/install


3.Then you can see this window. Now you have to select some option.


1.How would you like to install IntenseDebate?

select "Template" option.


2.Which blog posts should have IntenseDebate comments enabled?

Only on new posts
- Your old comments will be displayed using your blog's native comment system

On all blog posts
- IntenseDebate comments will be available on all posts, but your existing comments will be hidden.

Select "On all blog posts" option.

Note : If you want to keep "Blogger default comments of your old blog posts",then select "Only on new posts".

4.Scroll down to the bottom of the instructions.

Now upload the template you have backup.


5.After uploading it you can see a screen like below. Copy modified template code from the textfield.


6.Login to your blogger dashboard--> Design--> Edit html.

7.Select entire code in the Edit Template text Box and delete it.Now you must have a blank text box.


8.Now paste the code we have copied in step 5.

Save your template.You are done.


You can see IntenseDebate comment form under your blog posts.
READ MORE - How To Add IntenseDebate Comment System to Blogger

New Comments System on Blogger : Spam Filtering | Comments "Inbox"

Commenting is one of the most important parts of blogging. it�s what makes blogging a conversation. Now Blogger has introduced 2 new improvements to Blogger�s comments system: Spam filtering(Spam Inbox) and the ability to view all comments on your blog in one place(Comments Inbox).


Comment Inbox

The Published sub-tab(under Comments tab) provides a similar view as your email inbox. You can see all of the comments on your blog in one place.


Also you can mark them as "spam",delete or remove content of the comments.When you mark a comment as Spam, it will be deleted immediately from your blog.


Comment moderation has also moved under the Comments tab and has been extended to allow you to mark comments as Spam.


Comments Spam Filtering(Spam Inbox)

To fight with spam, some of you enabled moderation of all comments or required word verification or login. While somewhat effective, these checks limit real-time conversations around your blog.To address this,Blogger have integrated Google�s spam filtering technologies into the Blogger comment system.

The comments in the Spam inbox are not visible to your readers. Here, you can permanently delete spam comments by selecting them and choosing Delete. You can also mark comments as Not Spam that have been incorrectly classified as spam.Choose Not Spam and the selected comments will be moved out of the spam list and will be immediately published on your blog.

Want to Read More?

http://www.google.com/support/blogger/bin/answer.py?&answer=187141

http://buzz.blogger.com/2010/08/new-comments-system-on-blogger.html
READ MORE - New Comments System on Blogger : Spam Filtering | Comments "Inbox"

How To Add Reply Option to Blogger Comments

This tutorials will show you how to add reply option to your blogger comments like wordpress.Usually we can see reply option in non blogger blogs.But in blogger blogs there is no option to reply comments.But after you add this trick to your blogger template,you can see a reply option in blogger comments.

Before add this feature to your blogger blog you must find your blog ID.


To find your blog id follow the step given below.

Login to your dashboard and click on "Settings" link of your blog.


Now look at address bar of your browser.You can see your blog ID on the address bar.It will be a number like 2183677992760077155.Now note your blog ID.


Now let see how to add reply option to blogger comments.

1.Log in to your dashboard--> layout- -> Edit HTML

2.Click on "Expand Widget Templates"

3.Scroll down to where you see this:

<data:commentPostedByMsg/>


4.Copy below code and paste it just after above code.

<span><a expr:href='&quot;https://www.blogger.com/comment.g?blogID=YOUR-BLOG-ID&amp;postID=&quot; + data:post.id + &quot;&amp;isPopup=true&amp;postBody=%40%3C%61%20%68%72%65%66%3D%22%23&quot; + data:comment.anchorName + &quot;%22%3E&quot; + data:comment.author + &quot;%3C%2F%61%3E#form&quot;' onclick='javascript:window.open(this.href, &quot;bloggerPopup&quot;, &quot;toolbar=0,location=0,statusbar=1,menubar=0,scrollbars=yes,width=450,height=450&quot;); return false;'>[Reply]</a></span>

NOTE : Remember to replace YOUR-BLOG-ID with your real blog ID.

Look at the example given below:

<span><a expr:href='&quot;https://www.blogger.com/comment.g?blogID=5649319381222938273&amp;postID=&quot; + data:post.id + &quot;&amp;isPopup=true&amp;postBody=%40%3C%61%20%68%72%65%66%3D%22%23&quot; + data:comment.anchorName + &quot;%22%3E&quot; + data:comment.author + &quot;%3C%2F%61%3E#form&quot;' onclick='javascript:window.open(this.href, &quot;bloggerPopup&quot;, &quot;toolbar=0,location=0,statusbar=1,menubar=0,scrollbars=yes,width=450,height=450&quot;); return false;'>[Reply]</a></span>

5.Now save your template and you are done.
READ MORE - How To Add Reply Option to Blogger Comments

How To Hidden Deleted Comments in Blogger

When you delete the comments in blogger, still you'll see an message like the picture below.This messages add a ugly appearance to your blogspot site.But doing this little trick,you can hidden deleted comments easily.If you like to hidden deleted comments in your blogspot blog,then simply follow the steps below.


1.Login to your blogger dashboard--> layout- -> Edit HTML

2.Click on "Expand Widget Templates".

3.Scroll down to where you see below code:

<b:loop values='data:post.comments' var='comment'>

<dt expr:class='&quot;comment-author &quot; + data:comment.authorClass' expr:id='data:comment.anchorName'>

<b:if cond='data:comment.favicon'>
<img expr:src='data:comment.favicon' height='16px' style='margin-bottom:-2px;' width='16px'/>
</b:if>

<a expr:name='data:comment.anchorName'/>

<b:if cond='data:blog.enabledCommentProfileImages'>
<data:comment.authorAvatarImage/>
</b:if>

<data:comment.author/>

<data:commentPostedByMsg/>
</dt>

<dd class='comment-body'>

<b:if cond='data:comment.isDeleted'>
<span class='deleted-comment'><data:comment.body/></span>
<b:else/>
<p><data:comment.body/></p>
</b:if>
</dd>

<dd class='comment-footer'>
<span class='comment-timestamp'>
<a expr:href='data:comment.url' title='comment permalink'>
<data:comment.timestamp/>
</a>
<b:include data='comment' name='commentDeleteIcon'/>
</span>
</dd>

</b:loop>


4.Copy below code and paste it just after <b:loop values='data:post.comments' var='comment'>.

<b:if cond='data:comment.isDeleted'>

<b:else/>


5.Copy below code and paste it just before </b:loop>.

</b:if>


6.Save your template and you are done.

Now your deleted comments will not appear.
READ MORE - How To Hidden Deleted Comments in Blogger

How To Remove Commentators Profiles/Sites URLs in Blogger

When someone leave a comment,your site is linked automatically into his website or profile url.If you don't like this you can stop it doing this very simple trick.Simply follow the steps below to do it:

1.Login to your blogger dashboard--> layout- -> Edit HTML

2.Click on "Expand Widget Templates".

3.Scroll down to where you see below code:

<b:if cond='data:comment.authorUrl'>
<a expr:href='data:comment.authorUrl' rel='nofollow'><data:comment.author/></a>
<b:else/>
<data:comment.author/>
</b:if>


4.Now replace above code with below code:

<data:comment.author/>


5.Save your template and you are done.

Now your site will not linked to commentators sites/profiles.
READ MORE - How To Remove Commentators Profiles/Sites URLs in Blogger

How To Expand/Collapse Blogger Comments

Do you like to show and hide your blogger comments?If your blog have large number of comments this will very helpful to you.Because if there are many more comments in your blogger posts, your blog post can be very long.This will be a interrupt to your readers.So if you like add this trick to your blogspot blog,then folow the steps below.

1.Login to your blogger dashboard--> layout- -> Edit HTML

2.Click on "Expand Widget Templates".

3.Scroll down to where you see </head> tag .

4.Copy below code and paste it just before the </head> tag .

<script language="javascript">
function toggle() {
var ele = document.getElementById("toggleText");
var text = document.getElementById("displayText");
if(ele.style.display == "block") {
ele.style.display = "none";
text.innerHTML = "Show Comments";
}
else {
ele.style.display = "block";
text.innerHTML = "Hide Comments";
}
}
</script>


5.Now find below code block:

<dl expr:class='data:post.avatarIndentClass' id='comments-block'>

<b:loop values='data:post.comments' var='comment'>
<dt expr:class='&quot;comment-author &quot; + data:comment.authorClass' expr:id='data:comment.anchorName'>
<b:if cond='data:comment.favicon'>
<img expr:src='data:comment.favicon' height='16px' style='margin-bottom:-2px;' width='16px'/>
</b:if>
<a expr:name='data:comment.anchorName'/>
<b:if cond='data:blog.enabledCommentProfileImages'>
<data:comment.authorAvatarImage/>
</b:if>
<b:if cond='data:comment.authorUrl'>
<a expr:href='data:comment.authorUrl' rel='nofollow'><data:comment.author/></a>
<b:else/>
<data:comment.author/>
</b:if>
<data:commentPostedByMsg/>
</dt>
<dd class='comment-body'>
<b:if cond='data:comment.isDeleted'>
<span class='deleted-comment'><data:comment.body/></span>
<b:else/>
<p><data:comment.body/></p>
</b:if>
</dd>
<dd class='comment-footer'>
<span class='comment-timestamp'>
<a expr:href='data:comment.url' title='comment permalink'>
<data:comment.timestamp/>
</a>
<b:include data='comment' name='commentDeleteIcon'/>
</span>
</dd>
</b:loop>

</dl>


Note : Blue colored code can be different.Specially consider the Green color code.
( <dl expr:class='data:post.avatarIndentClass' id='comments-block'> and </dl> )

6.Now Replace above code with below code :

<a href='javascript:toggle();' id='displayText'>Show/Hide Comments</a>

<div id='toggleText' style='display: none;'>


<dl expr:class='data:post.avatarIndentClass' id='comments-block'>

<b:loop values='data:post.comments' var='comment'>
<dt expr:class='&quot;comment-author &quot; + data:comment.authorClass' expr:id='data:comment.anchorName'>
<b:if cond='data:comment.favicon'>
<img expr:src='data:comment.favicon' height='16px' style='margin-bottom:-2px;' width='16px'/>
</b:if>
<a expr:name='data:comment.anchorName'/>
<b:if cond='data:blog.enabledCommentProfileImages'>
<data:comment.authorAvatarImage/>
</b:if>
<b:if cond='data:comment.authorUrl'>
<a expr:href='data:comment.authorUrl' rel='nofollow'><data:comment.author/></a>
<b:else/>
<data:comment.author/>
</b:if>
<data:commentPostedByMsg/>
</dt>
<dd class='comment-body'>
<b:if cond='data:comment.isDeleted'>
<span class='deleted-comment'><data:comment.body/></span>
<b:else/>
<p><data:comment.body/></p>
</b:if>
</dd>
<dd class='comment-footer'>
<span class='comment-timestamp'>
<a expr:href='data:comment.url' title='comment permalink'>
<data:comment.timestamp/>
</a>
<b:include data='comment' name='commentDeleteIcon'/>
</span>
</dd>
</b:loop>

</dl>


</div>


7.Now save your template and you are done.
READ MORE - How To Expand/Collapse Blogger Comments

How To Add Comment Feeds For Individual Blogger Posts

This is very useful for your visitors to Subscribe to comments for the special blog posts of your blogger blog.

1.Log in to your dashboard--> layout- -> Edit HTML

2.Click on "Expand Widget Templates"

3.Scroll down to where you see this:

<data:post.body/>


4.Copy below code and paste it immediately after the line <data:post.body/>.

<p style='background-color:#ffffc6;'><a expr:href='"http://YOURBLOG.blogspot.com/feeds/" + data:post.id + "/comments/default?alt=rss"'>Comments Feed For This Post</a></p>


Note:Replace YOURBLOG with your blog url name.

5.Now save your template and you are done.

Comments Feed For This Post
READ MORE - How To Add Comment Feeds For Individual Blogger Posts

Beautiful Comment Form to Blogger using CSS

This simple article explains to you how to become your blogger comment form beautiful, using CSS.If you like to change your blogger comment form appearance,simply follow the steps below.

1.Login to your blogger dashboard--> layout- -> Edit HTML

2.Scroll down to where you see ]]></b:skin> tag .

3.Copy below code and paste it just before the ]]></b:skin> tag .

Beautiful CSS Comment Form to Blogger

#comment-form iframe{
background:#7f9db9 url() no-repeat bottom right;
border:7px solid #eeeeee;
padding:5px;
font:normal 12pt "ms sans serif", Arial;
color:#000000;
width:95%;
height:250px;
}
#comment-form iframe:hover{
background:#7f9db9 url() no-repeat bottom right;
border:7px solid #bababa;
}
#comment-form a{
color:#ffffff;
}


Note:You can colors,width,height,.... as your choice and also can add background images for your comment form.

Now save your template.You are done.
READ MORE - Beautiful Comment Form to Blogger using CSS

How To Change "Post a Comment" Text of Blogger Blog

You can see "Post a Comment" text above your comment form in blogger.If you like to replace this "Post a Comment" text with your own creative text follow the steps below.

1.Login to your blogger dashboard--> layout- -> Edit HTML

2.Click on "Expand Widget Templates".

3.Scroll down to where you see this:

Post a Comment

<data:postCommentMsg/>


Note : You can find above code in 2 places.

4.Now replace above codes with your own text.For example I replace it with "Give Your's Feedbacks".

Change Post a Comment Text

5.Now save your template and you are done.Refresh your site to see result.It will look like above image.
READ MORE - How To Change "Post a Comment" Text of Blogger Blog

Advanced Top Commentators Widget to Blogger

This widget will decide the top commentators from the latest 5000 comments to your blog.But your blog hasn't such as more comments you can add that Top Commentators Widget instead of this one.It will decide the top commentators from the latest 500 comments.

However your blog have more than 500 comments add this widget:

1.Log in to your dashboard--> layout- ->Page Elements

2.Click on 'Add a Gadget' on the sidebar.

3.Select 'HTML/Javascript' and add the code given below and click save.

Select HTML/JavaScript

<script type="text/javascript">
function pipeCallback(obj) {
document.write('<ol>');
var i;
for (i = 0; i < obj.count ; i++)
{
var href = "'" + obj.value.items[i].link + "'";
if(obj.value.items[i].link == "")
var item ="<li>" + obj.value.items[i].title + "</li>";
else
var item = "<li>" + "<a href=" + href + ">" + obj.value.items[i].title + "</a> </li>";
document.write(item);
}
document.write('</ol>');
}
</script>
<script src="http://pipes.yahoo.com/pipes/pipe.run?_render=json&_callback=pipeCallback&_id=26191599715c07fbeaa491a5729e478b&url=http%3A%2F%2Fyourblog.blogspot.com&num=10&filter=" type="text/javascript"></script>


Note : Remember to replace yourblog with your blog name.Do not include http://

You are done.
READ MORE - Advanced Top Commentators Widget to Blogger

How To Enable Avatars in Blogger Comments

If you use this hack,you can show Show Blogger Profile Images In Comments As Avatars.For your safety,first backup your blogger template.To Enable avatars in blogger/blogspot comments follow the steps below.If first method doesn't work for you,then follow the second method.

comment avatars in blogger

Method 1

1.Login to your blogger dashboard--> Settings- -> Comments.

2.Enable Show profile images on comments.

Enable Avatars in Blogger Comments

3.Now Click on "Save Settings" and you are done.


Method 2

1.Login to your blogger dashboard--> Settings- -> Comments.

2.Enable Show profile images on comments.

Enable Avatars in Blogger Comments

3.Now Click on "Save Settings".

4.Go to Layout- -> Edit HTML.

5.Click on "Expand Widget Templates".

Expand Widget Templates

6.Now search below code in your template.

<dl expr:class='data:post.avatarIndentClass' id='comments-block'>


NOTE: If you can find above code no problem.But if you can't find it then search:

<dl id='comments-block'>

or
<div id='comments-block'>

in your template.

Now Replace it with:
<dl expr:class='data:post.avatarIndentClass' id='comments-block'>


7.Now find below code:

<a expr:name='data:comment.anchorName'/>


Note:You can see above code one or more time.

8.Now Replace every above code (<a expr:name='data:comment.anchorName'/>) with below code:

<b:if cond='data:comment.favicon'>
<img expr:src='data:comment.favicon' height='16px' style='margin-bottom:-2px;' width='16px'/>
</b:if>
<a expr:name='data:comment.anchorName'/>
<b:if cond='data:blog.enabledCommentProfileImages'>
<div expr:class='data:comment.avatarContainerClass'>
<data:comment.authorAvatarImage/>
</div>
</b:if>


9.Now find ]]></b:skin> tag in your template.

10.Copy below code and paste it just before ]]></b:skin> tag.

/* Avatar */
.avatar-image-container img {
background:url(https://blogger.googleusercontent.com/img/b/R29vZ2xl/AVvXsEgrWZyjmjMABQd9b733hDu_gaAbPthakOqdaskiiNhOfLcxVFXMDAQjC6upNKtmNMou1anx0dOekhgFvu-I6T1DD3uRGHWilqebE2fSbXKyQd7lk3H5pKrG4KrO1WvEbDf5Bq-KHiZ9Ctnc/+avatar.png);
width:35px;
height:35px;
}


11.Save your template and you are done.
READ MORE - How To Enable Avatars in Blogger Comments

How To Add Yahoo Smileys Emotions to your Comments

1.Login to your dashboard--> layout- -> Edit HTML

2.Click on "Expand Widget Templates"

3.Scroll down to where you see this :

<p class='comment-footer'>
<b:if cond='data:post.embedCommentForm'>
<b:include data='post' name='comment-form'/>
<b:else/>
<b:if cond='data:post.allowComments'>
<h3><a expr:href='data:post.addCommentUrl'
expr:onclick='data:post.addCommentOnclick'>
<data:postCommentMsg/></a></h3>
</b:if>
</b:if>
</p>
</b:if>


4.Now replace above code with below code.

<p class='comment-footer'>
<b:if cond='data:post.embedCommentForm'>
<div style='-moz-background-clip: -moz-initial; -moz-background-origin: -moz-initial; -moz-background-inline-policy: -moz-initial; width: 369; text-align: left; border: 1px solid #cccccc; padding: 5px; background: #eeeddf; height:86'>
<b>
<img border='0' height='18' src='http://us.i1.yimg.com/us.yimg.com/i/mesg/emoticons7/21.gif' width='18'/> :))
<img border='0' height='18' src='http://us.i1.yimg.com/us.yimg.com/i/mesg/emoticons7/71.gif' width='18'/> ;))
<img border='0' height='18' src='http://us.i1.yimg.com/us.yimg.com/i/mesg/emoticons7/5.gif' width='18'/> ;;)
<img border='0' height='18' src='http://us.i1.yimg.com/us.yimg.com/i/mesg/emoticons7/4.gif' width='18'/> :D
<img border='0' height='18' src='http://us.i1.yimg.com/us.yimg.com/i/mesg/emoticons7/3.gif' width='18'/> ;)
<img border='0' height='18' src='http://us.i1.yimg.com/us.yimg.com/i/mesg/emoticons7/10.gif' width='18'/> :p
<img border='0' height='18' src='http://us.i1.yimg.com/us.yimg.com/i/mesg/emoticons7/20.gif' width='22'/> :((
<img border='0' height='18' src='http://us.i1.yimg.com/us.yimg.com/i/mesg/emoticons7/1.gif' width='18'/> :)
<img border='0' height='18' src='http://us.i1.yimg.com/us.yimg.com/i/mesg/emoticons7/2.gif' width='18'/> :(
<img border='0' height='18' src='http://us.i1.yimg.com/us.yimg.com/i/mesg/emoticons7/8.gif' width='18'/> :X
<img border='0' height='18' src='http://us.i1.yimg.com/us.yimg.com/i/mesg/emoticons7/12.gif' width='18'/> =((
<img border='0' height='18' src='http://us.i1.yimg.com/us.yimg.com/i/mesg/emoticons7/13.gif' width='18'/> :-o
<img border='0' height='18' src='http://us.i1.yimg.com/us.yimg.com/i/mesg/emoticons7/7.gif' width='20'/> :-/
<img border='0' height='18' src='http://us.i1.yimg.com/us.yimg.com/i/mesg/emoticons7/11.gif' width='18'/> :-*
<img border='0' height='18' src='http://us.i1.yimg.com/us.yimg.com/i/mesg/emoticons7/22.gif' width='18'/> :|
<img border='0' height='18' src='http://us.i1.yimg.com/us.yimg.com/i/mesg/emoticons7/35.gif' width='24'/> 8-}
<img border='0' height='18' src='http://us.i1.yimg.com/us.yimg.com/i/mesg/emoticons7/100.gif' width='31'/> :)]
<img border='0' height='18' src='http://us.i1.yimg.com/us.yimg.com/i/mesg/emoticons7/102.gif' width='44'/> ~x(
<img border='0' height='18' src='http://us.i1.yimg.com/us.yimg.com/i/mesg/emoticons7/104.gif' width='30'/> :-t
<img border='0' height='18' src='http://us.i1.yimg.com/us.yimg.com/i/mesg/emoticons7/66.gif' width='18'/> b-(
<img border='0' height='18' src='http://us.i1.yimg.com/us.yimg.com/i/mesg/emoticons7/62.gif' width='18'/> :-L
<img border='0' height='18' src='http://us.i1.yimg.com/us.yimg.com/i/mesg/emoticons7/14.gif' width='34'/> x(
<img border='0' height='18' src='http://us.i1.yimg.com/us.yimg.com/i/mesg/emoticons7/24.gif' width='30'/> =))
</b>
</div>
<b:include data='post' name='comment-form'/>
<b:else/>
<b:if cond='data:post.allowComments'>
<a expr:href='data:post.addCommentUrl' expr:onclick='data:post.addCommentOnclick'><data:postCommentMsg/></a>
</b:if>
</b:if>
</p>
</b:if>


5.Now Download Smiley.js ( As a zipped file ) and host Smiley.js yourself using free js hosting service provider like HotLinkFiles.com or 110mb.com.

6.Now Scroll down to where you see </body> tag in your template.

7.Copy below code and paste it just before the </body> tag .

<script src='smiley.js' type='text/javascript'/><noscript><a href="http://bloggertipandtrick.blogspot.com/" target="_blank">Blogger Tips And Tricks</a></noscript>


Note: Replace smiley.js with your direct hosting link of smiley.js .

8.Now save your template and you are done.It will look like this.


READ MORE - How To Add Yahoo Smileys Emotions to your Comments

How To Change Height and Width of blogger Comment Box

1.Log in to your dashboard--> layout- -> Edit HTML

2.Click on "Expand Widget Templates"

3.Scroll down to where you see this:

<iframe allowtransparency='true' class='blogger-iframe-colorize' frameborder='0' height='275' id='comment-editor' scrolling='no' src='' width='100%'/>


4.Now change width='100%' and height='275' as your choice.

5.Now save your template and you are done.
READ MORE - How To Change Height and Width of blogger Comment Box

How To Add Top Commentators Widget for Blogger

If you like to add Top Commentators Widget to your blog follow the steps below.It will increase the commenting rate on blogs.

1.Log in to your dashboard--> layout- ->Page Elements

2.Click on 'Add a Gadget' on the sidebar.

3.Select 'HTML/Javascript' and add the code given below and click save.

<script type="text/javascript">
function pipeCallback(obj) {
document.write('<ol>');
var i;
for (i = 0; i < obj.count ; i++)
{
var href = "'" + obj.value.items[i].link + "'";
if(obj.value.items[i].link == "")
var item ="<li>" + obj.value.items[i].title + "</li>";
else
var item = "<li>" + "<a href=" + href + ">" + obj.value.items[i].title + "</a> </li>";
document.write(item);
}
document.write('</ol>');
}
</script>
<script src="http://pipes.yahoo.com/pipes/pipe.run?_render=json&_callback=pipeCallback&_id=2f414149ab66e0892a6a179016f93019&url=http%3A%2F%2Fyourblog.blogspot.com&num=10&filter=" type="text/javascript"></script>


Note : Remember to replace yourblog with your blog name.Do not include http://

You are done.
READ MORE - How To Add Top Commentators Widget for Blogger

How To Highlight Author Comment in Blogger blog

This tip is very usefull for every blogger.If you like this follow the steps below.

1.Log in to your dashboard--> layout- -> Edit HTML

2.Click on "Expand Widget Templates"

3.Scroll down to where you see this:-

]]></b:skin>

4.Copy below code and put it before ]]></b:skin>

.comment-body-author {
background: #E6E6E6; /* Background color*/
color: #000; /* Text color*/
border-top: 1px dotted #223344;border-bottom: 1px dotted #223344;border-left: 1px dotted #223344;border-right: 1px dotted #223344;
margin:0;
padding:0 0 0 20px; /* Posotion*/
}

5.Now Scroll down to where you see this:-

<dl id='comments-block'>
<b:loop values='data:post.comments' var='comment'>
<dt class='comment-author' expr:id='"comment-" + data:comment.id'>
<a expr:name='"comment-" + data:comment.id'/>
<b:if cond='data:comment.authorUrl'>
<a expr:href='data:comment.authorUrl' rel='nofollow'><data:comment.author/></a>
<b:else/>
<data:comment.author/>
</b:if>
said...
</dt>

<dd class='comment-body'>
<b:if cond='data:comment.isDeleted'>
<span class='deleted-comment'><data:comment.body/></span>
<b:else/>
<p><data:comment.body/></p>
</b:if>
</dd>

6.Replace above code with below code.

<dl id='comments-block'>
<b:loop values='data:post.comments' var='comment'>
<dt class='comment-author' expr:id='"comment-" + data:comment.id'>
<a expr:name='"comment-" + data:comment.id'/>
<b:if cond='data:comment.authorUrl'>
<a expr:href='data:comment.authorUrl' rel='nofollow'><data:comment.author/></a>
<b:else/>
<data:comment.author/>
</b:if>
said...
</dt>

<b:if cond='data:comment.author == data:post.author'>
<dd class='comment-body-author'>
<p><data:comment.body/></p>
</dd>
<b:else/>

<dd class='comment-body'>
<b:if cond='data:comment.isDeleted'>
<span class='deleted-comment'><data:comment.body/></span>
<b:else/>
<p><data:comment.body/></p>
</b:if>
</dd>

</b:if>

7.Click on "Save Templates" and you are done.

Note : You can change "Background color" , "Text color" and "Posotion" of above codes.
READ MORE - How To Highlight Author Comment in Blogger blog

How To Comment Box is made "DO FOLLOW" for Google spiders

Above Title Means comments on this blog are made do follow and will be spidered.Comments field in blogger are made NOFOLLOW by default.This is done as a measure to reduce spam.To Become comments on your blog are made "do follow",follow the easy steps below.

1.Log in to your dashboard--> layout- -> Edit HTML

2.Click on "Expand Widget Templates"

3.Scroll down to where you see this:-

<a expr:href='data:comment.authorUrl' rel='nofollow'>

4.Replace it with below code.

<a expr:href='data:comment.authorUrl'>

5.Click on Save Templates and you are done.

Now you must to make other bloggers know that you are comments are made do follow.For this add below code to your blog.

<table width="200" height="30" border="1" bgcolor="80FFFF">
<tr>
<td>Comment Box is made DO FOLLOW for Google spiders..So comment on..<br/>
<p align="center"><a href="http://bloggertipandtrick.blogspot.com/"><img border="0" alt="Blogger Tips And Tricks" src="http://i626.photobucket.com/albums/tt346/wam8387/c1.jpg"/></a></p>
<span ></td>
</tr>
</table>

It will look like this.

Comment Box is made DO FOLLOW for Google spiders..So comment on..

Blogger Tips And Tricks

READ MORE - How To Comment Box is made "DO FOLLOW" for Google spiders

How To Add Recent Comments Widget For Blogger Blog

1.Log in to your dashboard--> layout- ->Page Elements

2.Click on Add a Gadget. Select HTML/Javascript.

3.Select the whole code given below and paste it in the widget box you have just opened above.


<script style="text/javascript">
function showrecentcomments(json) {
var numcomments = 5;
var showcommentdate = true;
var showposttitle = true;
var numchars = 100;
for (var i = 0; i < numcomments; i++) {
var entry = json.feed.entry[i];
var alturl;
if (i == json.feed.entry.length) break;
for (var k = 0; k < entry.link.length; k++) {
if (entry.link[k].rel == 'alternate') {
alturl = entry.link[k].href;
break;
}
}
alturl = alturl.replace("#", "#comment-");
var postlink = alturl.split("#");
postlink = postlink[0];
var linktext = postlink.split("/");
linktext = linktext[5];
linktext = linktext.split(".html");
linktext = linktext[0];
var posttitle = linktext.replace(/-/g," ");
posttitle = posttitle.link(postlink);
var commentdate = entry.published.$t;
var cdyear = commentdate.substring(0,4);
var cdmonth = commentdate.substring(5,7);
var cdday = commentdate.substring(8,10);
var monthnames = new Array();
monthnames[1] = "Jan";
monthnames[2] = "Feb";
monthnames[3] = "Mar";
monthnames[4] = "Apr";
monthnames[5] = "May";
monthnames[6] = "Jun";
monthnames[7] = "Jul";
monthnames[8] = "Aug";
monthnames[9] = "Sep";
monthnames[10] = "Oct";
monthnames[11] = "Nov";
monthnames[12] = "Dec";
if ("content" in entry) {
var comment = entry.content.$t;}
else
if ("summary" in entry) {
var comment = entry.summary.$t;}
else var comment = "";
var re = /<\S[^>]*>/g;
comment = comment.replace(re, "");
document.write('<br/>');
if (showcommentdate == true) document.write('On ' + monthnames[parseInt(cdmonth,10)] + ' ' + cdday + ' ');
document.write('<a href="' + alturl + '">' + entry.author[0].name.$t + '</a> commented');
if (showposttitle == true) document.write(' on ' + posttitle);
document.write('<br/>');
if (comment.length < numchars) {
document.write('<i>');
document.write(comment);
document.write('</i>');}
else
{
document.write('<i>');
comment = comment.substring(0, numchars);
var quoteEnd = comment.lastIndexOf(" ");
comment = comment.substring(0, quoteEnd);
document.write(comment + '...<a href="' + alturl + '">(more)</a>');
document.write('</i>');}
document.write('<br/>');
}
document.write('<br/>');
}
</script>
<script src="http://YOURBLOG.blogspot.com/feeds/comments/default?alt=json-in-script&callback=showrecentcomments">
</script>

Note : Replace "http://YOURBLOG.blogspot.com" with Your blogspot URL.

4. Now Click Save and Refresh Your site.

READ MORE - How To Add Recent Comments Widget For Blogger Blog

How To Hide Your Post Date,Time and Author

1.Log in to your dashboard--> layout- -> Edit HTML

2.Click on "Expand Widget Template"

How To Hide Post Date

Scroll down to where you see this:-

<data:post.dateHeader/>

Now delete this code.

Save Template and preview your site.


How To Hide Post Time

Scroll down to where you see this:-

<span class='post-timestamp'>
<b:if cond='data:top.showTimestamp'>
<data:top.timestampLabel/>
<b:if cond='data:post.url'>
<a class='timestamp-link' expr:href='data:post.url' rel='bookmark'
title='permanent link'><abbr class='published'
expr:title='data:post.timestampISO8601'><data:post.timestamp/></abbr></a>
</b:if>
</b:if>
</span>

Now delete this code.

Save Template and preview your site.


How To Hide Post Author

Scroll down to where you see this:-

<span class='post-author vcard'>
<b:if cond='data:top.showAuthor'>
<data:top.authorLabel/>
<span class='fn'><data:post.author/></span>
</b:if>
</span>

Now delete this code.

Save Template and preview your site.
READ MORE - How To Hide Your Post Date,Time and Author

How To Add Comment Form Under Every Post

Commenting is a very helpful feature for every bloggers,Because They can know what visitors think about their site.We can easily integrate comment form under every post with no extra effort.To do this follow these simple steps.

log in to your dashboard--> Setting- -> Comments


Now goto "Comment Form Placement" and Check "Embedded below post" Option.


Click on Save Settings.You have successfully embedded Comment form in your blog.

Note : Wait !!! If Above method doesn't work for your template continue with below steps.(including above step)

Go to Layout- -> Edit HTML.

Click on "Expand Widget Templates".

Scroll down to till you see below code:

<b:include data='post' name='comments'/>


Now copy and paste below code immediately below the above code:

<b:include data='post' name='comment-form'/>


Now save your template.You are done.
READ MORE - How To Add Comment Form Under Every Post
 

Support By Blogger