2.Click on "Expand Widget Templates"
3.Scroll down to where you see this:
4.Replace above code with below code.
<style>.fullpost{display:inline;}</style> <p><data:post.body/></p> <b:else/> <style>.fullpost{display:none;}</style> <p><data:post.body/> <a expr:href='data:post.url'><strong>Read more...</strong></a></p> </b:if> |
5.Click on "Save Templates"
6.Now go to Setting-->formatting-->Post Template.
7.Fill that "Post Template" blank text area with below code :
</span> |
Look at the picture below.

8.Click on "Save settings"
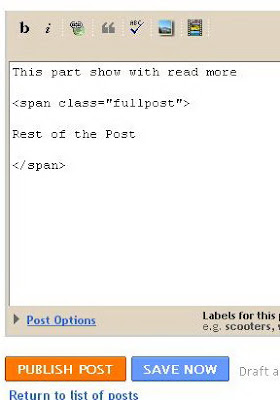
9.When you post your article, choose "Edit Html" tab. and you will see the code below :
</span> |
Look at this image.

10.Place the paragraps you want show with read more, above of below line.
11.Place the rest of the post (you want to hide) between below 2 lines.
</span> |
Look at the image below.
12.Then Publish your post.You are done.
Note :If you want to add this feature to your old posts ,do the 9-12 steps to each posts.


0 comments:
Post a Comment