How To Setup co.cc Domain for Blogger|Blogspot

1.First go to co.cc or check your domain name here.


2.Then regiter a domain name that you want to use.

Note:If it's no available, you have to find another domain name. But if it's available then you can register it.

3. Now you have to setup your domain.So sign in to your co.cc account.


4.Go to "setup"


5.Go to "Manage domain"


5.Choose "Zone Records"

6. In the coloumn "Host" fill it with your domain name (www.yourdomainname.co.cc)

7. Choose "CNAME" for "Type"

8. In the "Value" box fill it with "ghs.google.com"

9. Then click "Setup" Button.

Now you have to some setup in your blogger account.

10.Now Login to your Bloggr dashboard.


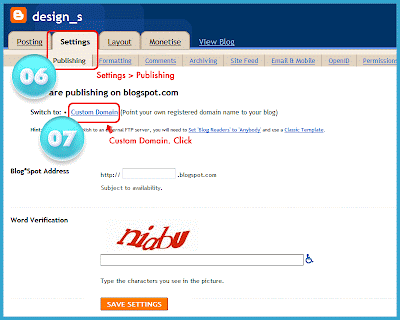
11.Go to Setting-->Publishing.

12. Then choose "Switch to: � Custom Domain"


13. Then click on "Already own a domain? Switch to advanced settings"


14. Fill it with your new domain in the "Your Domain" box.


15. To Finish click "Save Setting" Button.


Now you are done.It will take 1-48 hours for your new domain to work. So please be patient....
READ MORE - How To Setup co.cc Domain for Blogger|Blogspot

How To Add Beautiful Multi Tab View Widget to Blogger

1.Login to your dashboard--> layout- -> Edit HTML

2.Don't Click on "Expand Widget Templates"

3.Scroll down to till you see ]]></b:skin> tag.

4.Now copy and paste below code just before ]]></b:skin> tag.

.widgets{width:100%; overflow:hidden; margin-top:5px; padding:0px 0px 0px 0px; background:#FFF; border:1px solid #ccc}

.widgets a{color:#222; text-decoration:none}

.widgets a:hover{color:#009; text-decoration:underline}

ul.tabnav{padding:0px 0px 0px 0px; height:27px; margin:0px 0px}

.tabnav li{display:inline; list-style:none; float:left; text-align:center; margin-right:4px}

.tabnav li a{text-decoration:none; text-transform:uppercase; font-weight:normal; padding:5px 8px; width:90px; line-height:18px; font-weight:bold; font-family:Century gothic,Arial,sans-serif; color:#262B2F; text-decoration:none; display:block}

.tabnav li a:hover, .tabnav li a:active, .tabnav li.ui-tabs-selected a{text-decoration:none; background:url(none/catm.pg) repeat-x; color:#0283C7}

.tabdiv{margin-top:2px; padding:5px 5px 5px 5px; font-family: Tahoma,Georgia,Century gothic,Arial,sans-serif; background:#EBF3FB}
.tabdiv a:link, .tabdiv a:visited{color:#333}
.tabdiv a:hover{color:#2676A1}
.tabdiv ul{list-style-type:none; margin:0px 0px; padding:0px 0px}

.tabdiv ul li{height:100%; line-height:28px; padding:0px 0px 0px 0px; color:#333; border-bottom:1px dotted #61696F}
.tabdiv li a:link, .tabdiv li a:visited{margin-left:5px; overflow:hidden; height:18px; line-height:24px; padding:0px 0 0px 0px; margin:3px 0px; color:#99A6AF; font-size:13px}

.tabdiv li a:hover{background:url(none/la.jpg) no-repeat; color:#fff; text-decoration:none}
.ui-tabs-hide{display:none}

.tagcloud{width:300px; float:left; height:100%; padding:5px 15px; margin:0px 0px; background:#fff url(YOUR-IMAGE-HOSTING-LOCATION-HERE/tbody.jpg) repeat-y; font-family:Tahoma,Century gothic,verdana,Arial, sans-serif}

.tagcloud a:link, .tagcloud a:visited{color:#0282D9}
.tagcloud a:hover{color:#BC0C0F}


NOTE : You can change width,height,color,..... as your choice.

5.Now you must host below 6 java script files into free java script hosting service like 110mb.com.First download these files.After hosting these 6 files, copy their direct urls.

hoverIntent.js
jquery-1.2.6.min.js
jquery-ui-personalized-1.5.2.packed.js
scroll.js
sprinkle.js
spy.js

Look at the example below.

http://YOUR-USER-NAME.110mb.com/hoverIntent.js
http://YOUR-USER-NAME.110mb.com/jquery-1.2.6.min.js
http://YOUR-USER-NAME.110mb.com/jquery-ui-personalized-1.5.2.packed.js
http://YOUR-USER-NAME.110mb.com/scroll.js
http://YOUR-USER-NAME.110mb.com/sprinkle.js
http://YOUR-USER-NAME.110mb.com/spy.js

6.Now again scroll down to till you see </head> tag.

7.Now copy and paste below code just before </head> tag.

<script src='http://YOUR-USER-NAME.110mb.com/jquery-1.2.6.min.js' type='text/javascript'/>
<script src='http://YOUR-USER-NAME.110mb.com/jquery-ui-personalized-1.5.2.packed.js' type='text/javascript'/>
<script src='http://YOUR-USER-NAME.110mb.com/sprinkle.js' type='text/javascript'/>
<script src='http://YOUR-USER-NAME.110mb.com/hoverIntent.js' type='text/javascript'/>
<script src='http://YOUR-USER-NAME.110mb.com/scroll.js' type='text/javascript'/>
<script src='http://YOUR-USER-NAME.110mb.com/spy.js'/>


Note : Remember to replace above urls with your real hosting urls.

8.Scroll down to where you see this :

<div id='sidebar-wrapper'>


9.Now add below code just after above code.

<div class='widgets' id='tabzine'>

<ul class='tabnav'>
<li class='pop'><a href='#popular'> Recent</a></li>
<li class='fea'><a href='#tags'> Labels </a></li>
<li class='rec'><a href=' #recent'> Followers </a></li>
</ul>

<div class='tabdiv' id='popular'>
<b:section class='cahaya13' id='cahaya16' showaddelement='yes'>
<b:widget id='HTML144' locked='false' title='Recent Post' type='HTML'/>
</b:section>
</div>
<div class='tabdiv' id='tags'>
<b:section class='cahaya4' id='cahaya4' showaddelement='yes'>
<b:widget id='Label122' locked='false' title='Labels' type='Label'/>
</b:section>
</div>

<div class='tabdiv' id='recent'>
<b:section class='cahaya13' id='cahaya14' showaddelement='yes'>
<b:widget id='Followers152' locked='false' title='Followers' type='Followers'/>
</b:section>
</div>

</div>
<p><font><b>created by</b></font> <a href="http://bloggertipandtrick.blogspot.com/" target="_BLANK" name="blogger tips and tricks">Lasantha</a></p>


Note : Please do not remove credits.

You can change Recent,Labels,Followers(Red coloured codes) if you want to change tab names.

To add your own widget into the tabs, replace Blue coloured codes with your widget codes.

10.Now save your template and you are done.

Look at the example below.

READ MORE - How To Add Beautiful Multi Tab View Widget to Blogger

Scarlett Blogger Template

A new awesome blogger template has been released by Cahaya. Scarlett Blogger Template was converted from a wordpress theme designed by Jinsona.

The Scarlett theme begins with a navigation menu right on top, under it comes the header image on the left while the right has a search bar neatly designed into the template. Under that is place for a leader board advertisement.

Now comes the drop down menu, before the slider that is found on many of the Zinmag Series Templates. The main column's posts are neatly divided with an automatic read more function. Under the headline is a neat icon for the Author and time stamp, while the end of the mini post has the labels. There is no comment count on the homepage which perhaps is good for a blog that does not receive too many comments!


The specialty of the sidebar is the auto rotating top posts, you can choose the content in this widget and it keeps rotating with a nice disappearing effect at a specified time delay.

Then comes a very sleek tabber that has a cool effect when you select the tabs, the sidebar starts off as a single column and then branches into two. You also have a sponsors section that you can knock off if you choose too.

The footer is divided into three columns with a special about me and twitter section with matching icons!


Download
READ MORE - Scarlett Blogger Template

Falkner Press Magazine Style Blogger Template

A new awesome blogger template has been released by bloggertricks. Falkner Press Blogger Template was converted from a wordpress theme designed by CamelGraph. It's magazine style blogger template. Falkner Press has 3 columns with 2 right sidebar and much of feature is built in.


Feature :
* Auto Readmore
* Adsense Ready
* Featured Content Slideshow
* Social Bookmarking Icons
* Twitter Updates widget
* And Many more..

Download Here
READ MORE - Falkner Press Magazine Style Blogger Template

Free Download IBP,Internet Business Promoter 11

Internet Business Promoter(IBP) is one of the most useful seo software to all webmasters.It guarantee that your website will get top 10 rankings on Google for keywords of your choice if you use IBP.


IBP is a sophisticated website promotion tool that we continually refine. If you use IBP, you can be sure that you use the latest and proven methods that will successfully bring your website to the top of Google's search results.

IBP offers sophisticated tools for website optimization, link building, position checking, search engine submission, directory submission, keyword research and analysis and much more.

Homepage:
http://www.axandra.com/

Download Installer:
http://www.axandra.com/IBP-Installer.exe
READ MORE - Free Download IBP,Internet Business Promoter 11

How To Make a blogger Link List Widget with Nofollow

1.Login to your dashboard--> layout- -> Edit HTML

2.Click on "Expand Widget Templates"

3.Scroll down to till you see your Link list code :

(Note : You may also can find it by searching <b:widget id='LinkList )

Look at the example below.

<b:widget id='LinkList12' locked='false' title='Recomended Links' type='LinkList'>
<b:includable id='main'>

<b:if cond='data:title'><h2><data:title/></h2></b:if>
<div class='widget-content'>
<ul>
<b:loop values='data:links' var='link'>
<li><a expr:href='data:link.target' target='_blank'><data:link.name/></a></li>
</b:loop>
</ul>
<b:include name='quickedit'/>
</div>
</b:includable>
</b:widget>


4.Now put blue colored code ( rel='noindex, nofollow' ) as the example below into your Link list code.

<b:widget id='LinkList12' locked='false' title='Recomended Links' type='LinkList'>
<b:includable id='main'>

<b:if cond='data:title'><h2><data:title/></h2></b:if>
<div class='widget-content'>
<ul>
<b:loop values='data:links' var='link'>
<li><a expr:href='data:link.target' rel='noindex, nofollow'><data:link.name/></a></li>
</b:loop>
</ul>
<b:include name='quickedit'/>
</div>
</b:includable>
</b:widget>


Important : You must include the space before rel='noindex, nofollow' as the example above.

Now save your template and you are done.
READ MORE - How To Make a blogger Link List Widget with Nofollow

How To Add Hovering Peek-A-Boo Blogger Navbar to blogger

1.Log in to your blogger dashboard

2.Go to --> layout- -> Edit HTML

3.Scroll down to where you see this:

]]></b:skin>


4.Now add below code just before ]]></b:skin> tag .

#navbar-iframe{opacity:0.0;filter:alpha(Opacity=0)}
#navbar-iframe:hover{opacity:1.0;filter:alpha(Opacity=100, FinishedOpacity=100)}


Look at the example below.

#navbar-iframe{opacity:0.0;filter:alpha(Opacity=0)}
#navbar-iframe:hover{opacity:1.0;filter:alpha(Opacity=100, FinishedOpacity=100)}

]]></b:skin>


5.Click on "Save Templates" and now you are done.
READ MORE - How To Add Hovering Peek-A-Boo Blogger Navbar to blogger

How To Add jQuery on Blogger / Blogspot blogs

1.Login to your blogger dashboard.

2.Go to--> layout- -> Edit HTML

3.Scroll down to where you see <head> tag.

4.Now copy below code and paste it just after <head> tag.

<script src="http://ajax.googleapis.com/ajax/libs/jquery/1.2.6/jquery.min.js" type="text/javascript"></script>


5.Click on "Save Templates" and now you are done.
READ MORE - How To Add jQuery on Blogger / Blogspot blogs

Download Travel The World Blogger Template

Travel The World Blogger Template

Template name : Travel The World Blogger Template

Type : New Blogger Template (XML),2 Column, 1 Sidebar, Right Sidebar, White colour background

Demo|Download
READ MORE - Download Travel The World Blogger Template

Download Traveller Blogger Template

Traveller Blogger Template

Template name : Traveller Blogger Template

Type : New Blogger Template (XML),2 Column, 1 Sidebar, Right Sidebar

Demo|Download

How To Add this template to your blog.

1. Download your Blogger template to your computer. If the template is contained in a zip file, ensure you have extracted the XML template.

2. Log in to your Blogger dashboard and go to Template> Edit HTML

3. Ensure you back up your old template in case you decide to use it again. To do this, click on the "download full template" link and save the file to your hard drive.

4. Look for the section near the top where you can browse for your XML template:

5. Enter the location of your template and press "upload".

6. The HTML of your new template will now appear in the box below. You can preview your template or simply save to start using it!

7. You are done !!!
READ MORE - Download Traveller Blogger Template

Download The iPhone Blogger Template

The iPhone Blogger Template

Template name : The iPhone Blogger Template

Type : New Blogger Template (XML),2 Column, 1 Sidebar, Right Sidebar, Black colour background

Demo|Download
READ MORE - Download The iPhone Blogger Template

Download So Sweet Widgetized Blogger Template

So Sweet Widgetized Blogger Template

Template name : So Sweet Widgetized Blogger Template

Type : New Blogger Template (XML),2 Column, 1 Sidebar, Left Sidebar

Demo|Download
READ MORE - Download So Sweet Widgetized Blogger Template

Download Midnight Widgetized Blogger Template

Midnight Widgetized Blogger Template

Template name : Midnight Widgetized Blogger Template

Type : New Blogger Template (XML),2 Column, 1 Sidebar, Right Sidebar

Demo|Download
READ MORE - Download Midnight Widgetized Blogger Template

Download Lotus Blogger Template

Lotus Blogger Template

Template name : Lotus Blogger Template

Type : New Blogger Template (XML),2 Column, 1 Sidebar, Right Sidebar, Nice Header

Demo|Download
READ MORE - Download Lotus Blogger Template

Download Free as a Bird Blogger Template

Free as a Bird Blogger Template

Template name : Free as a Bird Blogger Template

Type : New Blogger Template (XML),2 Column, 1 Sidebar, Right Sidebar, Blue header,White background

Demo|Download
READ MORE - Download Free as a Bird Blogger Template

Download Azure Blogger Template

Azure Blogger Template

Template name : Azure Blogger Template

Type : 2 Column, 1 Sidebar, Right Sidebar, Top Navigation Bar,White background and header

Demo|Download
READ MORE - Download Azure Blogger Template

Download Yourblog 2 Blogger Template

Yourblog 2 Blogger Template

Template name : Yourblog 2 Blogger Template

Type : New Blogger Template (XML),2 Column, 1 Sidebar, Right Sidebar, Top Navigation Bar,Nice Header

Demo|Download
READ MORE - Download Yourblog 2 Blogger Template

Download Blogy Vertical Blogger Template

Blogy Vertical Blogger Template

Template name : Blogy Vertical Blogger Template

Type : New Blogger Template (XML),2 Column, 1 Sidebar, Left Sidebar, Brown Sidebar

Demo|Download
READ MORE - Download Blogy Vertical Blogger Template

Download Late Show Blogger Template

Late Show Blogger Template

Template name : Late Show Blogger Template

Type : New Blogger Template (XML),2 Column, Left Sidebar, 1 Sidebar, Red colour header, black background

Demo|Download
READ MORE - Download Late Show Blogger Template

Download Sweet blog Blogger Template

Sweet blog Blogger Template

Template name : Sweet blog Blogger Template

Type : New Blogger Template (XML),2 Column, 1 Sidebar, Right Sidebar, About me section

Demo|Download
READ MORE - Download Sweet blog Blogger Template

Download Soft Light Blogger Template

Soft Light Blogger Template

Template name : Soft Light Blogger Template

Type : New Blogger Template (XML),2 Column, 1 Sidebar, Right Sidebar, Top Navigation Bar

Demo|Download
READ MORE - Download Soft Light Blogger Template

Download Pannasmontata Blogger Template

Pannasmontata Blogger Template

Template name : Pannasmontata Blogger Template

Type : 2 Column, 1 Sidebar, Left Sidebar, Beautiful header

Demo|Download
READ MORE - Download Pannasmontata Blogger Template

Download Mr. Techie Blogger Template

Mr. Techie Blogger Template

Template name : Mr. Techie Blogger Template

Type : New Blogger Template (XML),2 Column, 1 Sidebar, Right Sidebar, Top Navigation Bar,About me section

Demo|Download
READ MORE - Download Mr. Techie Blogger Template

Download Blogy Minyx Blogger Template

Blogy Minyx Blogger Template

Template name : Blogy Minyx Blogger Template

Type : 2 Column, Right Sidebar, 1 Sidebar, Top Navigation Bar,Search Box, Feed button

Demo|Download
READ MORE - Download Blogy Minyx Blogger Template

Download Integral Blogger Template

Integral Blogger Template

Template name : Integral Blogger Template

Type : New Blogger Template (XML),2 Column, 1 Sidebar, Left Sidebar, Top Navigation Bar,Search Box

Demo|Download
READ MORE - Download Integral Blogger Template

Download Hemingway Black Blogger Template


Template name : Hemingway Black Blogger Template

Type : 1 Column template,black background, blogger Navigation Bar

Demo|Download

How To Add this template to your blog.

1.After download the Zip File, you must extract it with software extractor such as Winzip software or other software.

2.Now Log in to your dashboard--> layout- -> Edit HTML

3. Click on "choose" and upload your xml file.That's it.


Note : Before Upload your new template,Don't forget to backup your old template and your widgets.
READ MORE - Download Hemingway Black Blogger Template

Download Fleur Blogger Template


Template name : Fleur Blogger Template

Type : New Blogger Template (XML),2 Column, 1 Sidebar, Left Sidebar, blogger navigation Bar

Demo|Download
READ MORE - Download Fleur Blogger Template

Download Erudite Blogger Template


Template name : Erudite

Type : New Blogger Template (XML),2 Column, 1 Sidebar, Right Sidebar, Feed Button,nice header

Demo|Download
READ MORE - Download Erudite Blogger Template

Download Colibri Blogger Template


Template name : Colibri

Type : 2 Column, Right Sidebar, 1 Sidebar, Beautiful header

Demo|Download
READ MORE - Download Colibri Blogger Template

Download Blogy Decorativo Blogger Template


Template name : Blogy Decorativo

Type : 2 Column, 1 Sidebar, Left Sidebar,Search Box,red colour sidebar

Demo|Download

How To Add this template to your blog.

1.After download the Zip File, you must extract it with software extractor such as Winzip software or other software.

2.Now Log in to your dashboard--> layout- -> Edit HTML

3. Click on "choose" and upload your xml file.That's it.


Note : Before Upload your new template,Don't forget to backup your old template and your widgets.
READ MORE - Download Blogy Decorativo Blogger Template

How To Add NoFollow Tags into HTML Links

There are many occasions where you want to link to a website, but you don't want to follow links on this pages.For an example we can take Advertising and affiliate links. If Google catches you passing PageRank from a paid link, they view it as spam, and you could end up being removed from Google's database.

There's an good solution for this. Use the nofollow tag. Google won't follow the link, and you'll remain in good standing with the search engine. You can use a nofollow meta tag to negate links for an entire page, but this isn't necessary for every page.

You can use nofollow on individual links by simply typing rel="nofollow" after the link in the href tag.To add NoFollow Tags into your html links use the code below.

<a href="YOUR-LINK-HERE" rel="nofollow">LINK-NAME</a>


Note : Replace YOUR-LINK-HERE and LINK-NAME with your real details.

Look at the example below.

<a href="http://affiliate-program.amazon.com/gp/associates/join?tag=blotipandtr06-20" rel="nofollow">Amazon</a>
READ MORE - How To Add NoFollow Tags into HTML Links

How To Add Big Social Bookmarking buttons below blogger post

1.Log in to your dashboard--> layout- -> Edit HTML

2.Click on "Expand Widget Templates"

3.Scroll down to where you see this:

<p><data:post.body/></p>


4.Copy below code and paste it immediately after the line <p><data:post.body/></p> .

<div style='clear:both; '>
<div style='width:60px; float:left;'>
<script type='text/javascript'>
digg_url = &#39;<data:post.url/>&#39;;
</script>
<script src='http://digg.com/tools/diggthis.js' type='text/javascript'/>
</div>
<div style='width:60px; float:left;'>
<script badgetype='square' src='http://d.yimg.com/ds/badge2.js' type='text/javascript'><data:post.url/></script>
</div>
<div style='width:65px; float:left;'>
<a expr:href='&quot;http://www.stumbleupon.com/submit?url=&quot; + data:post.url + &quot;&amp;title=&quot; + data:post.title' rel='external nofollow' target='_blank'><img alt='Stumble' src='https://blogger.googleusercontent.com/img/b/R29vZ2xl/AVvXsEjkIDEQv1DisPohBEvhjk8kapi3rVl7v-iVLne-g_NqnU-9OiLILjwOdxPd26lYbsX9XAb4AP1opsN0wY0b_a6G0NATcAjWpT-eJ_oTTBCMVNjsMl6e4F3Ump2t7wEeHSKg6_mAHJ1kvSqk/' style='padding:0;margin:0;border:none;'/></a>
</div>
<div style='width:65px; float:left;'>
<a expr:href='&quot;http://del.icio.us/post?url=&quot; + data:post.url + &quot;&amp;title=&quot; + data:post.title' rel='external nofollow' target='_blank'><img alt='Delicious' src='https://blogger.googleusercontent.com/img/b/R29vZ2xl/AVvXsEhRDd47X_VtkiV-dg8NSBQaPSjwu_sQzXUIAaGyVlurZKtkqJ9e2h6jMP0PQ6otaGxa4Of4Dvmnd74MuIgAunR0wMAJs1Iv6SFh-rOG7Jwru8HVtT1hRcDakriVnVFOFZNfpGkzVLf-P1Z1/' style='padding:0;margin:0;border:none;'/></a>
</div>
<div style='width:65px; float:left;'>
<a expr:href='&quot;http://technorati.com/faves?add=&quot; + data:post.url' rel='external nofollow' target='_blank'><img alt='Technorati' src='https://blogger.googleusercontent.com/img/b/R29vZ2xl/AVvXsEhUx1cZK5mdNx-yCpJwgwsM3XwPORHF6pf2f1BQlXZCjMBnOX-3NRs52E0YvMRkJ_oXhZ2NZcRv5pzZR6sYY8EydjW6wixIQ_b0QhBkKfGTDjJDhiK-cA4YCheaWQ-gr_rV9ynb-HyTMns6/' style='padding:0;margin:0;border:none;'/></a>
</div>
<div style='width:65px; float:left;'>
<a expr:href='&quot;http://twitthis.com/twit?url=&quot; + data:post.url' rel='external nofollow' target='_blank'><img alt='Twitter' src='https://blogger.googleusercontent.com/img/b/R29vZ2xl/AVvXsEitKoEIwYAJDwGSZJm9RG4g_urEwHgkgStaOpeB2pqoRC5Cu95HA5jKztMGOqloSrlVEdCSQ9ElfUQl1Z5e7nHE0wSvwqXN8_dhyphenhyphenlsEMhlx_Dc0_YqPjYcbycvQr03X_XMgOPRTnAag1Xrf/' style='padding:0;margin:0;border:none;'/></a>
</div>
<div style='width:65px; float:left;'>
<a expr:href='&quot;http://www.facebook.com/sharer.php?u=&quot; + data:post.url + &quot;&amp;t=&quot; + data:post.title' rel='external nofollow' target='_blank'><img alt='Facebook' src='https://blogger.googleusercontent.com/img/b/R29vZ2xl/AVvXsEi-ECDd-gDfzSbf0RVJ57q5u059Reuph1jGwJiY3Cd_8b8WCmUUdqWCRr4UH2HIWyKvEYpOAmU7FTaLQSkKBoh020-QG6vx7c6lGDKDIf72Lbuy3eD_rjNye71EaE8lONxULWw_fTxMjY1X/' style='padding:0;margin:0;border:none;'/></a>
</div>
</div>


5.Click on "Save Templates" and now you are done.It will look like this.


Demo
READ MORE - How To Add Big Social Bookmarking buttons below blogger post

How To Display Posts as Headlines in blogger

1.Login to blogger dashboard-->Layout > Page Elements

2.Click on 'Add a Gadget'.

3.Select 'HTML/Javascript' and add the code given below and click save.

<script style="" src="http://www.hotlinkfiles.com/files/2681944_ihtfn/RecentPostsScrollerv2.js"> </script><script style=""> var nMaxPosts = 15; var sBgColor; var nWidth; var nScrollDelay = 175; var sDirection="left"; var sOpenLinkLocation="N"; var sBulletChar="��"; </script> <script style="" src="http://YOURBLOG.blogspot.com/feeds/posts/default?alt=json-in-script&callback=RecentPostsScrollerv2"> </script>


Note : You must replace YOURBLOG with your real blog name.

You can Customize other values as your choice ;

var nMaxPosts = 15; - This code sets the number of posts in this widget.

var sBgColor; - If you want to set background color then change this code to var sBgColor= grey;

var nWidth; - Modify this code to change the width to var nWidth= 100px;

var nScrollDelay = 175; - This code is used to set the speed of scrolling. Lesser the no, higher the speed of scrolling.

var sDirection="left"; - This code sets the direction of scroll. left = Right to left; Right = Left to right; Up = Down to up; Down = Up to down

var sBulletChar="��"; - This bullet appears before each post link in this widget. You can replace this to any other bullet.

Now you are done.
READ MORE - How To Display Posts as Headlines in blogger

How To Show HTML/CSS Codes On Coloured Background In Blogger Posts

1.Login to your dashboard--> layout- -> Edit HTML

2.Scroll down to where you see ]]></b:skin> tag.

3.Now copy below code and paste it before ]]></b:skin> tag.

.csscode {
margin : 10px 10px 10px 10px;
padding : 5px;
clear : both;
list-style-type : none;
background : #F9F7E8;;
border-top : 2px solid #000000;
border-right : 2px solid #000000;
border-bottom : 2px solid #000000;
border-left : 2px solid #000000;
}


Look at the example below.

.csscode {
margin : 10px 10px 10px 10px;
padding : 5px;
clear : both;
list-style-type : none;
background : #F9F7E8;;
border-top : 2px solid #000000;
border-right : 2px solid #000000;
border-bottom : 2px solid #000000;
border-left : 2px solid #000000;
}

]]></b:skin>


4.Now save your template.

5.Now when you want to insert some codes in your posts always put it between <div class="csscode"> and </div> and publish your post.

<div class="csscode">

YOUR CODE HERE


</div>


Look at the example below.

<div class="csscode">

&lt;form action=&quot;http://www.roundpic.com&quot; method=&quot;post&quot; enctype=&quot;multipart/form-data&quot; target=&quot;blank&quot;&gt;&lt;input value=&quot;1048576&quot; name=&quot;MAX_FILE_SIZE&quot; type=&quot;hidden&quot;&gt;&lt;table&gt;&lt;tbody&gt;&lt;tr&gt;&lt;td class=&quot;title&quot;&gt;&lt;b&gt;Image:&lt;/b&gt;&lt;/td&gt;&lt;td class=&quot;input&quot;&gt;&lt;input name=&quot;file&quot; type=&quot;file&quot;&gt;&lt;/td&gt;&lt;/tr&gt;&lt;tr&gt;&lt;td class=&quot;title&quot;&gt;or &lt;b&gt;URL:&lt;/b&gt;&lt;/td&gt;&lt;td class=&quot;input&quot;&gt;&lt;input value=&quot;http://&quot; name=&quot;url&quot; type=&quot;text&quot;&gt;&lt;/td&gt;&lt;/tr&gt;&lt;tr&gt;&lt;br /&gt;&lt;td colspan=&quot;2&quot; class=&quot;submit&quot;&gt;&lt;button onclick=&quot;getLoader();&quot; type=&quot;submit&quot;&gt;Round it!&lt;/button&gt;&lt;/td&gt;&lt;/tr&gt;&lt;/tbody&gt;&lt;/table&gt;&lt;/form&gt;

</div>


It will look like this.

READ MORE - How To Show HTML/CSS Codes On Coloured Background In Blogger Posts

How To Add Java Script Browser Detector to Blogger

1.Login to blogger dashboard-->Layout > Page Elements

2.Click on 'Add a Gadget'.

3.Select 'HTML/Javascript' and add the code given below and click save.

<script type="text/javascript">
var browser=navigator.appName;
var b_version=navigator.appVersion;
var version=parseFloat(b_version);

document.write("Browser name: "+ browser);
document.write("<br />");
document.write("Browser version: "+ version);
</script>


Now you are done.
READ MORE - How To Add Java Script Browser Detector to Blogger

How To Add Round Image Corners Generator to blogger

This is a very useful and simple tool.Try it if you want to create Round Image Corners to your images.

1.Login to blogger dashboard-->Layout > Page Elements

2.Click on 'Add a Gadget'.

3.Select 'HTML/Javascript' and add the code given below and click save.

<form action="http://www.roundpic.com" method="post" enctype="multipart/form-data" target="blank"><input value="1048576" name="MAX_FILE_SIZE" type="hidden"><table><tbody><tr><td class="title"><b>Image:</b></td><td class="input"><input name="file" type="file"></td></tr><tr><td class="title">or <b>URL:</b></td><td class="input"><input value="http://" name="url" type="text"></td></tr><tr><br /><td colspan="2" class="submit"><button onclick="getLoader();" type="submit">Round it!</button></td></tr></tbody></table></form>


Now you are done.Look at the below.


Image:
or URL:


READ MORE - How To Add Round Image Corners Generator to blogger

How to Create dTree Navigation Menu

Do you want Great Navigation for your Blog? I suggest you to use this stuff! We called dTree Navigation Menu. Maybe you have ever see this Menu. That's right! Like Windows Explorer Navigation Menu. You must have to try this. Just by following these simple steps, you will have Great dTree Navigation Menu on Your Great Blog:

1. Login to your Blogger Account

2. Go to Layout tab

3. Click Edit HTML

4. Download Full Template for your Back Up

5. Copy the code below, and paste before </head> (You can find this code by Ctrl+F)


<link rel="StyleSheet" href="http://www.hotlinkfiles.com/files/2669839_ry7co/dtree.css" type="text/css" />
<script type="text/javascript" src="http://www.hotlinkfiles.com/files/2669840_otete/dtree.js"></script>


6. SAVE TEMPLATE

7. Go to Page Elements

8. Click Add a Gadget

9. Choose Add HTML/JavaScript

10. Fill the code below to the Gadget


<div class="dtree">

<p><a href="javascript: d.openAll();"><img src="http://amen24.googlepages.com/plus.gif"><b>Open all</b></a> | <a href="javascript: d.closeAll();"><img src="http://amen24.googlepages.com/minus.gif"><b>Close all</b></a></p>

<script type="text/javascript">
<!--

d = new dTree('d');

d.add(0,-1,'Home','http://bloggertrick4u.blogspot.com');


d.add(1,0,'Example 1')

d.add(3,1,'Example 1.1','');
d.add(10,3,'Example 1.1.1','http://bloggertrick4u.blogspot.com/2009/05/blogger-trick-how-to-create-blog.html');
d.add(20,3,'Example 1.1.2','http://bloggertrick4u.blogspot.com/2009/05/blogger-trick-how-to-setting-blog.html');
d.add(30,3,'Example 1.1.3','http://bloggertrick4u.blogspot.com/2009/05/blogger-trick-how-to-select-and-use.html');
d.add(40,3,'Example 1.1.4','http://bloggertrick4u.blogspot.com/2009/05/blogger-trick-how-to-setting-fonts-and.html');
d.add(50,3,'Example 1.1.5','http://bloggertrick4u.blogspot.com/2009/05/blogger-trick-how-to-post.html');
d.add(60,3,'Example 1.1....','http://bloggertrick4u.blogspot.com/2009/05/blogger-trick-how-to-upload-photos-to.html');

d.add(5,1,'Example 1.2');
d.add(10,5,'Example 1.2.1','http://bloggertrick4u.blogspot.com/2009/05/blogger-trick-how-to-post-html-codes.html');
d.add(20,5,'Example 1.2.2','http://bloggertrick4u.blogspot.com/2009/05/blogger-trick-how-to-setting-my-profile.html');
d.add(30,5,'Example 1.2.3','http://bloggertrick4u.blogspot.com/2009/05/blogger-trick-how-to-upload-photo-to.html');
d.add(40,5,'Example 1.2.4','http://bloggertrick4u.blogspot.com/2009/06/blogger-trick-bloging-tips-for-beginner.html');
d.add(50,5,'Example 1.2.5','http://bloggertrick4u.blogspot.com/2009/05/blogger-trick-how-to-create-banner.html');
d.add(60,5,'Example 1.2....','http://bloggertrick4u.blogspot.com/2009/05/blogger-trick-how-to-create-animated.html');

d.add(2,0,'Example 2','','','','http://i717.photobucket.com/albums/ww176/neorie/D-Tree/globe.gif','http://i717.photobucket.com/albums/ww176/neorie/D-Tree/globe.gif');
d.add(10,2,'Example 2.1','http://bloggertrick4u.blogspot.com','','','http://i717.photobucket.com/albums/ww176/neorie/D-Tree/user_icon.gif');
d.add(20,2,'Example 2.2','http://21hotbiker.blogspot.com','','','http://i717.photobucket.com/albums/ww176/neorie/D-Tree/user_icon.gif');

d.add(4,0,'My friendster!','http://profiles.friendster.com/rie21hotbiker','My Friendster!','','http://i717.photobucket.com/albums/ww176/neorie/D-Tree/my_friendster.gif');
d.add(6,0,'My Facebook!','http://www.facebook.com/Rie21','My Facebook!','','http://i717.photobucket.com/albums/ww176/neorie/D-Tree/my_facebook.png');


document.write(d);

//-->
</script>

</div>


11. SAVE

12. Now you can see the Result

13. But you must edit the code in the Gadget with yours


Good Luck!

READ MORE - How to Create dTree Navigation Menu

How to Add 'Print Page' option to blogger(blogSpot) blogs

1.Login to your dashboard--> layout- -> Edit HTML

2.Click on "Expand Widget Templates"

3.Scroll down to where you see </head> tag.

4.Now copy below code and paste it before </head> tag.

<style type="text/css" media="print">
#noprint {display: none;}
// Hide unwanted elements
body {background:fff; color:000;}
// Black text on White background
a {text-decoration: underline; color:00f;}
//Underline Hyperlinks in blue
}
</style>

5.Now again scroll down to where you see this :

<p><data:post.body/></p>

6.Now copy below code and paste it after <p><data:post.body/></p> .

<a href="javascript:window.print()">Print Page</a>

7.Now save your template and you are done.
READ MORE - How to Add 'Print Page' option to blogger(blogSpot) blogs

How To Add Hover Menu Style Feature to Blogger Links

1.Login to your blogger dashboard.

2.Go to Layout- -> Edit HTML

3.Scroll down to where you see <head> tag :

4.Now add below code immediately after <head> tag .

<script src="http://meblogger.bravehost.com/extras/mootools.js" type="text/javascript"></script>
<script src="http://meblogger.bravehost.com/extras/mooefx.js" type="text/javascript"></script>


5.Now save your template and you are done.Refresh your site to see effect.
READ MORE - How To Add Hover Menu Style Feature to Blogger Links

How To Add Convert Text into mp3 Widget to blogger

1.Login to your dashboard--> layout- -> Edit HTML

2.Click on "Expand Widget Templates"

3.Scroll down to where you see this :

<p><data:post.body/></p>


4.Copy below code and paste it after <p><data:post.body/></p> .

<div id='voice'>
<script src='http://vozme.com/get_text.js' type='text/javascript'/> <a expr:onclick='"get_blogger(\"" + data:post.id + "\",\"en\",\"ml\");"' href='javascript:void(0);'><img src='http://vozme.com/img/paper_sound32x32.gif' align='left' alt='' border='0' style='margin-right:0.4em;'/></a>
<a expr:onclick='"get_blogger(\"" + data:post.id + "\",\"en\",\"ml\");"' href='javascript:void(0);' style='font-size:10px;'>Hear<br/>this post</a>
</div>


5.Now save your template and you are done.It will look like this.

READ MORE - How To Add Convert Text into mp3 Widget to blogger

How To Embed a PHP File into Blogger

If you want to embed a php file into your blog use below code.

<object width="400" height="300" type="text/html" data="URL.php"></object>


Note : Remember to replace 'URL.php' with your php file url.

You can change 'width' and 'height' as your choice.

Look at the example below.

CODE :

<object width="400" height="300" type="text/html" data="http://tools.bloggerplugins.org/parser.php"></object>


RESULTS :

READ MORE - How To Embed a PHP File into Blogger

How To Set Links of a Linklist widget Open in a New Window

1.Login to your dashboard--> layout- -> Edit HTML

2.Click on "Expand Widget Templates"

3.Scroll down to till you see your Link list code :

(Note : You may also can find it by searching <b:widget id='LinkList )

Look at the example below.

<b:widget id='LinkList12' locked='false' title='Recomended Links' type='LinkList'>
<b:includable id='main'>

<b:if cond='data:title'><h2><data:title/></h2></b:if>
<div class='widget-content'>
<ul>
<b:loop values='data:links' var='link'>
<li><a expr:href='data:link.target' target='_blank'><data:link.name/></a></li>
</b:loop>
</ul>
<b:include name='quickedit'/>
</div>
</b:includable>
</b:widget>


Now put blue colored code ( target='_blank' ) as the example below into your Link list code.

<b:widget id='LinkList12' locked='false' title='Recomended Links' type='LinkList'>
<b:includable id='main'>

<b:if cond='data:title'><h2><data:title/></h2></b:if>
<div class='widget-content'>
<ul>
<b:loop values='data:links' var='link'>
<li><a expr:href='data:link.target' target='_blank'><data:link.name/></a></li>
</b:loop>
</ul>
<b:include name='quickedit'/>
</div>
</b:includable>
</b:widget>


Important : You must include the space before target='_blank' as the example above.

Now save your template and you are done.
READ MORE - How To Set Links of a Linklist widget Open in a New Window

How to Post HTML,CSS,JavaScript,... Codes As Plain Text In Blogger

1.First install Greasemonkey script for your Firefox browser.


2.Now click here to install 'Blogger - HTML encode on post edit' to blogger.


This adds a new button at the bottom of your new post area.It encodes the selected text so it can be posted as plain text in Blogger.It will look like this.


When you want to encode some code select it and cick on 'HTML ENCODE SELECTION' button.


Your code will look like this after being encoded:


Now publish your post and see the result.
READ MORE - How to Post HTML,CSS,JavaScript,... Codes As Plain Text In Blogger

How To Change the colour of Scrollbars in Blogger

1.Login to your dashboard--> layout- -> Edit HTML

2.Scroll down to where you see </head> tag.

3.Now copy below code and paste it just before </head> tag.

<style type="text/css">
html {
scrollbar-arrow-color:#6E0502;
scrollbar-track-color:#940400;
scrollbar-face-color:#6BE02;
scrollbar-highlight-color:#909400;
scrollbar-3dlight-color:#333333;
scrollbar-darkshadow-color:#473624;
scrollbar-shadow-color:#BFB186;
}
</style>


Note : You can change colours of above code as your choice.

4.Now save your template and your done.

Important: This changes works best in Internet Explorer browser only, for other browser it may or may not work.
READ MORE - How To Change the colour of Scrollbars in Blogger

How To Add picture Links in Blogger posts

Upload an image to blogger and you'll see some code like this:


<a onblur="try {parent.deselectBloggerImageGracefully();} catch(e) {}" href="https://blogger.googleusercontent.com/img/b/R29vZ2xl/AVvXsEhVoCMcRPbVW5NMe2vZgxJutMnETAvQ3cULrKHgBlipaWTnZZ7vSgKH-UIKySWDEEcn1fPt9AB3JYEymR-NkPFHQCOw0UeiVa5PDQyg27FmeZ1lH_0H3lAS5iSZ19sZKc66KXZgCkk2v90/s1600-h/word33.png"><img style="cursor:pointer; cursor:hand;width: 400px; height: 90px;" src="https://blogger.googleusercontent.com/img/b/R29vZ2xl/AVvXsEhVoCMcRPbVW5NMe2vZgxJutMnETAvQ3cULrKHgBlipaWTnZZ7vSgKH-UIKySWDEEcn1fPt9AB3JYEymR-NkPFHQCOw0UeiVa5PDQyg27FmeZ1lH_0H3lAS5iSZ19sZKc66KXZgCkk2v90/s400/word33.png" border="0" alt=""id="BLOGGER_PHOTO_ID_5354519305007574418" /></a>


Now replace the red colored URL with the URL of your link and your image will be linked to that URL.Now publish your post.You are done.Look at the example below.I linked the image to my twitter account.

<a onblur="try {parent.deselectBloggerImageGracefully();} catch(e) {}" href="http://twitter.com/keerthiset2"><img style="cursor: pointer; width: 400px; height: 90px;" src="https://blogger.googleusercontent.com/img/b/R29vZ2xl/AVvXsEhVoCMcRPbVW5NMe2vZgxJutMnETAvQ3cULrKHgBlipaWTnZZ7vSgKH-UIKySWDEEcn1fPt9AB3JYEymR-NkPFHQCOw0UeiVa5PDQyg27FmeZ1lH_0H3lAS5iSZ19sZKc66KXZgCkk2v90/s400/word33.png" alt="" id="BLOGGER_PHOTO_ID_5354519305007574418" border="0" /></a>


READ MORE - How To Add picture Links in Blogger posts

Blogger Trick: Set the Blog Width

Many of the good templates in the internet ready for your blog. But for some people feel this is not special. Special is that we create and modified by your own. Results will also be very satisfying because we get a template like what we want. Where to begin? I suggest to you to begin to set the blog width of the view that its header wrapper, outer wrapper, main wrapper, sidebar wrapper and footer. Not too difficult to do it. With little change to the code number, you have to do it successfully. You ready to get started now? Please follow a few steps below:

Note: This example is using Minima Default template by Blogger


1. Login to your Blogger Account


2. Go to Layout Tab


3. Click Edit Html


4. Download Full Template! Important to back up your data.


5. To set Width of Header, find this code:

#header-wrapper {

width:660px;

margin:0 auto 10px;

border:1px solid $bordercolor;

}

Change the red with your want. Example:

#header-wrapper {

width:990px;

margin:0 auto 10px;

border:1px solid $bordercolor;

}


6. To set Width of Outer, find this code:

#outer-wrapper {

width: 660px;

margin:0 auto;

padding:10px;

text-align:$startSide;

font: $bodyfont;

}

Change the red with your want. Example:

#outer-wrapper {

width: 990px;

margin:0 auto;

padding:10px;

text-align:$startSide;

font: $bodyfont;

}


7. To set Width of Main, find this code:

#main-wrapper {

width: 410px;

float: $startSide;

word-wrap: break-word; /* fix for long text breaking sidebar float in IE */

overflow: hidden; /* fix for long non-text content breaking IE sidebar float */

}

Change the red with your want. Example:

#main-wrapper {

width: 650px;

float: $startSide;

word-wrap: break-word; /* fix for long text breaking sidebar float in IE */

overflow: hidden; /* fix for long non-text content breaking IE sidebar float */

}


8. To set Width of Sidebar, find this code:

#sidebar-wrapper {

width: 220px;

float: $endSide;

word-wrap: break-word; /* fix for long text breaking sidebar float in IE */

overflow: hidden; /* fix for long non-text content breaking IE sidebar float */

}

Change the red with your want. Example:

#sidebar-wrapper {

width: 300px;

float: $endSide;

word-wrap: break-word; /* fix for long text breaking sidebar float in IE */

overflow: hidden; /* fix for long non-text content breaking IE sidebar float */

}


8. To set Width of Footer, find this code:

#footer {

width:660px;

clear:both;

margin:0 auto;

padding-top:15px;

line-height: 1.6em;

text-transform:uppercase;

letter-spacing:.1em;

text-align: center;

}

Change the red with your want. Example:

#footer {

width:990px;

clear:both;

margin:0 auto;

padding-top:15px;

line-height: 1.6em;

text-transform:uppercase;

letter-spacing:.1em;

text-align: center;

}


9. Click PREVIEW


10. If you want to set again, don't click SAVE TEMPLATE!


11. If you have done, click SAVE TEMPLATE


12. If you want to back to your last template, just upload back up template that your download with Download Full Template.


Next post I will tell you about next trick to modified your blog template to be great! Good Luck!

READ MORE - Blogger Trick: Set the Blog Width

How To Split Blogger Header into 3 Sections

1.Log in to your dashboard--> layout- -> Edit HTML

2.Don't click on "Expand Widget Templates"

3.Scroll down to where you see like this code:

#header {
margin: 5px;
border: 1px solid $bordercolor;
text-align: center;
color:$pagetitlecolor;
}


4.Now replace above code with below code :

#header {
float:left;
width:30%;
height:200px;
margin: 0px;
border: 0px solid $bordercolor;
text-align: center;
color:$pagetitlecolor;
}

#header2{float:left; width:30%; height:200px}

#header3{float:left; width:39%; height:200px}


Look at the picture below.


Note : If you like you can change width,height,... as your choice.

5.Now again scroll down to where you see like this code:

<div id='header-wrapper'>
<b:section class='header' id='header' maxwidgets='1' showaddelement='no'>
<b:widget id='Header1' locked='true' title='YOUR-BLOG-TITLE (Header)' type='Header'/>
</b:section>
</div>


Remember that YOUR-BLOG-TITLE is your real blog title.Look at the example below.

6.Now replace this code with below code :


<div id='header-wrapper'>
<b:section class='header' id='header' maxwidgets='1' showaddelement='no'>
<b:widget id='Header1' locked='true' title='YOUR-BLOG-TITLE (Header)' type='Header'/>
</b:section>

<b:section class='header' id='header2' maxwidgets='4' showaddelement='yes'/>
<b:section class='header' id='header3' maxwidgets='4' showaddelement='yes'/>
<div style='clear:both;'/>
</div><!-- end header-wrapper -->


Look at the example below.


7.Now save your template and your done.It will look like this.

READ MORE - How To Split Blogger Header into 3 Sections
 

Support By Blogger