How To Add Blogger Calendar Archive to Blogger

1.Log in to your dashboard--> layout- -> Edit HTML

2.Scroll down to where you see </head> tag.

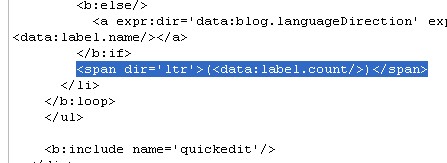
3.Now copy below code and paste it just before </head> tag.

<script type="text/javascript" src="http://yui.yahooapis.com/2.2.0/build/yahoo-dom-event/yahoo-dom-event.js"></script>
<script type="text/javascript" src="http://yui.yahooapis.com/2.2.0/build/calendar/calendar-min.js"></script>
<link rel="stylesheet" type="text/css" href="http://yui.yahooapis.com/2.2.0/build/calendar/assets/calendar.css"/>


<script type="text/javascript">
//<![CDATA[
/*
Created by: PurpleMoggy
http://purplemoggy.blogspot.com
*/

var _yourBlogUrl = "http://YOURBLOG.blogspot.com"; //edit this
var _yourBlogTimeZone = "-08:00"; //edit this

_yourBlogTimeZone = encodeURIComponent(_yourBlogTimeZone);

var _dayTitles = new Array("","","","","","","","","","","","","","","","","","","","","","","","","","","","","","","");

YAHOO.namespace("example.calendar");

function cal1Init() {
YAHOO.example.calendar.cal1 = new YAHOO.widget.Calendar("cal1","cal1Container");
YAHOO.example.calendar.cal1.addMonthRenderer(1, YAHOO.example.calendar.cal1.renderBodyCellRestricted);
YAHOO.example.calendar.cal1.addMonthRenderer(2, YAHOO.example.calendar.cal1.renderBodyCellRestricted);
YAHOO.example.calendar.cal1.addMonthRenderer(3, YAHOO.example.calendar.cal1.renderBodyCellRestricted);
YAHOO.example.calendar.cal1.addMonthRenderer(4, YAHOO.example.calendar.cal1.renderBodyCellRestricted);
YAHOO.example.calendar.cal1.addMonthRenderer(5, YAHOO.example.calendar.cal1.renderBodyCellRestricted);
YAHOO.example.calendar.cal1.addMonthRenderer(6, YAHOO.example.calendar.cal1.renderBodyCellRestricted);
YAHOO.example.calendar.cal1.addMonthRenderer(7, YAHOO.example.calendar.cal1.renderBodyCellRestricted);
YAHOO.example.calendar.cal1.addMonthRenderer(8, YAHOO.example.calendar.cal1.renderBodyCellRestricted);
YAHOO.example.calendar.cal1.addMonthRenderer(9, YAHOO.example.calendar.cal1.renderBodyCellRestricted);
YAHOO.example.calendar.cal1.addMonthRenderer(10, YAHOO.example.calendar.cal1.renderBodyCellRestricted);
YAHOO.example.calendar.cal1.addMonthRenderer(11, YAHOO.example.calendar.cal1.renderBodyCellRestricted);
YAHOO.example.calendar.cal1.addMonthRenderer(12, YAHOO.example.calendar.cal1.renderBodyCellRestricted);
YAHOO.example.calendar.cal1.selectEvent.subscribe(mySelectHandler, YAHOO.example.calendar.cal1, true);
YAHOO.example.calendar.cal1.changePageEvent.subscribe(myChangePageHandler, YAHOO.example.calendar.cal1, true);
YAHOO.example.calendar.cal1.renderEvent.subscribe(syncMonthYear);
YAHOO.example.calendar.cal1.render();
myChangePageHandler();
};


var myChangePageHandler = function(type,args,obj) {
var month = YAHOO.example.calendar.cal1.cfg.getProperty("pagedate").getMonth() + 1;
if (month.toString().length == 1) {
month = "0" + month;
}
var year = YAHOO.example.calendar.cal1.cfg.getProperty("pagedate").getFullYear();

document.getElementById("cal1Titles").innerHTML = "";
_dayTitles = new Array("","","","","","","","","","","","","","","","","","","","","","","","","","","","","","","");

checkPostsForMonth(month, year);
};

function checkPostsForMonth(month,year) {
document.getElementById("cal1loadimg").style.display = "block";

var script = document.createElement("script");
script.setAttribute("type", "text/javascript");
var theUrl = _yourBlogUrl +"/feeds/posts/summary?alt=json-in-script&callback=checkPostsCallback&published-min=" + year + "-" + month + "-01T00%3A00%3A00" + _yourBlogTimeZone + "&published-max=" + year + "-" + month + "-31T23%3A59%3A59" + _yourBlogTimeZone + "&max-results=100";
script.setAttribute("src", theUrl);
document.documentElement.firstChild.appendChild(script);
};

function checkPostsCallback(json) {

if (json.feed.entry) {
for(i = 0; i < json.feed.entry.length; i++) {
var month = json.feed.entry[i].published.$t.substr(5,2);
var year = json.feed.entry[i].published.$t.substr(0,4);
var day = json.feed.entry[i].published.$t.substr(8,2);
var date = month + "/" + day + "/" + year;
var href = json.feed.entry[i].link[0].href;
var title = json.feed.entry[i].title.$t;

if (day.substr(0,1) == "0") {
day = day.substr(1);
}

document.getElementById("cal1Titles").innerHTML += "<li><a href='" + href + "'>" + title + "</a>";
_dayTitles[day] += "<li><a href='" + href + "'>" + title + "</a>";

YAHOO.example.calendar.cal1.addRenderer(date, myCustomRenderer);

}
YAHOO.example.calendar.cal1.render();
}

document.getElementById("cal1loadimg").style.display = "none";

};


function showDayTitles(day) {
document.getElementById("cal1Titles").innerHTML = _dayTitles[day];
}


var myCustomRenderer = function(workingDate, cell) {

var day = workingDate.toString().substr(8,2);
if (day.substr(0,1) == "0") {
day = day.substr(1);
}


cell.innerHTML = '<div onmouseover="showDayTitles(' + day + ');"><a href="javascript:void(null);" >' + YAHOO.example.calendar.cal1.buildDayLabel(workingDate) + "</a></div>";
YAHOO.util.Dom.addClass(cell, YAHOO.example.calendar.cal1.Style.CSS_CELL_SELECTABLE);
YAHOO.util.Dom.addClass(cell, YAHOO.example.calendar.cal1.Style.CSS_CELL_HIGHLIGHT1);
return YAHOO.widget.Calendar.STOP_RENDER;


}

var mySelectHandler = function(type,args,obj) {
var dates = args[0];
var date = dates[0];
var year = date[0];
var month = date[1];
if (month.toString().length == 1) {
month = "0" + month;
}
var day = date[2];

var element = YAHOO.util.Dom.getElementsByClassName("d" + day, "td", "cal1Container")[0];

if (day.toString().length == 1) {
day = "0" + day;
}

if (element.className.indexOf("highlight1") != -1) {
window.location = _yourBlogUrl + "/search?updated-min=" + year + "-" + month + "-" + day + "T00%3A00%3A00" + _yourBlogTimeZone + "&updated-max=" + year + "-" + month + "-" + day + "T23%3A59%3A59" + _yourBlogTimeZone;
}

};

var changeDate = function() {
YAHOO.example.calendar.cal1.setMonth(parseInt(YAHOO.util.Dom.get("cal1monthselect").value));
YAHOO.example.calendar.cal1.setYear(parseInt(YAHOO.util.Dom.get("cal1yearselect").value));
YAHOO.example.calendar.cal1.render();
myChangePageHandler();
}

var syncMonthYear = function(type) {
YAHOO.util.Dom.get("cal1monthselect").value = parseInt(YAHOO.example.calendar.cal1.cfg.getProperty("pagedate").getMonth());

var fullYear = parseInt(YAHOO.example.calendar.cal1.cfg.getProperty("pagedate").getFullYear());

var isYearFound = false;
var i = 0;
while(i < document.getElementById("cal1yearselect").options.length && !isYearFound) {
if (document.getElementById("cal1yearselect").options[i].value == fullYear) {
isYearFound = true;
}
i++;
}
if (!isYearFound) {
var option = document.createElement("option");
option.setAttribute("value", fullYear);
var text = document.createTextNode(fullYear);
option.appendChild(text);
document.getElementById("cal1yearselect").appendChild(option);
}

YAHOO.util.Dom.get("cal1yearselect").value = fullYear;
};

YAHOO.util.Event.addListener(window, "load", cal1Init);
YAHOO.util.Event.addListener("cal1dateselect", "click", changeDate);
//]]>
</script>


Important : You must need to edit the following 2 variables of above code.

(1)var _yourBlogUrl = "http://YOURBLOG.blogspot.com";

Remember to replace YOURBLOG with your real blog name.

(2)var _yourBlogTimeZone = "-08:00";

Remember to replace -08:00 with the timezone offset that your blog is set to.
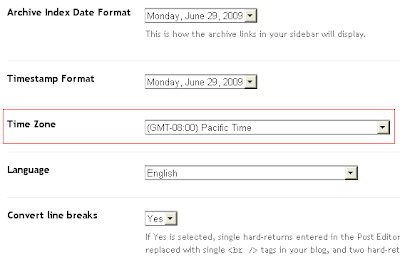
(For this go to Dashboard-->Settings-->Formatting and select 'Time Zone')


4.Now save your template.

5.Go to Layout > Page Elements

6.Click on 'Add a Gadget'

7.Select 'HTML/Javascript' and add the code given below and click save.

<div id="cal1wrapper">

<div id="cal1select">

<select name="cal1monthselect" id="cal1monthselect">
<option value="0">January</option>
<option value="1">February</option>
<option value="2">March</option>
<option value="3">April</option>
<option value="4">May</option>
<option value="5">June</option>
<option value="6">July</option>
<option value="7">August</option>
<option value="8">September</option>
<option value="9">October</option>
<option value="10">November</option>
<option value="11">December</option>
</select>
<select name="cal1yearselect" id="cal1yearselect">
<option value="1995">1995</option>
<option value="1996">1996</option>
<option value="1997">1997</option>
<option value="1998">1998</option>
<option value="1999">1999</option>
<option value="2000">2000</option>
<option value="2001">2001</option>
<option value="2002">2002</option>
<option value="2003">2003</option>
<option value="2004">2004</option>
<option value="2005">2005</option>
<option value="2006">2006</option>
<option value="2007">2007</option>
<option value="2008">2008</option>
<option value="2009">2009</option>
<option value="2010">2010</option>
<option value="2011">2011</option>
<option value="2012">2012</option>
<option value="2013">2013</option>
<option value="2014">2014</option>
<option value="2015">2015</option>
<option value="2016">2016</option>
<option value="2017">2017</option>
<option value="2018">2018</option>
<option value="2019">2019</option>
</select>
<input type="button" value="-->" id="cal1dateselect"/>

</div>

<div id="cal1Container"><img src="http://img239.imageshack.us/img239/9057/40lf8.gif" style="vertical-align:middle;"/> Loading...</div>
<div style="clear:both;"></div>

<div id="calbackloadimg">
<pre id="cal1loadimg" style="display:none;"><img src="http://img239.imageshack.us/img239/9057/40lf8.gif" style="vertical-align:middle;"/> Loading...</pre>
<pre id="cal1Titles"></pre>
</div>

</div>


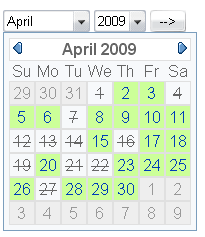
Now you are done.It will look like this.


Credit to purplemoggy
READ MORE - How To Add Blogger Calendar Archive to Blogger

Replace "Subscribe to: Posts (Atom)" With "Subscribe to: Posts (RSS)"

1.Log in to your dashboard--> layout- -> Edit HTML

2.Click on "Expand Widget Templates"

3.Scroll down to where you see this:

<b:includable id='feedLinksBody' var='links'>
<div class='feed-links'>
<data:feedLinksMsg/>
<b:loop values='data:links' var='f'>
<a class='feed-link' expr:href='data:f.url' expr:type='data:f.mimeType' target='_blank'><data:f.name/> (<data:f.feedType/>)</a>
</b:loop>
</div>
</b:includable>


4.Replace above with below code.

<b:includable id='feedLinksBody' var='links'>
<div class='feed-links'>
<data:feedLinksMsg/>
<b:loop values='data:links' var='f'>
<a class='feed-link' expr:href='data:f.url + "?alt=rss"' type='application/rss+xml' target='_blank'><data:f.name/> (RSS)</a>
</b:loop>
</div>
</b:includable>


5.Now save your template and your done.
READ MORE - Replace "Subscribe to: Posts (Atom)" With "Subscribe to: Posts (RSS)"

Blogger Trick: Install Date Properties

Date is one of many important information that we can give to visitors. Visitors will more like your blog. Not too much intro for this trick. If you want to Install Date Properties on your blog, go to Free Blog Content right now. And follow these steps:

1. In the Free Blog Content, choose your style.

2. In the below style you choose, save that code.

3. Login to your Blogger Account.

4. Go to Layout tab.

5. In the Page Elements, click Add a Gadget.

6. Choose Add a Html/JavaScript.

7. Paste that code on this form.

8. Click SAVE.

9. See your result.

10. Good Luck and see you in the next post.

READ MORE - Blogger Trick: Install Date Properties

How To Add 'TwitThis' Button to Below your Each Blogger Post

1.Log in to your dashboard--> layout- -> Edit HTML

2.Click on "Expand Widget Templates"

3.Scroll down to where you see this:

<p><data:post.body/></p>


4.Now copy below code and convert it using ad parser.

<!-- Begin TwitThis (http://twitthis.com/) -->
<script type="text/javascript" src="http://ajax.twitthis.com/chuug.twitthis.scripts/twitthis.js"></script>
<script type="text/javascript">
<!--
document.write('<a href="javascript:;" onclick="TwitThis.pop();"><img src="http://ajax.twitthis.com/chuug.twitthis.resources/twitthis_grey_72x22.gif" alt="TwitThis" style="border:none;" /></a>');
//-->
</script>
<!-- /End -->


Your parsed code will look like this.


5.Now copy your parsed code just after <p><data:post.body/></p> tag.

6.Now save your template and you are done.Look at the picture below.

READ MORE - How To Add 'TwitThis' Button to Below your Each Blogger Post

How To Add Multi Search Widget to Blogger

1.Log in to your dashboard--> layout- -> Edit HTML

2.Scroll down to where you see this:

]]></b:skin>


3.Now add below code just above ]]></b:skin> tag.

/** css for the search box */
div#pm-search ul { /* unordered list */
margin-top: 0;
margin-right: 0;
margin-left: 0px;
margin-bottom: 5px;
padding: 0;
}
div#pm-search li { /* each list element */
list-style-type: none; /* don't edit this */
display: inline; /* don't edit this */
cursor: pointer; /* don't edit this */
margin-top: 0;
margin-bottom: 0;
margin-right: 5px;
margin-left: 0px;
text-indent: 0px;
padding: 0;
}
div#pm-search form { /* the search form */
margin: 0;
padding: 0;
}
div#pm-search-h {
display: block; /* don't edit this */
}
div#pm-search-g,
div#pm-search-b,
div#pm-search-t {
display: none; /* don't edit this */
}
div#pm-search input { /* the textbox and submit button */
background-color: transparent;
border: 1px dotted #999;
color: #999;
}
.pm-search-selected { /* which search service is currently selected */
color: #999;
border-bottom: 1px dotted #999;
}
.pm-search-unselected { /* which search services are not selected */
color: #777;
border-bottom: 1px dotted #777;
}


4.Now again Scroll down to where you see this:

</head>


5.Now add below code just above </head> tag .

6.Now save your template.

7.Go to Layout > Page Elements

8.Click on 'Add a Gadget' on the sidebar.

9.Select 'HTML/Javascript' and add the code given below and click save.

<div id="pm-search">
<ul>
<li id="li-h" class="pm-search-selected" onclick="selectH()">here</li><li id="li-g" class="pm-search-unselected" onclick="selectG()">google</li><li id="li-b" class="pm-search-unselected" onclick="selectB()">blogger</li><li id="li-t" class="pm-search-unselected" onclick="selectT()">technorati</li>
</ul>
<div id="pm-search-h">
<form action="http://YOURBLOG.blogspot.com/search" method="get">
<input id="pm-f-h" value="" name="q" size="15" type="text"/>
<input value="Search" type="submit"/>
</form>
</div>
<div id="pm-search-g">
<form action="http://blogsearch.google.com/blogsearch" method="get">
<input id="pm-f-g" value="" name="as_q" size="15" type="text"/>
<input value="Search" type="submit"/>
<input value="YOURBLOG.blogspot.com" name="bl_url" type="hidden"/>
</form>
</div>
<div id="pm-search-b">
<form action="http://search.blogger.com/" method="get">
<input id="pm-f-b" value="" name="as_q" size="15" type="text"/>
<input value="Search" type="submit"/>
<input value="YOURBLOG.blogspot.com" name="bl_url" type="hidden"/>
</form>
</div>
<div id="pm-search-t">
<form action="http://www.technorati.com/search.php" method="post">
<input id="pm-f-t" maxlength="255" name="s" size="15" type="text"/>
<input value="Search" type="submit"/>
<input value="searchlet" name="sub" type="hidden"/>
<input value="YOURBLOG.blogspot.com" name="from" type="hidden"/>
<input value="n" name="authority" type="hidden"/>
<input value="n" name="language" type="hidden"/>
</form>
</div>
</div>


Note : Remember to replace YOURBLOG with your real blog name.

It will look like this.


Source
READ MORE - How To Add Multi Search Widget to Blogger

How To Add 728x90 leaderboard Adsense ads between Header and Post Section in blogger

1.Log in to your dashboard--> layout- -> Edit HTML

2.Click on "Expand Widget Templates"

3.Scroll down to where you see this:

<b:section class='crosscol' id='crosscol' showaddelement='no'/>


4.Now replace above code with below code.

<b:section class='crosscol' id='crosscol' showaddelement='yes'/>


5.Now save your template.

6.Go to Layout > Page Elements

7.Now Click on new 'Add a Gadget' option that will now have appeared between Blog Posts and the Header.


8.Select 'HTML/Javascript' and add your 728x90 leaderboard Adsesne code and click save.

Now you are done.
READ MORE - How To Add 728x90 leaderboard Adsense ads between Header and Post Section in blogger

Instant Submit Blog to Search Engine

Want to have a famous blog? Submit your blog to Search Engine! Have no time for submit one by one? Use Instant Submit Blog to Search Engine. You just need to fill your Blog URL and your Email. If you want to submit with instant, you can do this way. Here the list:

1. Free Web Submission

2. Submit Express

3. Coming Soon

Note: this list always update when I find another Instant Submit to Search Engine Service.

READ MORE - Instant Submit Blog to Search Engine

How To Add Language Translate Drop Down Menu to blogger

1.Log in to your dashboard--> layout- ->Page Elements

2.Click on 'Add a Gadget' on the sidebar.

3.Select 'HTML/Javascript' and add the code given below and click save.

<form name="google_tr">
<select class="dropdown" name="example" size="1" onChange="location=this.options[this.selectedIndex].value+'&amp;u='+location.href"><option value="" selected>Select a language:</option><option value="http://www.google.com/translate_c?langpair=en|es">Espa&#241;ol</option><option value="http://www.google.com/translate_c?langpair=en|de">Deutsche</option><option value="http://www.google.com/translate_c?langpair=en|fr">Fran&#231;ais</option><option value="http://www.google.com/translate_c?langpair=en|it">Italiano</option><option value="http://www.google.com/translate_c?langpair=en|pt">Portugu&#234;s</option><option value="http://www.google.com/translate_c?langpair=en|ar">Arabic</option><option value="http://www.google.com/translate_c?langpair=en|zh-CN">Chinese</option><option value="http://www.google.com/translate_c?langpair=en|ja">Japanese</option><option value="http://www.google.com/translate_c?langpair=en|ko">Korean</option><option value="http://www.google.com/translate_c?langpair=en|ru">Russian</option></select></form>


Now you are done.Look at the picture below.

READ MORE - How To Add Language Translate Drop Down Menu to blogger

How To Add Subscribe Feed... Drop Down Menu to blogger

1.Log in to your dashboard--> layout- ->Page Elements

2.Click on 'Add a Gadget' on the sidebar.

3.Select 'HTML/Javascript' and add the code given below and click save.

<form><select class="dropdown"
onchange="location = this.options[this.selectedIndex].value;">
<option value="" selected>Subscribe feed..</option>
<option
value="http://fusion.google.com/add?feedurl=YOUR-FEEDBURNER-URL">&nbsp;&nbsp;in Google Reader</option>
<option value="http://add.my.yahoo.com/rss?url=YOUR-FEEDBURNER-URL">&nbsp;&nbsp;in
My Yahoo!</option>
<option value="http://feeds.my.aol.com/add.jsp?url=YOUR-FEEDBURNER-URL">&nbsp;&nbsp;in
My AOL</option>
<option
value="http://www.bloglines.com/sub/YOUR-FEEDBURNER-URL">&nbsp;&nbsp;in
Bloglines</option>
<option
value="http://www.netvibes.com/subscribe.php?url=YOUR-FEEDBURNER-URL">&nbsp;&nbsp;in
Netvibes</option>
<option
value="http://www.newsgator.com/ngs/subscriber/subext.aspx?url=YOUR-FEEDBURNER-URL">&nbsp;&nbsp;in
NewsGator</option>
<option
value="http://www.addthis.com/feed.php?pub=YOUR-FEEDBURNER-ID&h1=http%3A%2F%2Ffeeds2.feedburner.com%2FYOUR-FEEDBURNER-ID&t1=">&nbsp;&nbsp;..more Options</option>
</select></form>


Note :
Remember to replace YOUR-FEEDBURNER-URL and YOUR-FEEDBURNER-ID with your real details.

Look at the example below.

<form><select class="dropdown"
onchange="location = this.options[this.selectedIndex].value;">
<option value="" selected>Subscribe feed..</option>
<option
value="http://fusion.google.com/add?feedurl=http://feeds2.feedburner.com/blogspot/WyNa">&nbsp;&nbsp;in Google Reader</option>
<option value="http://add.my.yahoo.com/rss?url=http://feeds2.feedburner.com/blogspot/WyNa">&nbsp;&nbsp;in
My Yahoo!</option>
<option value="http://feeds.my.aol.com/add.jsp?url=http://feeds2.feedburner.com/blogspot/WyNa">&nbsp;&nbsp;in
My AOL</option>
<option
value="http://www.bloglines.com/sub/http://feeds2.feedburner.com/blogspot/WyNa">&nbsp;&nbsp;in
Bloglines</option>
<option
value="http://www.netvibes.com/subscribe.php?url=http://feeds2.feedburner.com/blogspot/WyNa">&nbsp;&nbsp;in
Netvibes</option>
<option
value="http://www.newsgator.com/ngs/subscriber/subext.aspx?url=http://feeds2.feedburner.com/blogspot/WyNa">&nbsp;&nbsp;in
NewsGator</option>
<option
value="http://www.addthis.com/feed.php?pub=blogspot/WyNa&h1=http%3A%2F%2Ffeeds2.feedburner.com%2Fblogspot/WyNa&t1=">&nbsp;&nbsp;..more Options</option>
</select></form>


Now you are done.Look at the picture below.

READ MORE - How To Add Subscribe Feed... Drop Down Menu to blogger

How To Use Adsense Section Targeting on Blogger

What is Google Adsense Section targeting? Here is the official information on Adsense Help Center:

  • Section targeting allows you to suggest sections of your text and HTML content that you'd like us to emphasize or downplay when matching ads to your site's content. By providing us with your suggestions, you can assist us in improving your ad targeting. We recommend that only those familiar with HTML attempt to implement section targeting.
  • To implement section targeting, you'll need to add a set of special HTML comment tags to your code. These tags will mark the beginning and end of whichever section(s) you'd like to emphasize or de-emphasize for ad targeting.
  • The HTML tags to emphasize a page section take the following format:
<!-- google_ad_section_start -->

YOUR PAGE CONTENT

<!-- google_ad_section_end -->


Now, how can you implement Adsense Section Targeting on New Blogger? If you want to get relevant ads, applying Adsense Section Targeting to your blog use above the code before and after post titles and post content.

Follow these steps to do it.

1.Log in to your dashboard--> layout- -> Edit HTML

2.Click on "Expand Widget Templates"

3.Scroll down to where you see this:

<b:includable id='post' var='post'>
<div class='post uncustomized-post-template'>
<a expr:name='data:post.id'/>
<b:if cond='data:post.title'>
<h3 class='post-title'>
<b:if cond='data:post.link'>
<a expr:href='data:post.link'><data:post.title/></a>
<b:else/>
<b:if cond='data:post.url'>
<a expr:href='data:post.url'><data:post.title/></a>
<b:else/>
<data:post.title/>
</b:if>
</b:if>
</h3>
</b:if>


4.Now replace above code with below code.

<b:includable id='post' var='post'>
<div class='post uncustomized-post-template'>
<a expr:name='data:post.id'/>
<b:if cond='data:post.title'>
<h3 class='post-title'>
<b:if cond='data:post.link'>
<a expr:href='data:post.link'><!-- google_ad_section_start --><data:post.title/><!-- google_ad_section_end --></a>
<b:else/>
<b:if cond='data:post.url'>
<a expr:href='data:post.url'><!-- google_ad_section_start --><data:post.title/><!-- google_ad_section_end --></a>
<b:else/>
<!-- google_ad_section_start --><data:post.title/><!-- google_ad_section_end -->
</b:if>
</b:if>
</h3>
</b:if>


5.Now again scroll down to where you see this:

<data:post.body/>


6.Now replace above code with below code.

<!-- google_ad_section_start --><data:post.body/><!-- google_ad_section_end -->


7.Now save your template and you are done.
READ MORE - How To Use Adsense Section Targeting on Blogger

How To Add Feed Link Button Before All Labels in Blogger

1.Log in to your dashboard--> layout- -> Edit HTML

2.Click on "Expand Widget Templates"

3.Scroll down to where you see this code:

<b:loop values='data:labels' var='label'>
<li>
<b:if cond='data:blog.url == data:label.url'>
<span expr:dir='data:blog.languageDirection'><data:label.name/></span>
<b:else/>
<a expr:dir='data:blog.languageDirection' expr:href='data:label.url'><data:label.name/></a>
</b:if>
<span dir='ltr'/>
</li>
</b:loop>


4.Now replace above code with below code.

<b:loop values='data:labels' var='label'>
<li>

<a expr:href='data:blog.homepageUrl + &quot;feeds/posts/default/-/&quot; + data:label.name'><img alt='Subscribe' src='http://www.feedburner.com/fb/images/pub/feed-icon16x16.png' style='vertical-align:middle;border:0'/></a>

<b:if cond='data:blog.url == data:label.url'>
<span expr:dir='data:blog.languageDirection'><data:label.name/></span>
<b:else/>
<a expr:dir='data:blog.languageDirection' expr:href='data:label.url'><data:label.name/></a>
</b:if>
<span dir='ltr'/>
</li>
</b:loop>


5.Now save your template and you are done.It will look like this.

READ MORE - How To Add Feed Link Button Before All Labels in Blogger

How To Add Horizontal LinkList in Blogger -2

This is a another different method from post How To Add Horizontal LinkList in Blogger

1.Log in to your dashboard--> layout- -> Edit HTML

2.Scroll down to where you see like this code:

<div id='header-wrapper'>
<b:section class='header' id='header' maxwidgets='1' showaddelement='no'>
<b:widget id='Header1' locked='true' title='YOUR_BLOG_TITLE (Header)' type='Header'/>
</b:section>
</div>


3.Change above code as below code.

<div id='header-wrapper'>
<b:section class='header' id='header' maxwidgets='4' showaddelement='yes'>
<b:widget id='Header1' locked='true' title='YOUR_BLOG_TITLE (Header)' type='Header'/>
</b:section>
</div>


4.Now find ]]></b:skin> tag in your template .

5.Copy below code and paste it just before ]]></b:skin> tag.

/*Credits: Dynamic Drive CSS Library */
/*URL: http://www.dynamicdrive.com/style/ */

.underlinemenu{
font-weight: bold;
width: 100%;
}

.underlinemenu ul{
padding: 6px 0 7px 0; /*6px should equal top padding of "ul li a" below, 7px should equal bottom padding + bottom border of "ul li a" below*/
margin: 0;
text-align: right; //set value to "left", "center", or "right"*/
}

.underlinemenu ul li{
display: inline;
}

.underlinemenu ul li a{
color: #494949;
padding: 6px 3px 4px 3px; /*top padding is 6px, bottom padding is 4px*/
margin-right: 20px; /*spacing between each menu link*/
text-decoration: none;
border-bottom: 3px solid gray; /*bottom border is 3px*/
}

.underlinemenu ul li a:hover, .underlinemenu ul li a.selected{
border-bottom-color: black;
}


6.Now save your template.

7.Go to layout-->Page elements and click on 'Add a Gadget' on Header Section.

8.Select 'HTML/Javascript' and add the code given below and click save.

<div class="underlinemenu">
<ul>
<li><a href="Your-Link">Link-Name</a></li>
</ul>
</div>


Note : Remember to replace Your-Link and Link-Name with your real details.

Now you are done.
READ MORE - How To Add Horizontal LinkList in Blogger -2

How To Add Horizontal LinkList in Blogger

1.Log in to your dashboard--> layout- -> Edit HTML

2.Scroll down to where you see this:

</b:skin>


3.Now copy below code and paste it just before </b:skin> tag .

/* ----- LINKBAR ----- */
#linkbar {
margin: 6px 0px 0px 0px;
padding: 0px 0px 0px 0px;
width: 100%;
position: relative;
background: #000;
border: 1px solid #000;
border-bottom: 0;
}

#linkbar ul {
margin: 0px 0px 0px 0px;
padding: 5px 5px 7px 5px;
text-align: left;
list-style-type:none;
}

#linkbar li {
display: inline;
margin: 0px 0px 0px 0px;
padding: 0px 0px 0px 0px;
}

#linkbar h2 {
margin: 0px 0px 0px 0px;
padding: 0px 0px 0px 0px;
display: none;
visibility: hidden;
}

#linkbar a {
clear: both;
margin: 0px -4px 0px 0px;
padding: 3px 20px 3px 20px;
width:100%;
text-decoration:none;
font-family: arial, sans-serif;
font-weight: bold;
font-size: 12px;
color: #fff;
border-right: 1px solid #fff;
}

#linkbar a:hover {
color: #000;
background: #fff;
}


4.Now again Scroll down to where you see like this code:

<div id='header-wrapper'>
<b:section class='header' id='header' maxwidgets='1' showaddelement='no'>
<b:widget id='Header1' locked='true' title='Test blog (Header)' type='Header'/>
</b:section>
</div>


5.Now Copy below code and paste it after above code.

<div id='linkbar-wrapper'>
<b:section class='linkbar' id='linkbar' showaddelement='no'>
<b:widget id='LinkList1' locked='true' title='Linkbar' type='LinkList'>
<b:includable id='main'>

<b:if cond='data:title'><h2><data:title/></h2></b:if>
<div class='widget-content'>
<ul>
<b:loop values='data:links' var='link'>
<li><a expr:href='data:link.target'><data:link.name/></a></li>
</b:loop>
</ul>

</div>
</b:includable>
</b:widget>
</b:section>
</div>


Note:To open Linkbar in a new window or tab use below code instead of above code.

<div id='linkbar-wrapper'>
<b:section class='linkbar' id='linkbar' showaddelement='yes'>
<b:widget id='LinkList11' locked='true' title='Linkbar' type='LinkList'>
<b:includable id='main'>

<b:if cond='data:title'><h2><data:title/></h2></b:if>
<div class='widget-content'>
<ul>
<b:loop values='data:links' var='link'>
<li><a expr:href='data:link.target' target='_blank'><data:link.name/></a></li>
</b:loop>
</ul>

</div>
</b:includable>
</b:widget>
</b:section>
</div>


6.Now save your template and you are done.

Source
READ MORE - How To Add Horizontal LinkList in Blogger

How To Add Icon Image Before Blogger Post Title

1.Log in to your dashboard--> layout- -> Edit HTML

2.Click on "Expand Widget Templates"

3.Scroll down to where you see this:

<b:if cond='data:post.url'>
<a expr:href='data:post.url'><data:post.title/></a>
<b:else/>
<data:post.title/>
</b:if>


4.Now copy below code .

<img src="YOUR-IMAGE-URL" style="border-width: 0px;" />


Note :
Remember to replace YOUR-IMAGE-URL with your real image url.

5.Now paste it between <a expr:href='data:post.url'> and <data:post.title/> .

6.Now save your template and you are done.
READ MORE - How To Add Icon Image Before Blogger Post Title

Submit Blog to Directory

I have already Posting, Search Engine List and Ping Service List. Now I will tell you Submit Blog to Directory. This is one of SEO (Search Engine Optimization) for increase your blog traffic. Tips for you, submit 5~10 for a day. And this list will always update to adding more the list. So come back here later. Here the list:

http://www.freeweblinkdirectory.info
http://www.linkforfree.com.ar
http://www.starsdirectory.com.ar
http://www.mywebdirectory.com.ar
http://www.linkdirectory.com.ar
http://www.submitlink.com.ar
http://www.simpledirectory.com.ar
http://www.monsterdirectory.com.ar
http://www.vipdirectory.com.ar
http://www.fastdirectory.com.ar
http://www.alldirectory.com.ar
http://www.redlavadirectory.com.ar
http://www.gardendirectory.com.ar
http://www.seofriendly.com.ar
http://www.linkorama.com.ar
http://www.newfreedirectory.com.ar
http://www.sitiosmardelplata.com.ar
http://www.paginasenargentina.com.ar
http://www.argentodo.com.ar
http://www.mdpwebs.com.ar
http://www.websenargentina.com.ar
http://www.goldenlinks.com.ar
http://www.yourlinkhere.com.ar
http://www.000directory.com.ar
http://www.addnewlink.com.ar
http://www.addyourwebsite.com.ar
http://www.backlinkpower.com.ar
http://www.blpdirectory.info
http://www.linkshere.com.ar
http://www.linksheaven.com.ar
http://www.prdirectory.com.ar
http://www.freebacklink.com.ar
http://www.powerdirectory.com.ar
http://www.directorymaster.com.ar
http://www.monsterbacklink.com.ar
http://www.24directory.com.ar
http://www.thedirectory.com.ar
http://www.freecasinodirectory.info
http://www.zendirectory.com.ar
http://www.foreverlinks.info
http://www.seosubmissiondirectory.info
http://www.powerfulldirectory.info
http://www.welcomelinks.info
http://www.directorync.com.ar
http://www.beastdirectory.info
http://www.speedydirectory.info
http://www.addsitenow.info
http://www.subseo.info
http://www.sundirectory.info
http://www.linkdirectorysite.info
http://www.10directory.info
http://www.fastapprovals.info
http://www.thegeneraldirectory.info
http://www.forlinks.info
http://www.directorynow.info
http://www.directorysyndicate.info
http://www.websitelist.com.ar
http://www.submitsitenow.info
http://www.namedirectory.com.ar
http://www.directorylist.com.ar
http://www.noreciprocal.com.ar
http://www.morevisits.com.ar
http://www.power-backlink.com.ar
http://www.ncdirectory.com.ar
http://www.newconceptdir.com.ar
http://www.ukdirectory.com.ar
http://www.freewebdirectory.com.ar
http://www.seodirectory.com.ar
http://www.weblister.com.ar
http://www.megalinksdirectory.com.ar
http://www.linknow.com.ar
http://www.newconceptdirectory.com.ar
http://www.submityourlink.com.ar
http://www.reciprocaldirectory.com.ar

Hope this List can useful for you. But remember, this list will always update when I find more. Good Luck!

READ MORE - Submit Blog to Directory

How to Removing Post Image Border

For every new Blogger have border image in their post automatically set. I think that border make bad post image. So how�s that? Can we make the border disappear? Yes we can. Just change 1 code in your HTML code. For example you have image Post like this:


And when you removing post image border, the results to be like this:

Now I�ll tell you how to Removing Post Image Border. Please follow these steps:

1. Login to your Blogger Account

2. Go to Layout Tab

3. Click Edit Html

4. Download Full Template for back up data

5. Find code like this

.post img {

padding:4px;

border:1px solid $bordercolor;

}

Note: If you so hard to find, press Ctrl+F then type .post img

6. Change the border pixel number to be like this

.post img {

padding:4px;

border:0px solid $bordercolor;

}

7. Save Template


If this Blogger Trick is un useful for you, tell me. Good Luck Dude!

READ MORE - How to Removing Post Image Border

Ping Service List for Search Engine Optimization

Using Ping Service is one simple way of Search Engine Optimization. This is for tell them about your weblog or website has update. So your visitors number will increase.

But remember, you must just pinging one time on a day with some update in your blog. And if you doing ping more than 1 of a day or without blog update, maybe you doing Spam (you called Spammer) and they will blocking your ping next time. So be careful for this Blogger Trick.
Here I have Ping Service List for you.

READ MORE - Ping Service List for Search Engine Optimization

[Hack] How to Post Larger (HQ) Images in Blogger Posts

This post explains how to post extra large images in blogger posts:-

This is one of the most wanted blogger hacks, which makes it possible to post big size pictures in blogger posts.
Normally, If you upload a large image to blogger(with large thumb size selected), it will automatically resize it and then post it as thumbnail . But, the image quality of the resized image is very poor. So, to make the image look more clean and sharper, this trick will come handy.

Normally Uploaded Image: (with large thumbnail selected)


Normal Picture without the hack
Image after applying the hack:

Normal Picture without the hack

So, lets learn how to do this..

1.First, calculate how much image size(large) you want to display ( normally, its just a bit less than your main body width). Suppose, take this blog as an example, the main body width is about 570px. So, the maximum width to post a large image is 570px. But, to make the image looks nice, we have to give some padding to it.so,choose the width which is a bit less than the post body width.. like 560px.

Now, Go to Layout � Edit html

Find this

]]></b:skin>

Add this before that line:


img {
max-width: 560px;
width: expression(this.width > 560 ? 560: true);
}


Change the value in red depending on the previous step.

Note: Do check if you have the img{ tag already in your template. If its there, just add the additional couple of lines to it.


max-width: 560px;
width: expression(this.width > 560 ? 560: true);


Save the changes.

2. Now, while doing your posts, upload the images normally like you did previously. Once the image is uploaded, go to Edit html tab, and the image code will look something like this


<a onblur="try {parent.deselectBloggerImageGracefully();} catch(e) {}" href="https://blogger.googleusercontent.com/img/b/R29vZ2xl/AVvXsEi3zlXFvkrkiVoH426pETtNvvHBjeiJBg_yyG11dI1-FC2Ef749aNKIZxRB3zsrvPVeOY70_qhTr2xtMUrAF5zW65XnVF2Ph77Qe9mdls-YAU-MQ0H0MOsTcFRN6tXVVWGv0wf-dEz2gsgn/s1600-h/megan+fox.jpg"><img style="margin: 0px auto 10px; display: block; text-align: center; cursor: pointer; width: 280px; height: 400px;" src="https://blogger.googleusercontent.com/img/b/R29vZ2xl/AVvXsEi3zlXFvkrkiVoH426pETtNvvHBjeiJBg_yyG11dI1-FC2Ef749aNKIZxRB3zsrvPVeOY70_qhTr2xtMUrAF5zW65XnVF2Ph77Qe9mdls-YAU-MQ0H0MOsTcFRN6tXVVWGv0wf-dEz2gsgn/s400/megan+fox.jpg" alt="Normal Picture without the hack" id="BLOGGER_PHOTO_ID_5350218059319919970" border="0" /></a>


All you have to do is Just remove that bolded text (width and height attributes) and replace s400 to s800.

So, the final code looks like this


<a onblur="try {parent.deselectBloggerImageGracefully();} catch(e) {}" href="https://blogger.googleusercontent.com/img/b/R29vZ2xl/AVvXsEi3zlXFvkrkiVoH426pETtNvvHBjeiJBg_yyG11dI1-FC2Ef749aNKIZxRB3zsrvPVeOY70_qhTr2xtMUrAF5zW65XnVF2Ph77Qe9mdls-YAU-MQ0H0MOsTcFRN6tXVVWGv0wf-dEz2gsgn/s1600-h/megan+fox.jpg"><img style="margin: 0px auto 10px; display: block; text-align: center; cursor: pointer;" src="https://blogger.googleusercontent.com/img/b/R29vZ2xl/AVvXsEi3zlXFvkrkiVoH426pETtNvvHBjeiJBg_yyG11dI1-FC2Ef749aNKIZxRB3zsrvPVeOY70_qhTr2xtMUrAF5zW65XnVF2Ph77Qe9mdls-YAU-MQ0H0MOsTcFRN6tXVVWGv0wf-dEz2gsgn/s800/megan+fox.jpg" alt="Normal Picture without the hack" id="BLOGGER_PHOTO_ID_5350218059319919970" border="0" /></a>


Done! Now, your uploaded image will look big in the post.

READ MORE - [Hack] How to Post Larger (HQ) Images in Blogger Posts

How to Hide/Remove Label Count in Blogger Blogs

Some people prefer not to display the label count in their blogs as it looks a bit unprofessional. Lets say if you have a label 'Funny sms' with 50 label count and another one ' Good morning sms' with 2 as label count... less people will show interest on clicking the second one.
hiding blogger label count
So, lets see how to hide or remove the Label count in your blogger blog(s)...

1. Sign into Blogger dashboard � Layout � Edit html

Tick the expand widget templates and remove this line from the template..


<span dir='ltr'>(<data:label.count/>)</span>


removing blogger label count
2. Save the Changes and done!
READ MORE - How to Hide/Remove Label Count in Blogger Blogs

How to make Rainbow Links

Did you hear Rainbow Links? or do you ever see it? Rainbow Links is a text that all links in the blog someone who is color change such as the rainbow. You can see an example of fact here. You only need to refer you mouse, to a text link. See its colors. Very beautiful eh? Do you want your blog links have color like rainbow? Now I will give way to Make a Rainbow Links for you. Please follow some of the following steps:


1. Login with your Blogger Account

2. Go to Layout Tab

3. Choose Edit HTML

4. Find this code <body> (Press Ctrl+F then type the code)

5. Copy this code:

<script src='http://www.hotlinkfiles.com/files/2626671_vufeb/Rainbow-Links.txt'
type='text/javascript'>
</script>

6. Paste Under <body>

How to make Rainbow Links

7. Click Preview

8. If Done, Click Save Template


Congratulation! You have Rainbow Links on your beautiful blog...
See you in the next post...
READ MORE - How to make Rainbow Links

Most Useful Mozilla Firefox Keyboard Shortcuts

These are the Most Popular Keyboard Shortcuts for Firefox :


Ctrl+N - It use for Open New Browser Window.

Ctrl+T - It use for Open New Tab on Existing window.

Ctrl+W or Ctrl+F4 - It use for Close the current window or Tab.

Ctrl+R or F5 - For refresh The Page

Ctrl+F5 orCtrl+Shift+R - Refresh the page with override cache

Esc - Stop

Ctrl + O - It use for Open File

Alt+Home - Home

F1 - Firefox Help

F11 - Toggle Full Screen of Browser Window.

Ctrl+Tab - For Changing Tab between Existing window.

Ctrl+U - Open View Source Page of any webpage.

Ctrl+I or Ctrl+B - Open Bookmark window in left sidebar

Ctrl+P - For Print Command

Ctrl+A - Select All

Ctrl+S - Save Page As

Ctrl+D - Bookmark This Page

Ctrl+F - Find

Ctrl+G or F3 - Find Again

Ctrl+H - open History Window In left Sidebar.

Ctrl+J - Open Downloads Window

Ctrl+Z - Undo Your Process

Ctrl + Y or Ctrl + Shift + Z - Redo your Process

Ctrl+C - Copy

Ctrl+V - Paste

Ctrl + Shift + Delete - Clear your Private Data

F7 - To Open Browser in Caret mode

Backspace or Alt+Left Arrow - Back

Shift+Backspace or Alt+Right Arrow - Forward

Alt + Enter - Copy your existing window tab and Open It in New Tab

Ctrl + Tab or Ctrl + Shift + Tab � rotate forward to the next window tab

Down Arrow � Scroll down

Ctrl+ "+" or Ctrl+ Scroll up - Increase Text Size (Zoom In)

Ctrl+ "-" or Ctrl+ Scroll Down - Decrease text Size (Zoom Out)

Ctrl+ 0 (Zero) - Normal Text Size (Default Zoom Mode)

Alt+ Scroll Down - One step page go down

Alt+ Scroll Up - One step page go Up

Ctrl+Shift+I - DOM Inspector

Ctrl + L or ALT + D - Select Location Bar

Ctrl + Enter - To complete URL with .com

Ctrl + Shift + Enter - To complete URL with .org

Shift + Enter - To complete URL with .net

Ctrl + Up Arrow - Choose previous Search engines to search information

Ctrl + Down Arrow - Choose Next Search engines to search information

Alt + Up Arrow or Alt + Down Arrow - Open List of available Search Engine
READ MORE - Most Useful Mozilla Firefox Keyboard Shortcuts

How To Add You Tube embed code tool to blogger

This tools is very important to every blogger.When you put the video address and click Ok, embed code will appears in text box.

1.Log in to your dashboard--> layout- -> Page elements

2.Click on "Add a Gadget"

3.Select 'HTML/Javascript' and add the code given below and click save.


<script>function go(){var x=document.theform.url.value;var YT=(function(){return {getId:function(u){var a=u.match(/(\/vi\/|v=)([^&]+)/);return (a&&a[a.length-1]);}};})();document.theform.thelink.value=('<object width="'+document.theform.width.value+'" height="'+document.theform.height.value+'"><param value="http://www.youtube.com/v/'+YT.getId(document.theform.url.value)+'&searchbar=0&iv_load_policy=3&ap=%2526fmt%3D18" name="movie"></param><param value="true" name="allowFullScreen"></param><param value="always" name="allowscriptaccess"></param><embed allowscriptaccess="always" width="'+document.theform.width.value+'" src="http://www.youtube.com/v/'+YT.getId(document.theform.url.value)+'&searchbar=0&iv_load_policy=3&ap=%2526fmt%3D18" allowfullscreen="true" height="'+document.theform.height.value+'" type="application/x-shockwave-flash"></embed></object>');}</script><form action="#" name="theform" onsubmit="return go();"><input onfocus="this.value='';this.style.color='#72a8d2'" style="font-size:110%;color:#aaa" value="" name="url" size="50" type="text"/> <input style="font-size:110%;" value="Ok" onclick="javascript:go();document.theform.thelink.select()" type="button"/><br/>Width: <input onfocus="this.value='';this.style.color='#db0000'" style="color:#444;" value="660" name="width" size="3" type="text"/> &nbsp; Height: <input onfocus="this.value='';this.style.color='#db0000'" style="color:#444;" value="544" name="height" size="3" type="text"/><br/><div class="code-block-corner"></div><br/><div class="code-block"><div class="code"><br/><div style="background:#f3f6f7;padding:5px;"><textarea style="width:80%;height:100px;overflow:hidden" name="thelink"></textarea><br/><div style="text-align:center;color:#000;font-style:italic;font-size:130%;"></div></div></div></div></form>


Now you are done.Look at the picture below.


I found this tip from this site.
READ MORE - How To Add You Tube embed code tool to blogger

How To Remove Underline below Text Links

1.Log in to your blogger dashboard--> layout- -> Edit HTML

2.Scroll down to where you see like this code:

a:link {
color:$linkcolor;
text-decoration:none;
}
a:visited {
color:$visitedlinkcolor;
text-decoration:none;
}
a:hover {
color:$titlecolor;
text-decoration:underline;


3.Now replace above code with below code.

a:link {
color:$linkcolor;
text-decoration:none;
}
a:visited {
color:$visitedlinkcolor;
text-decoration:none;
}
a:hover {
color:$titlecolor;
text-decoration:none;


4.Now save your template and you are done.
READ MORE - How To Remove Underline below Text Links

Adding Picture to Post Title

Blog Post will looking good with adding some picture or image. How about Post Title? Can we adding image or picture too? Of course we can. Like this blog, you can see picture in the left of post title. You can put any picture you want, like your face photos maybe. This Blogger Trick can only put same picture on every post title. So, choose the best picture you want like animation gif image. About the size, don�t too bigger more than post title font size. Because can make your post title invisible. Ok, if you want Adding Picture to Your Post Title, please follow these steps:


1. Prepare your picture (you can put animation too)

Example:


2. Save the picture by upload your picture to your hosting (like photobucket). Then take the URL Picture.

Example: <img src="http://i717.photobucket.com/albums/ww176/neorie/Blogger%20Trick%20For%20You/BT4UBannerChicklet.gif"></img>


3. Set the image size and border with adding code width=��� , height=��� , border=���

Example: <img src="http://i717.photobucket.com/albums/ww176/neorie/Blogger%20Trick%20For%20You/BT4UBannerChicklet.gif" width="94" height="26" border="0"></img>


4. Log in with your Blogger Account


5. Go to Layout Tab


6. Click Edit HTML


7. Download Full Template for Back Up Data


8. Check Expand Widget Template radio button


9. Find this code:

<a expr:href='data:post.url'><data:post.title/></a>
<b:else/>


10. Put the picture code between <a expr:href='data:post.url'> and <data:post.title/></a>


Example to be like this:

<a expr:href='data:post.url'> <img src="http://i717.photobucket.com/albums/ww176/neorie/Blogger%20Trick%20For%20You/BT4UBannerChicklet.gif" width="94" height="26" border="0"></img> <data:post.title/></a>


11. Click Review to see the result. Done? Save Template


Good Luck! See you in the next post�

READ MORE - Adding Picture to Post Title

Making Blogger Contents List

If you reading book, maybe you have to see Contents List. Every book have Contents List. The function is for easy to find some content on the book. Also Blogger, need Contents List Featured for visitors easy to find some content or some article on the blog. Making Contents List is one of many Blogger Tricks.  Do you want Blogger Contents List Featured install to your Blog? Please follow these steps:

1. Login to Blogger with your Account


2. Go to Layout Tab


3. Click Edit HTML (Important: Download Full Template first for Back Up)


4. Check Expand Widget Template Radio


Expand-Widget-Templates


5. Find this code (You can use Ctrl+F, fill the code, and Click Next or Find)

 <b:include data='post' name='post'/>


6. Delete or replace that code with this code:

<b:if cond='data:blog.homepageUrl != data:blog.url'> <b:if cond='data:blog.pageType != "item"'> <a expr:href='data:post.url'> <div style="padding:6px 0 6px 5px;border-right:1px solid #ccc;border-bottom:1px solid #ccc;margin-bottom:2px;background:#EAE9E9;color:#406A0E;"> <data:post.title/></div></a> <b:else/> <b:include data='post' name='post'/> </b:if> <b:else/> <b:include data='post' name='post'/> </b:if>


7. Save Template


8. Go to Page Elements


9. Click Add a Gadget


10. Choose Add a HTML/JavaScript


11. Fill the form with this code:

<a href="http://YOURBLOGNAME.blogspot.com/search?max-results=200">Contents List</a>


12. Click SAVE


You can set that code to your style about border style, border size, border color, background color, font color, etc...

Congratulation! You have done and Good Luck!

READ MORE - Making Blogger Contents List

How To Compress CSS for Better Page Loading time

1.Log in to your blogger dashboard and go to--> layout- -> Edit HTML

2.Now Cut CSS Code of your template.

NOTE : CSS Code is the code between the <b:skin> and </b:skin> tags.

3.Now go to cssdrive.com

4.Paste your CSS Code into the box.


5.Select ,
(a).Compression mode:- Normal

(b).Comments handling:- Select Don't strip any comments.


6.Now click on "Compress-it!".

7.After compressing your css code you can see like this message.


8.Now copy your Compressed CSS Code and paste it between <b:skin> and </b:skin> tags.

9.Now save your template and you are done.
READ MORE - How To Compress CSS for Better Page Loading time

How To Change Height and Width of blogger Comment Box

1.Log in to your dashboard--> layout- -> Edit HTML

2.Click on "Expand Widget Templates"

3.Scroll down to where you see this:

<iframe allowtransparency='true' class='blogger-iframe-colorize' frameborder='0' height='275' id='comment-editor' scrolling='no' src='' width='100%'/>


4.Now change width='100%' and height='275' as your choice.

5.Now save your template and you are done.
READ MORE - How To Change Height and Width of blogger Comment Box

Blogger Trick: Using Keyboard Shortcuts While Posting

Blogger already have shortcut featured just by click. Don�t need to adding some code to make a font bold or something else. Now more simple way for you. Blogger has several keyboard shortcuts you can use while editing posts. And posting will more faster than before. The keyboard shortcuts definitely work in Internet Explorer 5.5+/Windows and the Mozilla Family (1.6+ and Firefox 0.9+) and might work in other browser. Ready to Using Keyboard Shortcuts While Posting? Here they are:


      Ctrl + b    Bold
      Ctrl + i    Italic
      Ctrl + l    Blockqoute (in edit HTML mode only)
      Ctrl + z    Undo
      Ctrl + y    Redo
      Ctrl + Shift + a    Link
      Ctrl + Shift + p    Preview
      Ctrl + d    Save as Draft
      Ctrl + p    Publish Post
      Ctrl + s    Autosave and keep editing
      Ctrl + g    Indic transliteration


Hope this info can useful for you. Good Luck.
READ MORE - Blogger Trick: Using Keyboard Shortcuts While Posting
 

Support By Blogger